Attention all registered users. The new forum upgrade requires you to reset your password as you logon for the first time.
To reset your password choose this option that is displayed when you attempted to login with your username: "Forgotten your password? Click here!"
You will be sent an e-mail to the address that is associated with your forum account. Follow the simple directions to reset your password.
If this is your first visit, be sure to
check out the FAQ by clicking the
link above. You may have to register
before you can post: click the register link above to proceed. To start viewing messages,
select the forum that you want to visit from the selection below.
Once again I am humbled, Tom. Amazing work, I'd say. I WILL eventually be contacting you for detailed Skype (or perhaps even in-person) tutorials when it's my turn!
Great progress, Tom! I like your use of the template for the bow floods. Will do that if I ever build another Gato.
Question regarding your rudder skeg install: how are you dealing with the lower prop shaft struts? I don't see them in the images. Will be curious to see how your setup works during trials. Really fun to see new approaches to the same problems.
Tom,
I was not smart enough to know I should not have built the Gato as a first sub, glad too! Keep on plugging away, ignorance is bliss. Love what you are doing!
Peace,
Tom
Thanks "Salmon" Tom, I've got ignorance in spades but having fun.
jefftytoo
Once again I am humbled, Tom. Amazing work, I'd say. I WILL eventually be contacting you for detailed Skype (or perhaps even in-person) tutorials when it's my turn!
Anytime Jeffty, we can get Harder off the ways in no time.
Paul C
Question regarding your rudder skeg install: how are you dealing with the lower prop shaft struts?
Just like Mr Salmon did here with the addition of some brass pins for more strength...
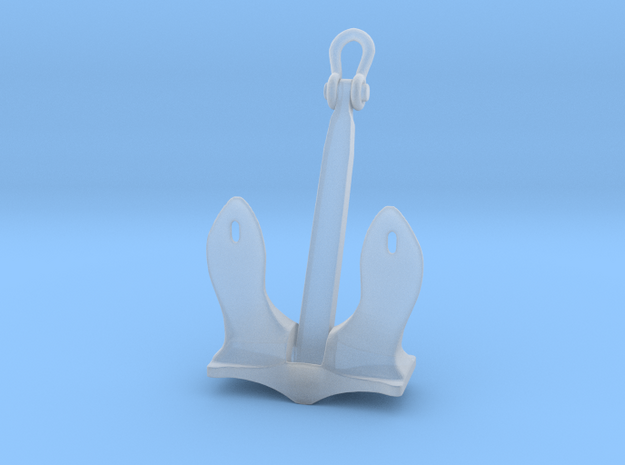
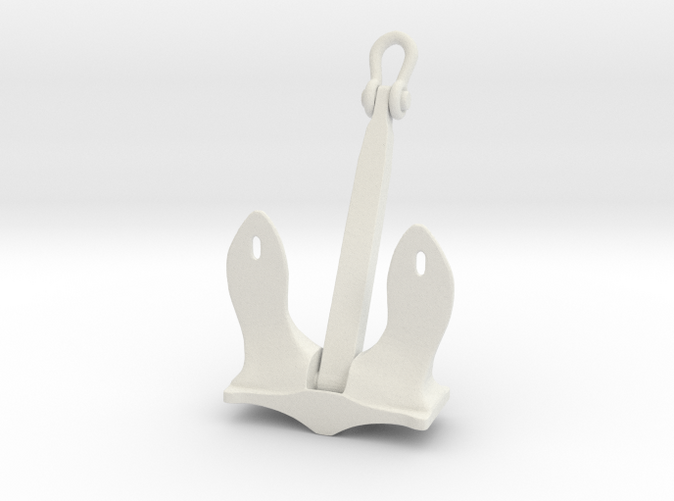
Does anyone have the dimensions of the anchor used in Gato-class boats? Specifically the max width? It thought I had a plan sheet somewhere and can't find it.
I believe there is a drawing with dimensions for 1/48 scale in the Floating Dry Dock book. It may have the actual 1:1 dimensions. I know it's in there, just don't 'xactly remember the numbers.
With the aid of Bill's pointer, I pulled out my copy of the Floating Drydock Flatboat book of plans.
There is a nice drawing of the anchor in there, but it isn't a dimensioned drawing. (!) However, if it helps, the cast anchor housing is noted as being 6 feet 4-3/4 inches in overall height. That would be from weld line to weld line. That may allow you to figure out the size of the anchor?
Thanks, guys. I couldn't access my FD plan book. It's packed up. I've been working with Sasa Drobac of DiStefan 3D Ship Models on Shapeways and he's come up with a cool replacement for the kit part. We were finalizing the anchor size -- hence the call for the reference. You can see, and order, the part here: http://www.shapeways.com/product/HJT...ionId=60641937. I've got one coming and will update with images on the model.
Last edited by PaulC; 09-05-2016, 10:27 PM.
Reason: link
Received the DiStefan anchor today -- it looks beautiful. Sooooo much better than the kit part. However, have not been able to get in the shop to hold it up to the kit bow for a pic. Will do as soon as able.
I was wondering if there were a corresponding template that might work for a 1/48th scale fleet boat? This Lions Roar piece made your model look exceptionally good. I looked up the Lion's Roar templates but I am not sure what size they need to be at the 1/48th scale compared to the 1/72nd...
The promised pics. I am very pleased. A shot of the part in my boat's anchor well (repositioned kit well part). Two shots of the part on my desk. The second gives a perspective on the shape of the anchor which is hard to see without it being primed.
It’s been quite a while since there’s been significant activity on this thread, and far longer since I’ve posted anything myself. I’m way overdue—but not Presumed Lost, I hope.
I have only recently been re-inspired to finally get back into my Gato build (Life, the SCR, and other projects have been in the way—you know the drill), and I am now once again eager to get to it. I have begun by re-reading every word of the previous 51 pages (!) of this thread (talk about inspiring!) as well as starting to go through the Merriman Gato build videos for an overall approach plan. Fear not, I’m still not going to do the equator hull split like he endorses, but continue to want the seamless removable-superstructure-only access Crazy Ivan and others have successfully achieved.
At this point I continue to amass 3rd party aftermarket parts, do research and make plans. As I at last start to get back to some building in the coming weeks, I shall of course post any progress and related photos here. For now, know that I’m planning to follow the trail others have blazed (for me, mostly pals Paul and Tom) in that I’ll attempt the same “chin” holes, dive plane welds, etc., that they have so wonderfully done. I don’t need to do rear torpedo tube shutters, thankfully, because Harder didn’t have them.
For a while, based on this artwork (identified as Harder in a Post Office stamp book publication some years back), I thought I needed to straighten out the kit’s canted anchor well as Tom and Paul have done with their boats.
But then this actual shot of Harder, and the following closeup made from it, shows the familiar Gato canted well like the kit’s, so now I’m okay to leave that alone too. (Though it does appear strangely rounded on its sides in th shot below; I might have to tinker with that a bit.)
Now here’s something I’ve been pondering for a while. My original plan was to (eventually) paint the boat in the Measure 9 all-black scheme. This decision was borne out by the shot below and others of her taken during her overhaul in February of ’44. (Frankly, I liked the idea of her standing out a bit from all the other boats done in the light or dark Measure 32 camo paint job.) I thought that these yard shots proved she went out on her Fourth in March/April (the famous near-beaching-to-pick-up-a-downed-flier run) and Fifth (unheard of five-destroyer run) patrols in all-black.
But then I studied this shot of her off Woleai during her post-overhaul Fourth and she is clearly in camo duds—agreed?
Also, the written material accompanying the yard photo said that forward periscope shear reinforcement was added during this overhaul. But I’ve always read this stuff was being taken off the shears by this time (midwar and beyond) for less of a horizon silhouette—and clearly the forward shears are spindlier in the Woleai shot as well. Guess I’m just looking for confirmation from you guys here: camo paint and non-plated-over/non-faired shears for Harder in ’44—post-overhaul—right?
P.S. Why oh WHY do I continue to have photo-posting issues on our forum?! Oh well, I see that if you click on the blue "attachments" you can still view them indirectly....


Comment