Need lots of help

Collapse
X
 
  • Time
  • Show
Clear All
new posts
  • Ralph --- SSBN 598
    Junior Member
    • Oct 2012
    • 1417

    #46
    Not sure what you're asking about the two bulkheads and O-rings.
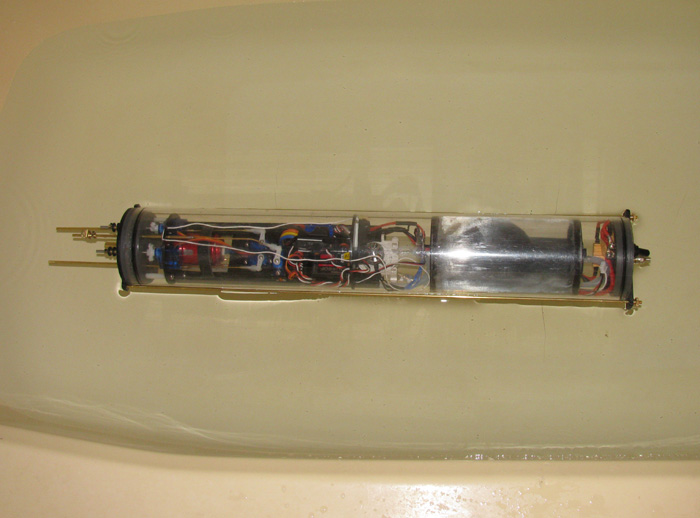
    Okay, I went back and looked at your photos.
    The bulkheads have O-rings to keep water in that section of the cylinder should the ballast bag leak.
    You have an electric through tube and a threaded rod which keeps the bulkheads at a fixed distance from each other.
    My tank can be moved forward and backwards to help set trim.
    The battery also can be moved and actually sits directly under the ballast containment tank.
    Your bulkheads may/should have small vent holes near the top of the bulkhead to let air move through out the cylinder but yet keeps any water in the section.
    If your ballast bag leaks and enough water gets up to the vent holes, you have far more serious problems to deal with.
    One being a cold swim.
    ---------------------------------
    My switch is an off/on switch to disconnect the battery power..
    It only has two terminals.
    Last edited by Ralph --- SSBN 598; 04-03-2016, 11:34 AM.

    Comment

    • Nb1914
      Junior Member
      • Mar 2016
      • 53

      #47
      ah i see if you take a look at the bulkhead picture in page 4 you can see the 3 holes in the end cap of the centre section one large one in the centre and 2 smaller ones slightly above the centre line. maybe I'm thinking too much but why the large hole in the centre ? mine only has the centre section bulkhead holes in one bulkhead but pressure can move to the far-end bulkhead by virtue of the large brass pipe caring the power cables to the ballast pump. can you show me how the end cap cross braces attach to the hull, thanks andy

      Comment

      • Guest

        #48
        I'll hazard a guess the endcaps were machined using a threaded mandrel, and centre hole is probably left over from that operation. Do the other caps have central holes in them?

        One way of keeping endcaps in place with a pressurized module, is to make saddles that overlap the endcaps. Ron Perrott does this with his modules, and it's very elegant as it saves having to mess about with drawbars etc.

        Comment

        • Nb1914
          Junior Member
          • Mar 2016
          • 53

          #49
          i think i have it, i pulled things part a bit, the 2 centre bulkheads look to be a common item both actually have a larger hole in the centre so the ballast section has a vent hole to both the front and rear compartments, now the other 2 holes i believe are for mounting devices by using metal rods i.e. on the front section they are used to bolt 2 carries which the ballast pump is secured to. So if i wanted i could use the ones on the other bulkhead to also secure devices.

          Comment

          • Ralph --- SSBN 598
            Junior Member
            • Oct 2012
            • 1417

            #50
            I think sub culture has it right.
            The center hole is there to mount the material with a threaded rod which I do using a nut on both sides to clamp it tight so I can turn the disks in my drill press.

            The holes to either side of the center hole I am not sure but your thinking that they are mounting holes for other things sounds like it would work.
            Vent holes should be as high in the disk as possible to allow holding as much water as possible should there be a leak.

            Such simple things as a small hole in a bulkhead can have such big effects on the operation of a submarine.
            In an airplane it's to lighten the over all weight.
            In a boat it is also to lighten the boat and make access.
            In a submarine, it can do all those things but it can also put your sub on the bottom.
            Thinking through what you do all the way to the end result will help you keep you boat returning to the surface.
            That's why we try to test our boats in the bath tub or a tank where we can see what is happening.

            I actually test my cylinders without the hull to make sure everything works as it is suppose to and there are no leaks.
            Trimming comes later in the process.
            Here is a test run of a Skipjack cylinder.

            Comment

            • Ralph --- SSBN 598
              Junior Member
              • Oct 2012
              • 1417

              #51
              Something else about the small vent holes.

              I put them at each end of the tank/section.
              If the ballast bag should cover one of the holes the other will still let the air move.
              During a test of a tank, I had only put one hole in the tank as a vent.
              The ballast bag did cover it and the pressure build up as the water made the bag bigger, tried to push the bag through the little hole.
              Did not take long for the bag to fail and release the water in to the tank.
              The ballast bag does not fill in to the square corners of the tank, section.
              Putting the holes as close to the end cap and cylinder intersection get the best protection from the bag covering the vent holes.

              The ballast bag will also expand as a ball and touch the walls of the cylinder in the middle and actually seals one end from the other.
              With a vent hole at only one end, the other end will build up pressure.

              Comment

              • Nb1914
                Junior Member
                • Mar 2016
                • 53

                #52
                i will need to bear that in mind if i dot use the 2 smaller holes on the other bulkhead, pressure can pass from the front to rear rear to front courtesy of the cable tube running through the centre section. there isn't much room for the ballet bag to expand but maybe it does need much filling. do you use any grease on the 2 very end caps around the o rings before a session.

                Comment

                • Ralph --- SSBN 598
                  Junior Member
                  • Oct 2012
                  • 1417

                  #53
                  Yes.
                  Just enough to cover the O-ring.
                  I put grease on my thumb and first finger and pull the o_ring through until it is coated.
                  It makes it so much easier to slip the end caps in and out without have the o-ring roll out out the groove and get pinch.
                  Usually cutting the o-ring.
                  --------
                  The wire tube will past air from the front to the back compartment but the air in the ballast section can be if there is no vent on one side.
                  During testing on the bench you can see this happen while filling the ballast bag.
                  The bag will expand evenly for a little while then the end without the vent will stop and the bag will fill only on the other end.
                  It is a nice experiment to see how it all works.
                  Trial and Error on the bench is a good learning tool.
                  At the pond, not so much as extremely frustrating.

                  Water volume needed.
                  For the 1/72 Skipjack, was worked out to be a little more than 400ml or 13.5 oz. (1.6 cups)
                  This is from full waterline to submerged at just negative.

                  Comment

                  • Nb1914
                    Junior Member
                    • Mar 2016
                    • 53

                    #54
                    thats great, I'm happy i now have the correct understanding to get on with the build, there will lots of bench and bath testing before i go anywhere near a lake. i will look at securing the end caps i had a thought about using a thin ratchet strap but i will probably use threaded bars front to back. how do you guys secure the top hull to bottom hull, the wtc sits in 2 thick perspex half moons that i will epoxy to the lower hull, the previous owner drilled a lot of holes in the bottom i assume i need to make some holes in the top.

                    Comment

                    • Nb1914
                      Junior Member
                      • Mar 2016
                      • 53

                      #55
                      in that case i guess i should seal up the large hole in the centre and the 2 small holes and then drill small holes at the top of each centre bulkhead. or could get away with small holes in just 1 centre bulkhead as air can propagate end to end through the cable conduit.

                      Comment

                      • Ralph --- SSBN 598
                        Junior Member
                        • Oct 2012
                        • 1417

                        #56
                        I made my rods using 5/32" long brass tubing.
                        3' before I cut it to fit.
                        I ground the threads of a brass bolt to make one end and I used just the threads of a brass bolt for the other end.
                        I soldiered the pieces in the tubing once I got the length right.
                        I use thumb nuts on the long rods.
                        No tools required.
                        They do not get tightened down. Just finger tight to keep cap from popping out.
                        ----------
                        Your submarine will need holes in the hull bottom.
                        Most submarines have flood holes and that is where we drill and file the bottom holes.
                        The Skipjack has scribe lines where the flood holes are.
                        I drill a hole in the center.
                        I rough cut the square holes with the drill or files.
                        I make wooden blocks the size of the finish hole and used those to check my progress as I make the hole to finish size.

                        ---------------------------------
                        Hole in the hull top.
                        I drill out the top side vent holes to size.
                        These are usually not enough to get the air out fast enough.
                        More holes are drilled the under the sail and any deck structure the boat might have.
                        The holes are hidden.
                        The sail has plenty of hole in the top where mast would be.
                        ------------------------
                        The frames inside the hull not only are saddles for the cylinder but help keep the hulls shape.
                        But we want water and air to pass the frames so we remove material to let this happen.
                        Here is the rear frame that the cylinder sits in.
                        It shows the opening between the hull and the frame.


                        Full length view of frames with their notches.


                        I am not sure if I had provided a link to my Skipjack build.
                        This is where I am getting the photos I amusing here.
                        ]Skipjack Build Log[/u]

                        Comment

                        • Nb1914
                          Junior Member
                          • Mar 2016
                          • 53

                          #57
                          i tried your link but got a 404 site not found, I'm not sure where the holes would be on the jmsdf.

                          Comment

                          • Ralph --- SSBN 598
                            Junior Member
                            • Oct 2012
                            • 1417

                            #58
                            the link code was not accepted.
                            I will try again.

                            Skipjack Build Log

                            Comment

                            • Ralph --- SSBN 598
                              Junior Member
                              • Oct 2012
                              • 1417

                              #59
                              I went looking for photos or drawing that might give a hint to wear where the ballast tank flood ports might be.
                              Not having much luck.


                              There are photos from above of the real boat in operations.
                              I would locate the top side vent valves and then maybe put a pair of flood holes on the bottom underneath the vent valves.


                              The way I look at it, If I can't find images showing the location, the chances are other can not find them either.

                              Drawing showing topside vents.

                              -------------------
                              I am working on a B-boat.
                              IT has not flood holes in the bottom of the boat.
                              In fact it has four 2.5" pipe openings with gate valves inside the boat to make the boat negative.
                              So my solution is to drill 3/8" holes down the center of the keel. Unless the boat is turned on it's side it upside down, they will not be seen.

                              Comment

                              • Nb1914
                                Junior Member
                                • Mar 2016
                                • 53

                                #60
                                Thanks Ralph , the previous guy has drilled small holes in 2 rows either side of the bottom centre line . I was thinking about cutting out a large opening under the conning tower then opening up the holes in the top of the conning tower . not sure that would be enough or not. Nice skipjack build I will study better tomorrow.

                                Comment

                                Working...
                                X