Attention all registered users. The new forum upgrade requires you to reset your password as you logon for the first time.
To reset your password choose this option that is displayed when you attempted to login with your username: "Forgotten your password? Click here!"
You will be sent an e-mail to the address that is associated with your forum account. Follow the simple directions to reset your password.
If this is your first visit, be sure to
check out the FAQ by clicking the
link above. You may have to register
before you can post: click the register link above to proceed. To start viewing messages,
select the forum that you want to visit from the selection below.
And the Forum is back—yay! Just a quickie here to start back in the swing of things. Have been continuing to work on my Harder. You’ll see in the photos below I’ve started removing material from the main deck to reduce topside weight while leaving a framework upon which to position an all-new “all-teak” full replacement PE deck.
Harder didn’t have this large marker buoy well you see in the top photo below. I believe this was a late- or post-war mod. (Cod definitely has one.) Anyway, my replacement PE deck shows a small round marker buoy in roughly this position, which does not extend beyond the edge of the deck, so this deck extension had to go. Some filing and a lot of careful sanding and—voilá—it’s gone. Actually looks even better in person than with the shadow evident in this photo!
Till next time,
Jeff
P.S. Dunno why it attaches a separate thumbnail image below like this...
Getting these regularly spaced, equally thick and basically straight is simply impossible (and I had to come to accept that). It’s so difficult to Dremel-cut them out of styrene in the first place, and no amount of filing and sanding will ever get them closer than “good enough.” So good-enough they are—the best I could manage. My hope is that the interior of the boat will be dark enough that their irregularities will not show up through the thin slits of the PE deck on top of them even in bright sunlight. Or at least not much. But we’ll see.
Even though thin, they should be plenty strong enough to support the new deck however. Note that some areas are left solid (or at least wider) where there were various kit slot and hole locations designed to accommodate deck doodads requiring styrene support beneath them—such as the capstan, cleats, stanchions and such. I also made an effort to keep plenty of wide styrene struts around the conning tower for sufficient support, since it will be held on by magnets and a tight friction fit, so the deck must be able to survive having the CT frequently removed and pressed firmly back into place.
The cuttings, shown collected in a paper cup, amounted to nearly two ounces of material weight removed above the boat’s waterline. Not as much as I’d hoped to make up for all the PE stuff I’ll be adding, but significant nonetheless.
Would you have a way to weigh how much you cut out? Then how much your PE deck weighs?
Every gram you save topside will help in surfacing performance.
Keep those updates coming!
If you can cut, drill, saw, hit things and swear a lot, you're well on the way to building a working model sub.
Yes, Tom, I weighed the material removed and it came to almost two ounces. I could weigh the PE I’ll be installing to compare, but I’m pretty sure it’ll come to more than that, so I sorta don’t wanna know. I’ve tried to remove as much as I can, knowing every bit will help.
Good work Jeffty,
Save all those cuttings. The kit plastic is very hard compared to Evergreen and thick! Very useful. Trigger is back on the bench. I discovered some fit problems between the deck and hull I plan to rectify with magnets. Nothing photo worthy so far.
Keep up the good inspiration.
TomK
Scott, no drawings. My chosen frames don't represent or relate to the boat's actual hull frames, to my knowledge. I simply laid out the "teak" PE deck sections in position atop the main deck and noted with fine marker along the edges of the kit's deck pieces where the teak slats "connected" or were "supported" within the PE pieces themselves by their own internal "deck frames." Therefore, the presumed frames within the PE pieces would be matched by the frames I created in the styrene beneath them. I couldn't be super-accurate or disciplined about it though (not very "scale," in other words), because as I explained earlier some sections had to be left very wide to support other plastic parts on the deck in addition to the thin PE sections. (Like the whole conning tower, for instance.) Does any of this make any sense? My goal was twofold: to remove weight and to give the PE deck sections something to adhere to. Trying to be very scale about my randomly assigned frames didn't much enter into it. My hope is that they really won't show up under the PE decking at all.
Jeff, on the topic of braces, you might be able to round out the bottom half to lose more weight. I think it is great you got 2 ounces off already!
How will air escape the areas between the cross braces?
If you can cut, drill, saw, hit things and swear a lot, you're well on the way to building a working model sub.
Tom, not sure what you mean for me to attempt to "round out." Explain? Or a pic?
There are some openings in the deck, and a few small spaces between slats and details that are part of the PE pieces. Whether or not this will offer enough space for air to escape during a dive remains to be seen and is perhaps doubtful; I may eventually have to add some non-scale holes to the deck, but I'm not going to do so till shown as required by trim testing. My hope is that enough air will ultimately escape up through the conning tower opening in the deck and out through the doorways to the Main Induction I opened up on the fairwater. Good question though. We'll see.
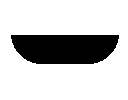
Jeff, looking at a cross section of your remaining frames.
The top is flat to hold the brass,
The sides are cut straight as well.
The bottom is also flat.
If you round off the bottom of the support frame making it look like a half round piece.
This will leave the stength but remove a little more material and help air move easier over the frames to escape.

Comment