1/144 Scale USS Batfish (SS310)

Collapse
X
 
  • Time
  • Show
Clear All
new posts
  • scott t
    Member
    • Feb 2003
    • 880

    #91
    Re: 1/144 Scale USS Batfish (SS310)

    Hey let me confuse things a little more.
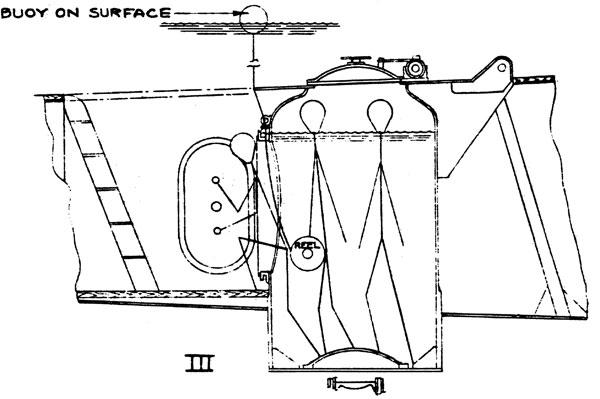
    I believe the two things you see throught the door opening on the fairwater are the conning tower with the scopes and hatches to the outside deck
    and the lower main deck, The other cylinder with the door on its side is a escape trunk. Attached is a diagram of the escape trunk for one of the
    bow hatch. The fairwater hatch has a hatch on top which ammo/other can be passed through. It has a hatch on the side for escape and a hatch on
    the bottom to enter from the main deck. If escape is necessary you enter the trunk and seal the bottom hatch, you flood the chamber and exit
    through the side door. You can see the stick figures with their head in a air bubble. Hope I got this right.
    Edit: The ridges in the front face of the fairwater are strengthening gussets that circle the escape trunk and stick through the skin of the fairwater
    covering. See Tom's picture below for the gussets.

    http://www.maritime.org/tech/escape.htm Escape procedures.


    Comment

    • Guest

      #92
      Re: 1/144 Scale USS Batfish (SS310)

      Rations must have been tight on that boat!

      Comment

      • tom dougherty
        Senior Member
        • Jul 2005
        • 1361

        #93
        Re: 1/144 Scale USS Batfish (SS310)

        Okay that makes more sense. The ammunition was stored below decks in the after battery compartment (which also had the freeze box and the chill box (refrigerator)). Ammo would have had to be brought up and then passed from the after battery into the crew's mess, then through the control room to the next forward compartment (near the yeoman's office and above the forward battery) to go through the hatch forward of the conning tower IF it were for ammo delivery. That route for ammunition makes little sense.

        Comment

        • wlambing
          SubCommittee Member
          • Feb 2003
          • 848

          #94
          Re: 1/144 Scale USS Batfish (SS310)

          Gents,

          Sort of like an escape trunk, only not. The sole purpose of the trunk under the 20MM is deck access. The upper hatch gets the gun crew right up to their gun, without having to pass through the bridge cockpit. The side door gets folks to the main deck, as well as allowing ammo for the big gun to be passed up. Pre-Gatos had a door in the aft end of the conning tower. The Squalus' sail at Portsmouth Naval Shipyard has this feature. Some ships had dedicated ammo scuttles, while others used hatches. Flasher has an ammo scuttle built into the front of her sail under the big stowage lockers. Silversides has a scuttle aft of her sail. Some Balao's had scuttles, too. Some boats passed ammo through the bridge and out the slanted chutes at either side of the 20MM platform deck. Ya gotta love these boats! Every one is different! It's all in the research.

          B^)

          Comment

          • rdutnell
            Junior Member
            • Nov 2012
            • 388

            #95
            Re: 1/144 Scale USS Batfish (SS310)

            UPDATE 36

            Thanks Scott! Actually you un-confused things nicely, even if the guys were on tight rations as Sub culture said. )

            Between your info and Tom’s, and another look at Page 4 of the Booklet of General Plans, I think I finally have it figured out. Below is a clipped image of said Page 4. You can see that the conning tower is clearly marked. You can also see the gun access trunk, with hatches top and bottom, and the door is also visible, partially behind the trunk. Control mechanisms appear to exit the conning tower, and seemingly enter the gun trunk and proceed down to the control room. The image seems to confirm what wlambing posted about the trunk being solely designed for gun access, even if the plans are for SS381 (USS Sand Lance).


            The image below shows two familiar images presented together. In Tom’s picture you can see the part of Tom D.’s picture shown in red. The flange, I assume, is where the control mechanisms would have exited the conning tower before either entering the gun trunk or paralleling it before going down to the control room.

            [URL=http://s1352.photobucket.com/user/rdutnell/media/USS%20Batfish%20ACAD%20images/pix36_Page_01_zpsc1aa7ca0.jpg.html][img]

            Comment

            • salmon
              Treasurer
              • Jul 2011
              • 2342

              #96
              Re: 1/144 Scale USS Batfish (SS310)

              I would leave it. What you have done looks great.
              If you can cut, drill, saw, hit things and swear a lot, you're well on the way to building a working model sub.

              Comment

              • rdutnell
                Junior Member
                • Nov 2012
                • 388

                #97
                Re: 1/144 Scale USS Batfish (SS310)

                UPDATE 37

                Cool! Thanks Tom!

                I think you are right about leaving it. I’m definitely leaving it for now anyway. Back to the SD Mast…

                Having completed the grabs and being satisfied with them, I joined them to the mast and started on the weld seams. To do them, I started by drawing a line at the vertical location of the seam…


                I then projected the line onto the mast. This projection created 8 arcs on the surface, on which I drew circles and extruded them along. In the image below I have drawn the standard 0.06’ (0.005” at 1/144 scale) circles on the two arcs perpendicular to my coordinate system.


                I copied these to the two arcs parallel to my coordinate system, rotated them 90 degrees…


                …And extruded them along the arcs.


                The corner arcs were slightly more complicated because I had to adjust my coordinate system each time, aligning it on one of the faces of the extruded arcs. With the coordinate system aligned properly, I could then draw the circle at the center of the extruded arc face…


                …And extrude the circle along the arc.


                This was repeated for each of the remaining arcs.


                The last step, as usual, was to attach it to the mast and recolor it. The lower one was done the same way.


                I think next I’m going to move back to the forward part of the bridge and put some of the niceties Tom presented earlier. I’ll return to the SD mast later.

                CHEERS!!!

                Comment

                • scott t
                  Member
                  • Feb 2003
                  • 880

                  #98
                  Re: 1/144 Scale USS Batfish (SS310)

                  Looking good, Russ!
                  I think the bar just above the side hatch is a hand grab to pull yourself through the hatch.

                  Comment

                  • rdutnell
                    Junior Member
                    • Nov 2012
                    • 388

                    #99
                    Re: 1/144 Scale USS Batfish (SS310)

                    Thanks Scott! I was wondering if that might be what that bar was for.

                    On another note, I started looking at the details on the bridge, and decided to put it off because in the few pictures I have of the area, it is a lot different on the Batfish pictures from Tom than on the Lionfish(?) pictures from TomD. Like wlambing posted, “Ya gotta love these boats! Every one is different!” So, rather than doing it all wrong, I’m going to wait until I get better pictures, and in the meantime I’m going to go back to the SDMast.

                    CHEERS!!!

                    Comment

                    • rdutnell
                      Junior Member
                      • Nov 2012
                      • 388

                      #100
                      Re: 1/144 Scale USS Batfish (SS310)

                      UPDATE 38


                      As I said in my last post, I decided to put the bridge detailing on hold and continue playing with the SD Mast details. In the picture below, once again cropped from one of Tom’s pix, you can see what, I think on USS Greenling (SSN-614), they call a pig stick. I don’t know if they call it a pig stick on fleet boats or not, but that’s what I’m going to call it.


                      To start the process, I did as usual, and drew construction lines in the correct (more or less) position, using the photograph for reference.


                      Once I was satisfied with the location, I moved it sideways, mirrored it and lofted it.


                      With the support bracket completed, I turned my attention to the pig stick itself, starting with drawing the center line along the outer edge of the bracket. I then realigned my coordinate system and drew a circle with a diameter of 0.14’ (0.12” at 1/144 scale)…


                      …And rotated it 90 degrees. I also moved it down to make sure that it was in the mast.


                      Next I prepared to drill a hole through it by drawing a 0.06’ (0.005” at 1/144 scale) diameter circle…


                      ..And extruding it.


                      I then subtracted the smaller cylinder from the larger one.


                      I think it came out pretty good, but I don’t think, at 0.005” diameter, that you could put a staff with a flag on it in the hole. So, I looked at my spare plastic and the smallest rod I found was 0.025” (0.3’ at 1/144 scale), so I did a redesign with the ID at 0.3’.


                      As you can see, when I make it big enough to hold a flag, it overwhelms the structure. So, I think that the flag is out.


                      CHEERS!!!

                      Comment

                      • rdutnell
                        Junior Member
                        • Nov 2012
                        • 388

                        #101
                        Re: 1/144 Scale USS Batfish (SS310)

                        UPDATE 39

                        Good evening guys!

                        After a frustrating day sampling due to instrumentation problems I settled in for some therapy in the form of Batfish. Checking my e-mail first, I had a nice present from Scott, who had sent me several more pictures of the SD Mast. Thanks Scott! One of the first things I noticed in the pictures was that I didn’t do the pig stick correctly, so I redid it, which didn’t take long, because I had saved an earlier version before I had joined the pieces.


                        In the process of preparing for the next step, I discovered that I had put the upper weld seam one rung too high, so I had to redo that as well. This took a little longer, but was also fairly easy. I simply sliced out the old one drew polylines on the ends of the cuts, lofted them and joined the resulting shape to the two parts of the mast.


                        In the image below you can see where the old one was.


                        Having corrected my mistakes, I decided to do the access plates, starting as usual by drawing the outline of the shape in the correct location on the side profile. In this case the shape consisted of 2 circle and two lines…


                        …Which were trimmed and joined to form a polyline.


                        The attachment bolts were made using a hexagon inscribed in a 0.06’ radius circle.


                        After completing one, I copied it to the other locations on the starboard side.


                        At this point I copied the mast and construction lines up out of the way and extruded the plates about half way into the mast.


                        I then did the intersection command for each plate, having to copy and paste the mast back after each one.


                        Next, I moved the plates out of the mast 0.06’.


                        For the bolts, I started by extruding the hexagons.


                        I then drew a reference polyline (yellow) 0.06’ from the bolt end then up, as a guide for moving the bolts so that only 0.06’ was protruding from the surface. I copied this to the other bolts and moved them into position.


                        I think it turned out pretty good as you can see below.


                        I think I’ll do the plates on the other side next.

                        CHEERS!!!

                        Comment

                        • rdutnell
                          Junior Member
                          • Nov 2012
                          • 388

                          #102
                          Re: 1/144 Scale USS Batfish (SS310)

                          UPDATE 40

                          Good Morning All!

                          Well, I did the plates on the port side of the SD Mast, but it took me a while to get to them, because the more I looked at the pictures, the more I realized that I had missed the basic shape of the mast. In my original design, I lofted from a circle at the top to a filleted rectangle at the bottom, but this made it too blocky when compared to pictures, which appear to be round down to the lowest welding seam. When I first noticed it, I considered just leaving it the way it was, but I couldn’t. I had to redo it. The good thing is that the whole process went a lot faster than the first time.
                          The main difference between the original design and the new one is that I lofted increasing diameter circles down to the lower weld seam, then lofted between the lower circle and a filleted rectangle at the bottom. The radius of the fillets was increased from 0.5’ to 0.6’.


                          Since the sections at the weld seams are now circular, it was a lot easier to add them. I just extruded 0.06’ circles along the circles I used to loft the mast.


                          Next I added the pig stick, which I did by slicing it off of the old mast and moving it to the new one. The grabs were copied and pasted from the grab drawing I made.


                          The access plates were made as before by extruding their outlines into the mast…


                          …And repeatedly using the intersect command to form little wedges, which I moved 0.06’ out from the surface.


                          The bolts were also done as before using guides to leave 0.06’ protruding from the surface.


                          Here’s a cool view from the top.


                          The good thing about having to redo it is that it made it real easy to do the port side access plates. I simply mirrored them from the starboard side.


                          CHEERS!!!

                          Comment

                          • scott t
                            Member
                            • Feb 2003
                            • 880

                            #103
                            Re: 1/144 Scale USS Batfish (SS310)

                            Glad you caught the roundness of the mast. Would it make it any quicker to make the raised weld lines by
                            makeing a quarter/half inch rectangle plate, position it at the right elevation in/on the mast. Then offset the
                            rounded mast surface a half inch outward and trim the excess of the plate outside the new mast surface.
                            Then return too the original mast diameter. If that worked you could also do the vertical welds that way.
                            Not that it needs every weld line.

                            I have not done the above process so guessing it might work.
                            To me it looks like the actual mast was built up of flat plate, then the curved sections
                            were welded to it on the top portion.

                            Comment

                            • tom dougherty
                              Senior Member
                              • Jul 2005
                              • 1361

                              #104
                              Re: 1/144 Scale USS Batfish (SS310)

                              Scott,
                              To me it looks like the actual mast was built up of flat plate, then the curved sections
                              were welded to it on the top portion.
                              The mast starts out as 28" squares with rounded edges at the base. See below diagram (click to magnify) at the bottom of the drawing. I believe the section to the rear proceeds straight up as a flat plate, and the rest of the mast is rounded, essentially leading to a "D" in cross section. This leads to the trailing edge of the mast being a straight rise from the base.

                              Comment

                              • scott t
                                Member
                                • Feb 2003
                                • 880

                                #105
                                Re: 1/144 Scale USS Batfish (SS310)

                                Yes, I agree with you. I sure wish we could upload pictures to the site without having to use a picture server.

                                Comment

                                Working...