My Rescue Barge

Collapse
X
 
  • Time
  • Show
Clear All
new posts
  • Ralph --- SSBN 598
    Junior Member
    • Oct 2012
    • 1417

    #46
    December 26th =================================================

    I had about 30 to 45 minutes in the shop this morning.

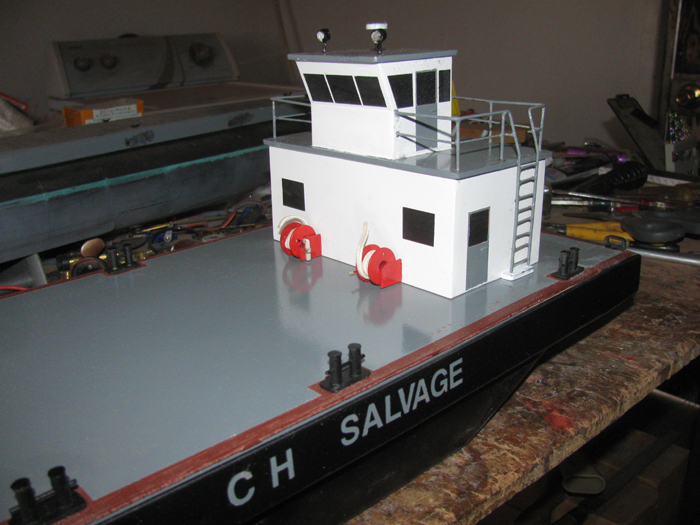
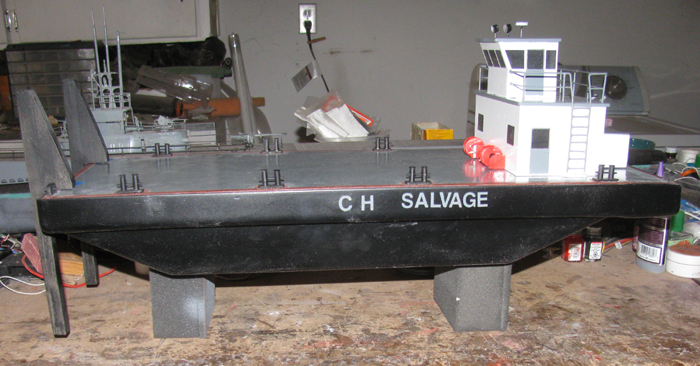
    Painted the spotlights black.
    I did not like the white.

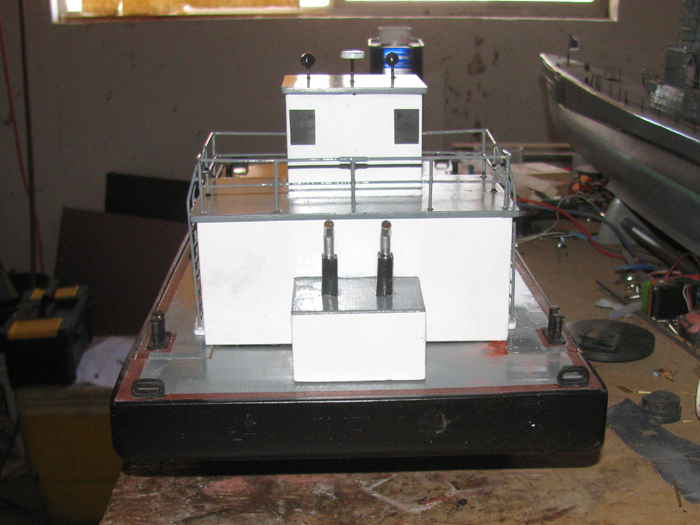
    Worked on the glazing on the stern block.
    Sanded and reglazed.

    Cleaned the railing with paint thinner.
    Files a couple of spots where the solder was sticking out and sharp.

    Applied a first coat of gray.
    It is going to need a second coat.
    The brass shows through in spots.

    I will let this paint dry then apply a second coat.
    After that, I will move on to touching up the white.
    There are some places that are just too much to be considered work related.


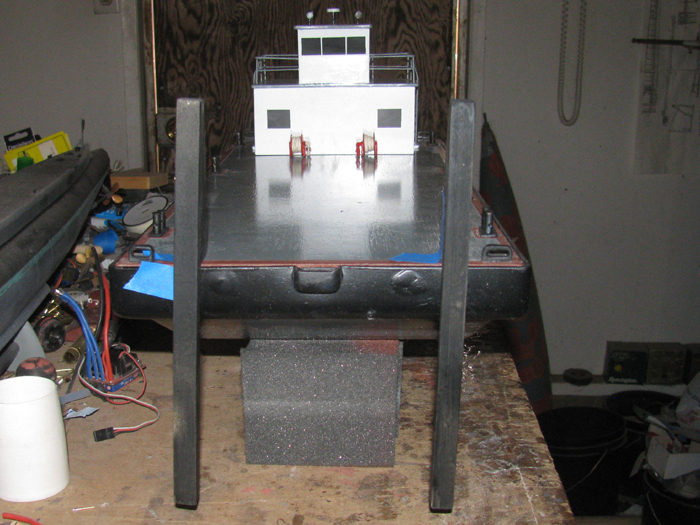
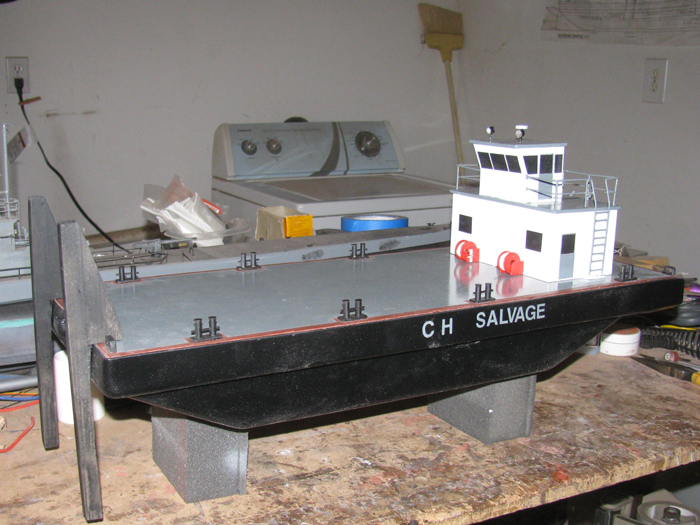
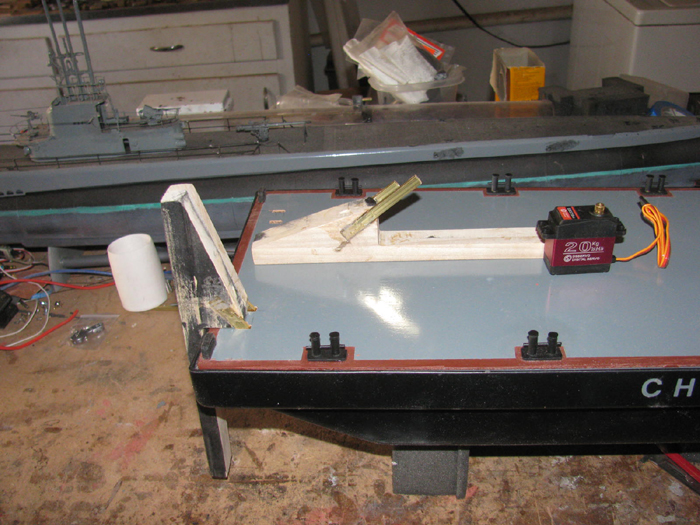
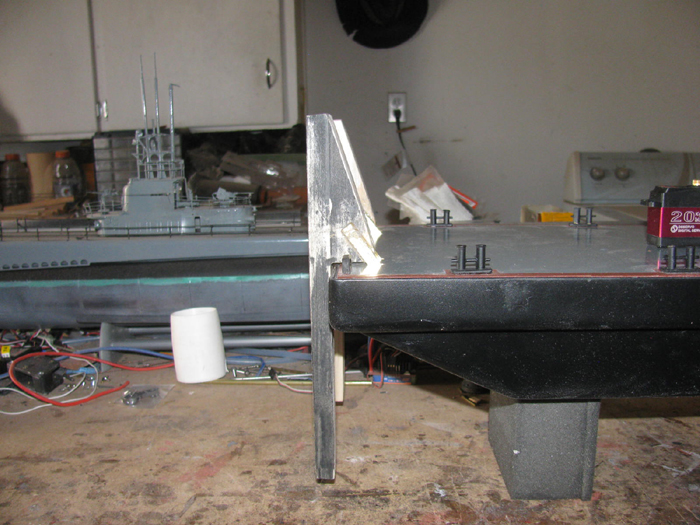
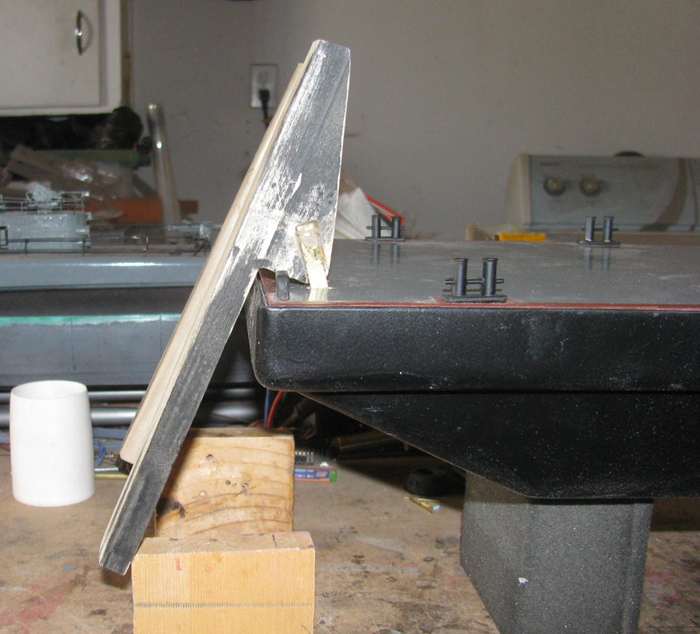
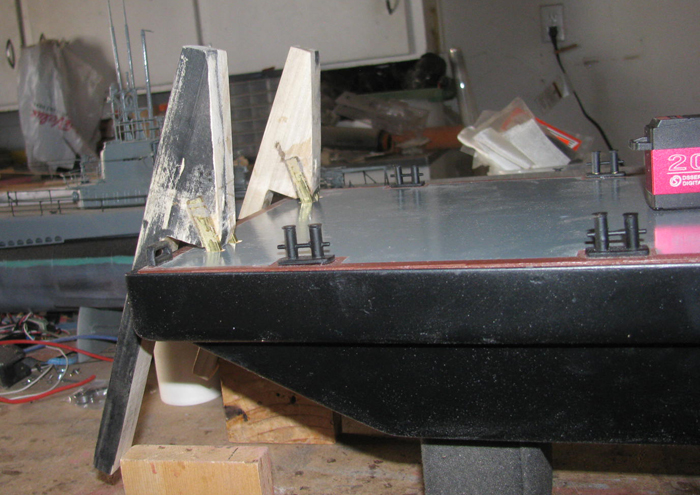
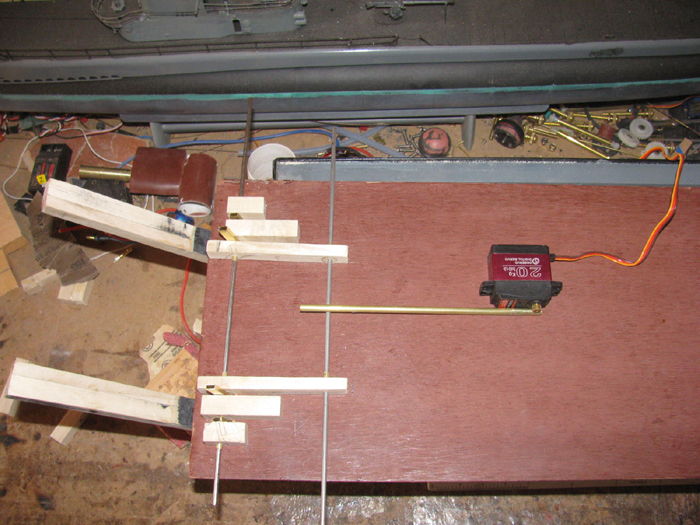
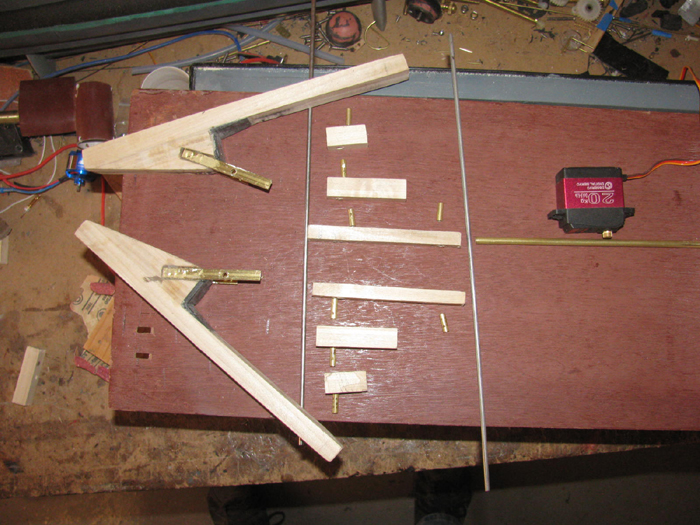
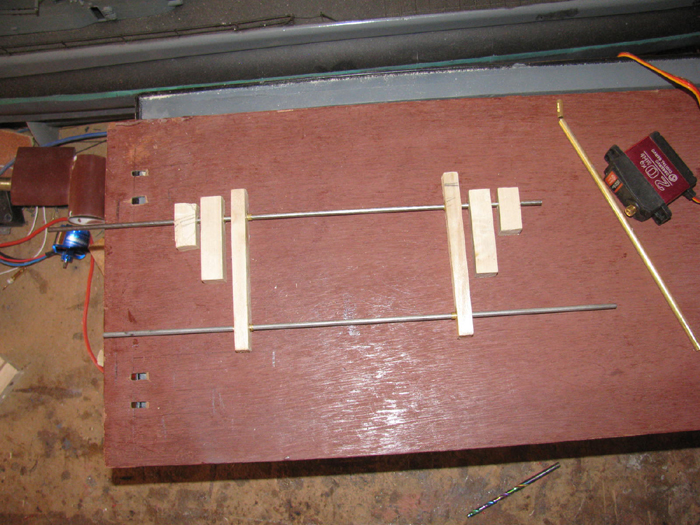
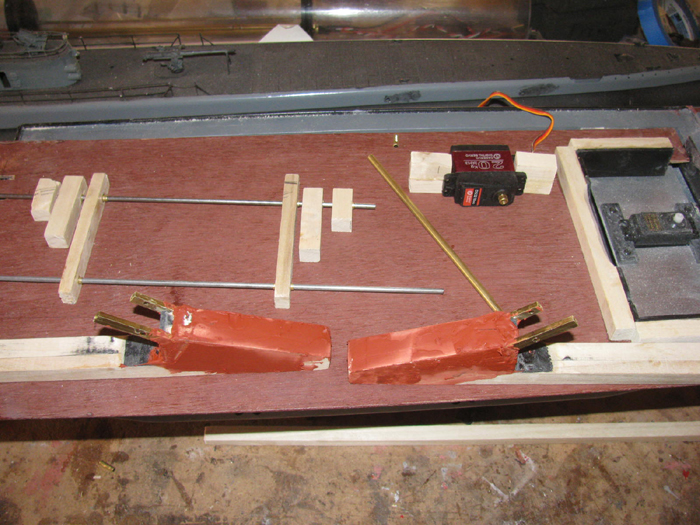
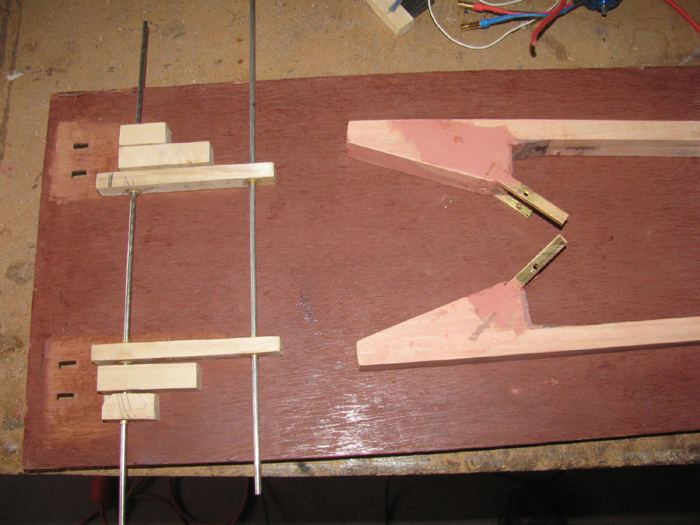
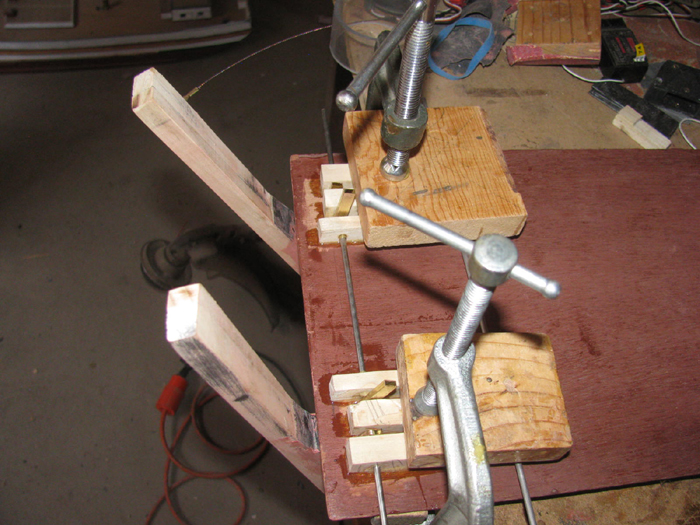
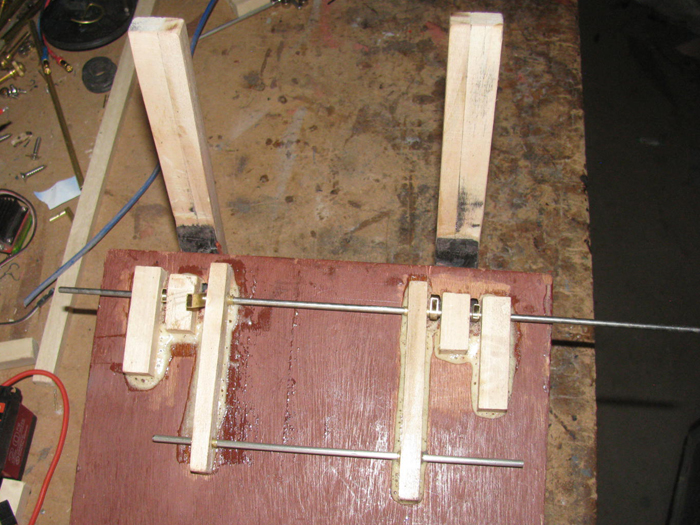
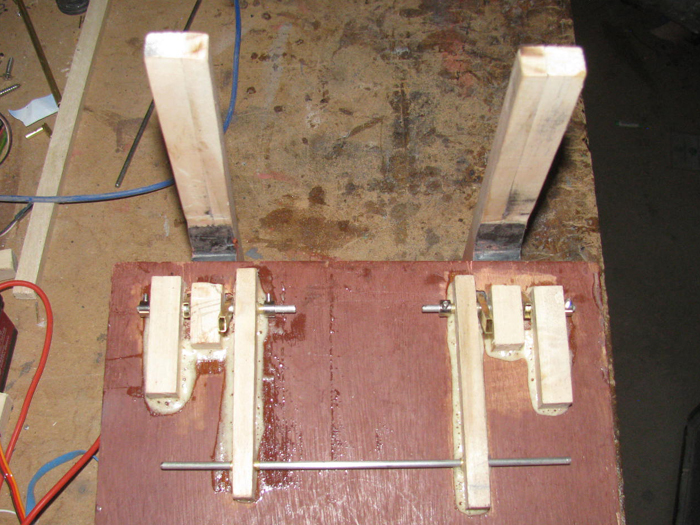
    Finished up the shims on the pusher bars.
    The hull sides are not 90 degrees tot he bench top.

    I had put a 1/16" plastic shim on last week.
    Today while fitting, it took another 1/16" to get it square.
    In 1" distance I needed to go from zero to 1/8" to get square.
    Go that done and sanded for primer.

    Photo just before applying primer.
    Last edited by Ralph --- SSBN 598; 12-26-2020, 07:30 PM.

    Comment

    • Ralph --- SSBN 598
      Junior Member
      • Oct 2012
      • 1417

      #47
      December 27th =================================================

      Progress.

      I did touch up on the gray railing.
      After cleaningup brushes, I found some more spots.
      Not to worry, I have gray touch up on the main deck to do.

      I went over the deck house and wheel house using an exacto knife to scrape some of the gray splatter off the white.
      I got most of it but need to wash the parts to get all the small dust particle off to see better.

      Repaired 1 of the fire hose valves. (it as missing the handle)

      Taped the pusher bars on the deck to take a look.
      The pusher bars are over length.
      I will cut them once I decide on how deep I want them below the water surface.
      Remember, I will be pushing submarines more than surface craft.
      Example: 1/72 scale Skipjack keel is about 4" below the surfaces with the centerline about 2.25" below the surface.


      Push bars are not straight.
      They are taped in place and falling over.

      ----------------------
      Later in the day.

      Well I can not leave well enough alone.

      Looking at the photo of the barge straight on with the push bars in place does not look right to me.
      The push bars look too thin.
      Out to the shop and I dug the first push bars out of the parts box.
      I put two push bars side by side.
      This makes them 1" wide.
      This is too much.
      Looked around the table saw and found a scrap piece about 5/16" wide.
      Held that next to one push bar and it looks better to me.

      I set the table saw to 3/8" and ran the original push bar through.
      Held it up and it looked better.
      I think I will go with this and ran the second push bar through the saw.
      I can always cut a little more off it it needs to be thinner.

      I cut the 2 original push bars and sanded the paint of one side of the second pair of push bars so the glue will adhere better.
      Cleaned the dust off all 4 pieces and applied glue.
      Put packing tape between the two units so they do not bond to each other or the vise.
      In to the vise they went.
      The long 1/2" pieces sticking out got a 3" clamp.
      Made sure the back edges were all flush.

      I will see what I have tomorrow.
      Last edited by Ralph --- SSBN 598; 12-27-2020, 07:12 PM.

      Comment

      • greg w
        SubCommittee Member
        • Mar 2010
        • 360

        #48
        A couple of thoughts for you. When I look at this on my i phone the pictures are displayed but not When I use my pc ( I have no idea why) . Also from my experience pushing subs you may want either an angled block on the bottom of the pushbars or an extension that you can attach to them when you need to push a sub. There is a tendency for the subs to roll under the pushbars as you won't be pushing on the keel but on the widest point.

        Comment

        • Ralph --- SSBN 598
          Junior Member
          • Oct 2012
          • 1417

          #49
          Greg, someone else had issues displaying the photos.
          How they fixed it he did not say.

          I have left the push bars long. Very long.
          Right now they are about 5" below the water line.
          I will cut them later but for now, I want them long.
          I want them the same depth as the motor pod.

          Now your thought on extensions on the bottom of the push bars.
          I have drawn up a plan for the push bars.
          Because our subs are of various scales, different diameters, I plan to make 3 or 4 extensions that can be bolted on to the bottom of the push bars.
          Not only will they change the depth of the push bars, they will stick out at different lengths to accommodate the different diameter boats.

          One more thing I am working on.
          The drawing works, I just have to get the mock up on the bench to work.
          The push bars have a high torque servo that will lean the push bars back about 15 to 25 degrees.
          This will tilt the push bars back and the lower piece sticking straight out in to a L that the boat will sit in.

          Like tipping back a hand truck.
          This tipping will also brings the L up about 1/2" which should raise the hull up slightly on the keel.
          In this position the boat should not be able to go down or slid off the push bar lower arms.

          I plan to cover the push bar fronts will rubber foam for a soft non slip grab.

          My barge is near completion.
          The push bars and wiring the electronics.
          Battery, Rx, speed controller and 2 servos.
          Oh and a main power switch. (I think the ESC has one built in)

          I will get a little work done the next few days but real life stuff has to be taken care of this week.

          Comment

          • Ralph --- SSBN 598
            Junior Member
            • Oct 2012
            • 1417

            #50
            December 28th =================================================

            Rain started about 1am.
            Continued through the night in to morning.
            At times there was snow in the air but did not stick.
            Went to town and there was snow on the ground.
            I was in the shop to see if I could get something done.
            Today's high so far has been 37F.
            My heater in the shop can not raise the temp high enough to work out there.
            Besides the work I need to do has to be done outside at the steel work bench.

            Yea, I am not doing that.
            Back in the house warm and toasty.

            Tomorrow a high of 42F is predicted with zero rain.
            Maybe I can get the heater going and take a second heater out there and see if I can get it to a temp that is workable.

            Also thinking on what I might be able to bring in the house to work on.
            The wiring looks like a good candidate for that.

            No big rush as there is no plan to go to the lake any time soon.

            Comment

            • Ralph --- SSBN 598
              Junior Member
              • Oct 2012
              • 1417

              #51
              December 29th =================================================

              Cleaned up the push bars.
              They look better wider.

              Took the time to measure up the push bars and where they will sit on the deck.
              Then I made a drawing and put the push bars on a deck to get the measurements for the servo linkage I think will work.

              I needed a hinge below the deck and a control horn to connect to.
              The hull has an angle to it and I have to make sure there is enough through on the control horn and not hit the hull.

              A year or so ago I bought some brass tubing.
              When I got home and sorted it, I had a rectangle tube. (Not sure how that happened.
              Today, I was going through various brass tubes.
              I was going to make the control arm and hinge out of round tubing.
              Then I see this rectangle tube.

              Perfect.
              I measured the angle I needed the tube to be in the push bars.
              I Dremeled slots on both side of both push bars.
              Test fitting was a must because I was cutting the grooves in by hand with the Dremel.

              It did not matter if the slots where a little big.
              This allowed me to move the tubing to align them at the correct distance from the push bar back face.
              Also allowed for more epoxy to bond the tube in the slot.


              After making sure I knew which way to push the tubing to get them all to align, I mixed a little epoxy and installed the long control horn tubes.

              After they cure, I will install the other 2 using the first to line up everything.

              When all has cured, I will fill the outside over the tubes to make the push bar side flush again.
              -----------------------
              Couple of hours on the epoxy.
              It has set.

              I have installed the second 2 brass tubes.
              These are the short ones.
              They will only act as hinges.
              All is clamped in the vise.
              Last edited by Ralph --- SSBN 598; 12-29-2020, 07:31 PM.

              Comment

              • Ralph --- SSBN 598
                Junior Member
                • Oct 2012
                • 1417

                #52
                December 30th =================================================

                In the shop working on the push bars.
                The wider bars look much better.
                I sanded down the epoxy that is holding the brass tubes on.
                There will be more to get it level but I can now work on the install in to the deck.

                Using the push bars I marked the deck where the brass tubes will go through.
                Here 1 push bar is dropped in through the deck and the other is lying on the deck and you can see the rectangle holes on the far side deck.

                In my parts box I had this 20KG servo. (will be under the deck)
                It should do the job of raising the push bars.


                Push bars in place.


                Push bars in the raised position I hope to achieve.


                A look from the side and back.

                -------------------------
                With the push bars off to the side of the work bench, I measured for the wooden bearing blocks.
                Using 1/2"x1/2" poplar wood stock to cut blocks that will become bearing blocks for the push bars and the control linkage.

                More gluing and clamping pieces together.

                This is all I will get done today.
                Time to do real life stuff.
                Last edited by Ralph --- SSBN 598; 12-30-2020, 04:02 PM.

                Comment

                • Ralph --- SSBN 598
                  Junior Member
                  • Oct 2012
                  • 1417

                  #53
                  December 31th =================================================

                  Just because it is the last day of the year, I can not violate my 10 minute rule.
                  "I must put at least 10 minutes every day during a build."

                  I got in about 20 minutes.
                  Maybe 30 minutes.

                  I files the shims on the front of the push bars that make them 90 degrees to the water when touching the barge bow.
                  I test fit the push bars until they sit at the correct angle.

                  The push bars sit about 1/8" above the deck at this point.
                  I can either file the slot in the deck longer towards the front or I can add plastic shims under the push bars.

                  I chose putting plastic shims under the push bars and leaving the tight fit through the deck to make it harder for water to enter the barge hull.
                  I think a little silicone will seal the control arms through the deck once I get all the linkage and servo in place.

                  Made the shims and glued them to the push bars.
                  As always, currently on the work bench in clamps while the glue cures.

                  There is today's minimum time in the shop.

                  I do not go out on New Years Eve.
                  I live in the desert and it is a long ways to anything.
                  But not to worry.
                  A few friends and I meet some where within 80 miles for a long lunch.
                  Been doing this for years.
                  Today was no different other than the group is getting smaller each year.
                  Some move away.
                  Some do not make it to the end of the year.

                  As long as I can be there, I will.
                  These are the few friends you can count on one hand to be there if you every need help.

                  Everyone be safe tonight and tomorrow.

                  Comment

                  • salmon
                    Treasurer
                    • Jul 2011
                    • 2340

                    #54
                    Ralph,
                    Happy New Year to you and look forward to running with you at Yoruba Linda!
                    Peace,
                    Tom
                    If you can cut, drill, saw, hit things and swear a lot, you're well on the way to building a working model sub.

                    Comment

                    • Ralph --- SSBN 598
                      Junior Member
                      • Oct 2012
                      • 1417

                      #55
                      That would be a good plan, Tom!

                      Comment

                      • Ralph --- SSBN 598
                        Junior Member
                        • Oct 2012
                        • 1417

                        #56
                        January 1st =================================================

                        This afternoon I started on the linkage mounts.

                        Cut lots of wooden blocks. (poplar wood)
                        These will support the push bars and the control linkage.
                        Test fit for look and placement.


                        Disassembled and removed the shaft bushings.


                        Applied glue to each bushing and slid each block on to the long control rod to align the parts


                        Next I applied glaze to the pusher bars so I can sand them smooth and hid the sanded low spots


                        Tomorrow, I will assemble everything to locate where on the underside of the deck they will be glued.
                        I will draw on the deck with a pencil so I know where to remove the primer to bare wood.

                        Comment

                        • Ralph --- SSBN 598
                          Junior Member
                          • Oct 2012
                          • 1417

                          #57
                          January 2nd =================================================

                          Sanded the push bars.
                          Need a little more glaze in a few spots.

                          All parts ready for glue.
                          The under side of the deck has been sanded down to the bare wood so the glue can soak in.


                          Glue has been applied and parts put in place with the push bars also in place as spacers.

                          Comment

                          • Ralph --- SSBN 598
                            Junior Member
                            • Oct 2012
                            • 1417

                            #58
                            January 3rd =================================================

                            Removed the push bars by cutting the glue and rotating the shaft.
                            I then cut and filed the glue in between the bushing blocks.
                            Took some time but I got a smooth fit between the block for the pusher bars.


                            I sanded the glaze on the pusher bars.
                            Didn't want that to get in the way of fitting the bars between the blocks.

                            I hand fitted both pusher bars.
                            It required making the deck slots longer towards the front.
                            It required filing on the shims to get the pusher bards to sit flat on the deck and get the 90 degrees to the water line.

                            Weather was nice outside and in the shop.
                            This fitting process took me almost 2 hours.
                            My fingers are tired and hurt from pinching the parts while filing.
                            I did get both pusher bars to sit correctly with just the weight of the pusher bars.

                            There is a lot of glue that squeezed out from under the bushing blocks.
                            I plan to leave it and I may add to it .

                            I cut 2 pusher bar shafts.
                            Found a small bag of 1/8" brass wheel collars to hold the shafts.

                            I will need to get more to make the control horns from the secondary shaft and to the servo.

                            I will use 2 wheel collars per control horn.
                            This servo has 20 kg of torque.
                            The arm that came with the servo is a steel arm with a split and 2 tightening bolts.


                            Worked on the 2 plastic pieces that will go on the large pulley wheel to remove the slack from the steering cable.
                            I found a small stainless bolt while looking for stainless Allen grub screws in my parts box.

                            Bad news, I spilled the grub screws of which most landed on the work bench but at least 3 got away to the floor.
                            I could not find them.
                            Must be time to clean the shop and the floor to find the years lost parts.

                            Comment

                            • Ralph --- SSBN 598
                              Junior Member
                              • Oct 2012
                              • 1417

                              #59
                              January 4th =================================================

                              Sanded the push bars.
                              Drilled holes for the control linkage.
                              They are ready for primer and paint.

                              I don't have any flat bar brass so I decided to make the control linkage out of round brass tubing.
                              Cut to length.
                              Cut a slot in to both ends.
                              Opened up the slots and flattened the ends so the rectangle tube fits down in the slot.

                              Remembered I got things to do in town.
                              Brought the primer and paint in to the house to warm up.
                              The shop is still down about 40F.

                              I think there will be time this afternoon to prime and paint.
                              Might even get to drill the holes in the linkage pieces.

                              Looking at the photo above, I might even get a coat of primer on the under side of the deck where I have been working.

                              Back in the shop.

                              Primed the pusher bars.
                              It is not warm enough to dry the primer.
                              I will let dry overnight before painting black.

                              Back to the control linkage.
                              Made more parts and started fitting them together.
                              Using brass 1/8" tubing and rod as pins to hold it all together I have mocked up the linkage


                              The servo will turn the long stainless through rod through a single horn at the center.
                              The long rod will turn 2 horns that will push the pusher bars horns.
                              Lots of wheel collars to solder .
                              1 on each side of each horn. (need lots of strength)

                              The push rods are made from 1/4" round tubing with the ends split and flattened.


                              I need to make the servo aluminum mounting bracket.
                              I think the mounting bolts will go through the deck.

                              Before I mount the servo, I need to get the electronics up and running so I can see the servo horn movement so I can align it for better torque.

                              Might have noticed, I did prime the underside of the deck. (looks better)

                              Comment

                              • salmon
                                Treasurer
                                • Jul 2011
                                • 2340

                                #60
                                Ralph,
                                Have you a servo tester? If not they are inexpensive and you can test your servos movement without having to wire everything up.
                                Peace,
                                Tom
                                If you can cut, drill, saw, hit things and swear a lot, you're well on the way to building a working model sub.

                                Comment

                                Working...
                                X