Attention all registered users. The new forum upgrade requires you to reset your password as you logon for the first time.
To reset your password choose this option that is displayed when you attempted to login with your username: "Forgotten your password? Click here!"
You will be sent an e-mail to the address that is associated with your forum account. Follow the simple directions to reset your password.
If this is your first visit, be sure to
check out the FAQ by clicking the
link above. You may have to register
before you can post: click the register link above to proceed. To start viewing messages,
select the forum that you want to visit from the selection below.
1/72 Revell Gato Balao conversion-first time cylinder (yeah, I'm at a loss)
Awl it is, thanks. Think I might pick up some more bullet connectors and some 14 or 16 gauge wire too since I'm not happy with how the battery feed wire turned out. The zip wire wasn't long enough to wire in the switch and trying to feed it through the tube pushed to tube out. As it sits right now, there are 'extensions' added to it so at least the positive can reach the switch. ESC, motor, and solenoid wiring looks good though. Not 100% sure if I should add the battery monitor after reading the instructions. What exactly will happen when it trips the failsafe while the snorkel is submerged? Also, I'm not seeing any fuses used in anyone else's setups.
You can program the failsafe to blow the tank. You have a SAS system? Not a SNORT right? SAS will take air from the cylinder and blow the water out of the ballast tank. SNORT system, you must have a gas backup.
A battery monitor with failsafe is a good idea.
If you can cut, drill, saw, hit things and swear a lot, you're well on the way to building a working model sub.
When you do the "wire through the tube bit" use a 1/16" rod to pull the wire through it. Just tape the end of the wiring to it and pull it through. No dislodging the tube and fast.
When you do the "wire through the tube bit" use a 1/16" rod to pull the wire through it. Just tape the end of the wiring to it and pull it through. No dislodging the tube and fast.
Thanks, I'll try that this go around. The soldered extensions are bothering me so I got some 14 gauge wire today and I'll cut it to a length that'll give me the extra I need to reach everything. It's individual wires so this should be fun, but it has far less insulation so it might be easier. It's the same gauge as the ESC and pre-made battery plug.
You can program the failsafe to blow the tank. You have a SAS system? Not a SNORT right? SAS will take air from the cylinder and blow the water out of the ballast tank. SNORT system, you must have a gas backup.
A battery monitor with failsafe is a good idea.
I think this is SAS, but without the optional emergency tank.
Now that it's in stock, does anyone know if Kevin's Bow plane interlock needs a channel of its own, or just kicks in the override when the retractor is engaged? I'm wondering because it looks like I won't be adding torpedos since my 6 channel receiver is full already so I don't have a spare channel for anything.
In no order,
1 Throttle
2 Dive planes
3 Rudder
4 Ballast Servo
5 Ballast Pump
6 Bow Plane Retractor
Your ballast servo and ballast pump can operate on the same channel using a wye connector. The pump runs when issuing a surface command and the ballast servo operates when you give a dive command.
Your ballast servo and ballast pump can operate on the same channel using a wye connector. The pump runs when issuing a surface command and the ballast servo operates when you give a dive command.
Are you talking about a Y-cable?
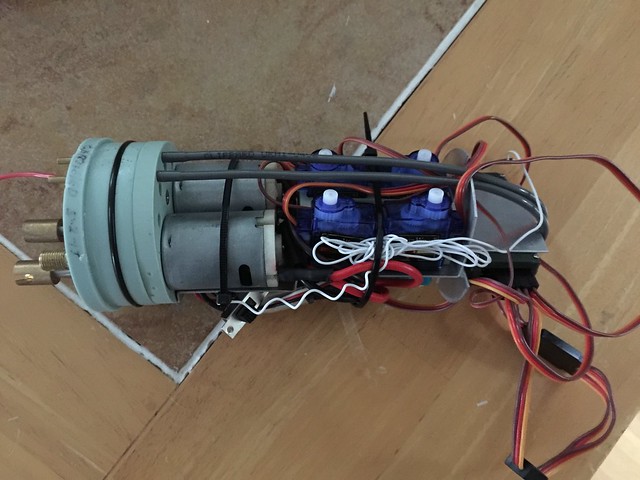
So, progress was made I think.
Why is the receiver there? Because that's the only spot it'll fit. Everything works so far, but nothing is glued down or completely fitted yet. For future reference when I'm ready, what's the test PSI for the cylinder?
In other news, found a really good hobby shop in Corvallis and got some things I needed (and some I didn't). Also picked up a Lindberg I-35 sub. According to a thread on the sub-driver forum, this thing will take my Gato/Balao's driver too???
Test pressure for the cylinder is low. Take the schrader valve out, press a hose onto the valve. put the cylinder into water. Gently blow into the hose, look for bubbles.
Yes. The cable connects the receiver to the ballast servo and the pump mounted
controller board from Nautilus Drydocks/Kevin Mcleod. Also, looking at the photo of what you have now, see if the air hoses in their present position will allow the unit to seat fully in the SD.
Test pressure for the cylinder is low. Take the schrader valve out, press a hose onto the valve. put the cylinder into water. Gently blow into the hose, look for bubbles.
I don't know how to remove it. The WTC has two though, one on the back cap and one on the front. The one on the front (battery compartment) looks like it would be easier to work with.
Yes. The cable connects the receiver to the ballast servo and the pump mounted
controller board from Nautilus Drydocks/Kevin Mcleod. Also, looking at the photo of what you have now, see if the air hoses in their present position will allow the unit to seat fully in the SD.
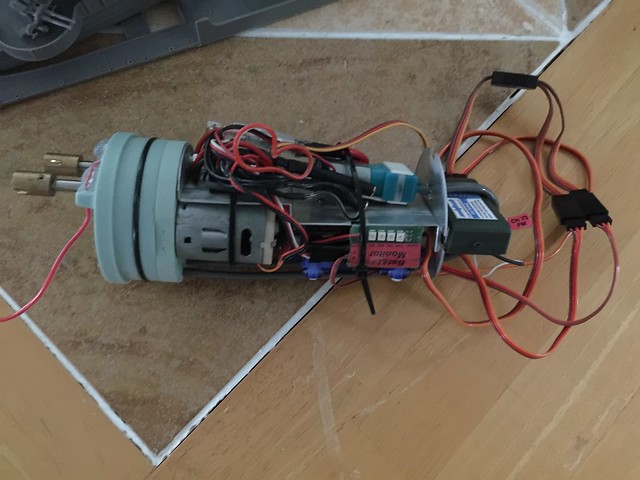
The hoses are in their stock position and don't bother anything. My rat's nest of power wires and servo leads is another story. I had to remove the pump to get to the screws for the servo mount because I needed to trim it down so the servos would fit, that's why it's hanging there.
Forgot to mention, everything was powered up and tested and even programed. I sent Bob an email about the bow plane interlock and ordered one so it should be here soon. I'm still working on the stern of the boat so there isn't a bow to program it with yet. Good news! Also picked up a pair of Z pliers!
To test it, remove center of Schrader valve using a tool you can get at any auto store (maybe even Walmart or a bike store).
Attach a hose, I bought it at a hardware store, Lightly blow into it. If there is a leak it will produce bubbles.
Then seal leaks with RTV rubber.
if you have more questions, ask away.
If you can cut, drill, saw, hit things and swear a lot, you're well on the way to building a working model sub.
Low pressure... lightly blowing into it is enough to force air out of any problem areas. Just make sure you don't blow too hard. You can pop the endcaps right off the cylinder, completely flooding the entire thing. Hold the caps in place when you're doing this.
Remove the casing for the RX. That will allow it to fit between your servos up top and make accessing the plugs much easier.
The Nautilus Drydocks - Exceptional Products for the World of R/C Submarines - www.nautilusdrydocks.com
Have some updates. Started installing the drivers control rods and received my order from Bob! Now I have an Angle Driver 2 and a BowPlane Interlock. I've been using my other project (Lindberg Blue Devil Destroyer) as a test subject before I attempt some of the modifications on the sub. So far I've managed to drill out the rudders and make a prop seal with RTV silicone successfully. JB Weld RTV silicone smells awful by the way but works better then I thought it would. I'm not putting a lot of effort in on the destroyer over all, but it's been a pretty successful test subject so far.
Quick update: I made the servo control rods for the sub-driver and started work on the hull. It's not progressing as fast as I'd like, but I have a lot of 'before winter starts' work done with a lot more yet to do. Fun fact, rebuilding my shed's roof was cheaper then an Engel's Typhoon.
So I'm close to the point that I'll be ready to test the Sub-Driver for water tightness. Aside from taking the valve out and using a gasket maker filler for leaks, is there anything else I should know?
No, I think you got the basics. Before testing visually inspect the o-rings once everything is put together. Look for a nice seal all he way around. It is evident in a dark line where the o-ring is in contact with the cylinder. If any are not making good contact, take the o-ring out and put a few wraps of Teflon plumber's tape in the channel will tighten up the fit.
Remember what Bob said do not blow too hard into the cylinder, you might pop the ends off. Fill the ballast tank as well, the bulkheads on each side can be a source for a leak. I keep the end of the hose in my mouth and hold each end initially. Once you see how much air you need to put in then you can let go. You will get the feel of it.
If you can cut, drill, saw, hit things and swear a lot, you're well on the way to building a working model sub.

Comment