Gato build has resumed.

Collapse
X
 
  • Filter
  • Time
  • Show
Clear All
new posts
  • Ralph --- SSBN 598
    Junior Member
    • Oct 2012
    • 1417

    #91
    October 18th ======================

    Out to the shop. (so I thought)
    Got tot he shop door and it was locked.
    I have never locked the door.

    In the house and found the keys for this door.
    Key turns both ways but the it does not unlock.

    The chaos continues.

    Now I have to break in to the shop.
    Tried a couple of different methods.
    With a flashlight I can see the bolt will not move.

    On to brute strength.
    Got a couple of long bars and a wedge.
    Slowly moved the jam away from the door.
    Finally cleared the bolt and the door popped open.

    Processed to remove the lock set.
    Well, it is stuck and will not slip out.
    Okay, time for a couple of wooden blocks and a hammer.
    Drove the shaft out off the bolt.

    The parts inside the bolt had completely fell apart binding the bolt.
    What I have now is a bunch of junk parts.

    Guess I will be going to town for a new door handle lock set.
    Yes, I look in the tools shed but only found 2 door assemblies that were incomplete.
    Unusable for this project.

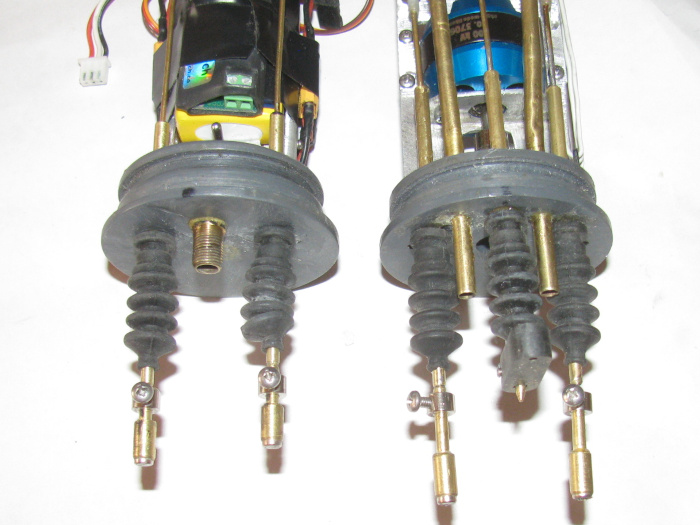
    Will in the shop, I took the front electronics tray out of the cylinder.
    Looked at the wires for cutting.
    Might work, so I will try it.
    But first I need to get the door working again.
    So before I got to town, I am charging the 2 batteries.
    If I happen to get all the wires in to the cylinder with all the systems working, I don't want to take it apart right away.

    There should be enough power to water trim and then maybe a hour or two of run time for the lake it I get it all in there.

    I have a plan B.
    Take the Skipjack to this Saturday's gathering.

    Later in the day ======================

    Shop door repaired.
    Batteries charge. (less than 10 minutes per battery to charge)
    Electronics trays are in the cylinder.
    I put the front tray in first instead of the rear tray.
    There was more room in front of the rear tray for the extra wires.
    Did not have to cut them.

    While testing all servos and installing the ballast tank vent mechanical parts, I ran the Tx battery down to where it was giving out random signals.
    Battery now on charger.

    The vent mechanical parts or installed but need Tx to adjust travel.
    This servo operated the vent valve open to release air and it also moves to operate 2 air pumps individually depending the distance traveled.

    Battery charged for Tx and vent valve mechanical control rod adjusted.

    It looks I might be able to water trim tomorrow.
    Last edited by Ralph --- SSBN 598; 10-19-2021, 08:02 PM.

    Comment

    • Ralph --- SSBN 598
      Junior Member
      • Oct 2012
      • 1417

      #92
      October 20th ======================

      Cylinder is closed up.
      Filled the test tank out side to do the water trimming.

      Everything in the cylinder has been tested and adjusted.
      Time to put it in the water to look for leaks.

      Right off I see an issue but will continue the test.
      10 minutes held at the bottom of the tank.
      Lifted it out and looked for water in the front and rear compartments.
      No water that I can see.

      Back in to the tank for a second time.
      10 minutes back out.
      I still see no water in the front and rear compartment.

      Now I look over the issue and see what I need to do to fix it.
      The vent valve body on top of the cylinder leaks air.
      It looks like the face of the valve body may not be square to the o-ring on the valve shut off.
      I will need to look closer after I fix the second air leak.
      Air is coming from the front side of the body between the valve body and the cylinder.
      This could be I have not gotten the valve body shape exactly right to fit the cylinder curve.

      I removed the body and cleaned off all the silicone caulking.
      Now I can see if the curve needs work to fit tighter.
      Or just put new silicone on the body and make sure I tighten the 2 bolts evenly and at the same time.

      I will lightly sand the cylinder area for the valve body with 600 grit paper.

      Before going that I will check the valve face square to the cylinder and o-ring shut off part.

      I am thinking I will replace the o-ring with new o-ring.
      Maybe all this time the old o-ring may have flatten out some on a angle.

      I also applied CA glue to the side seams on the valve body just in case.

      More to come later today.
      ------------------
      I fit the valve body on the cylinder and did some measuring.
      I made sure the bottom of the body fit the curve of the cylinder. (it does after cleaning all the silicone off)

      The angle of the valve body valve side was not 90 degrees to the cylinder.
      I files with a fine file and then did some sanding with the 600 grit paper until I got what looked like 90- degrees.
      I then polished the surface with auto body polishing compound to a nice smooth shiny finish.

      I put silicone caulking on the valve body and put it place then put the two bolts in.
      I did not tighten them up all the way.
      I held the control rod with the o-ring seal back away from the body about 1/32" and visually lined up the valve body tot he o-ring seal until it looked like the o-ring would contact all at the same time.
      I will tighten the 2 bolts after the silicone curse which should give me resistance and allow me to tighten the valve body down and using the silicone to keep the body square to the o-ring.

      Looked over the front and rear compartments for moisture.
      There is none.

      Tomorrow back in the test tank water.
      Last edited by Ralph --- SSBN 598; 10-20-2021, 06:30 PM.

      Comment

      • Ralph --- SSBN 598
        Junior Member
        • Oct 2012
        • 1417

        #93
        October 21st ======================

        Water tested the cylinder.
        The repaired ballast tank vent valve works.
        No leaks.

        This is where the good news ends.
        While testing the other systems everything works as it is suppose to.
        While running the air pumps I noticed water in the rear compartment.

        I took the cylinder out of the water and drained the ballast tank by tipping the front up allowing the remaining water to go to the back of the tank where there is a flood hole right at the frame cap.

        Quickly dried off the cylinder and removed the rear end cap to drain the water out.
        About 3/4 ounce.
        Was not enough to get up to the electronics.
        The rear tray is now out of the cylinder and I will need to disassemble the tray after I do a test of the air pumps using a bowl of water and long rubber hoses.
        Maybe I will be able to see where the water is coming from.
        Until I ran the air pumps, there was no water in the cylinder.

        Building this cylinder for the Gato has been nothing but one problem after another.
        For more than a year.

        I have thoughts of getting rid of this boat.
        Making a surface runner only.
        But I think I will set it aside and go back to the George Washington and finish the refit on it.
        I have all the parts.
        It's just a matter of building the electronics tray for the 2 new parts.
        The GW was a vacuum motor and air bag system.
        It will now be an air pump system with a small piston for negative and positive buoyancy.

        But for now, the work on the Gato is stopped.

        Comment

        • Ralph --- SSBN 598
          Junior Member
          • Oct 2012
          • 1417

          #94
          I could not stand having this leak.
          So I went back to the shop to see if I could find it.

          I disconnected the power wires and 2 servo wires so I could move the electronics tray around and over and see every bit of it.
          I took a short rubber fuel hose and put it on the intake tube coming out the rear end cap.
          I put my finger over the out let and blew in to the fuel hose.
          I see a couple of drops of water on the work bench.
          Held the tray up to my ear and blew again.
          I hear a quite squeaking noise.
          Removed the fuel hose from the intake tube and put it on the outlet tube.
          Again blew in to the fuel hoses.
          I can again hear the squeaking noise and it is louder.

          As near as I can guess, the noise is coming from where the air pumps are siliconed to the plastic manifold.

          To get to the air pumps I need to remove the vent control rod frame. (2 small screws)
          And I need to remove the small servo screw to the vent control rod.
          I need to remove the 2 fuel hose that connect the end cap through tubes to the 2 manifold tubes.
          This full exposes the air pumps.

          With a finger I find I can move them back and forth easily.
          By lifting up on the end away from the manifold I can see the air pumps starting to release from the silicone.
          Okay, lift them up completely.
          They are still wires to the activation switches so I need to be careful not to pull on the wires.

          With the pumps up and out of the manifold I can see the surfaces on the manifold and the air pumps.
          The silicone came completely off the manifold plastic.
          It appears there was no bond there.
          I rubbed the silicone on the pump face and with some effort the silicone started coming off but required pliers and Exacto knife.
          I removed all the silicone and I files and sanded on all the surfaces.

          My thought is the silicone is not going to work as I planned.
          Making the air pumps removable turns out to be a bad idea.

          So, the fix is to clean the surfaces and scuff them up.
          Make the air pumps semi permanent.

          There are not parts that can be repairs or replace except for the complete pump assembly.
          I decided to try gluing the air pumps to the manifold with Gorilla glue.
          I applied the glue to the manifold face and on the pump face including the outlets.
          Worked the air pumps back down on to the tray and on to the manifold.
          I can only hope I did not get glue in the inlet tubes.
          I found a piece of gray foam and cut it to fit between the air pump motors and the 2 servos.
          I squeezed the foam in and using a small screw drive got it all the way down so the foam put straight line pressure on the 2 pumps.

          Brought the tray in the house and so I can check on it every so often.
          I will check for leaks tomorrow morning while I gather up tools for Saturday's run at the lake.

          I will be taking the Akula II instead of the Skipjack.
          It happens to be the box on to of the pile.

          Comment

          • Ralph --- SSBN 598
            Junior Member
            • Oct 2012
            • 1417

            #95
            October 22nd ======================

            Tested the cylinder.
            The air pumps no longer leak.

            While in the water I pressurized the cylinder by blowing in to the Schreader valve.
            Air bubbles seem at both ends.
            Took the cylinder out of the water.
            Dried it off.
            And set it on the shelf for now.

            I have so much time in this cylinder, I could have bought another completed boat. Twice.

            Moved on to the Akula II.
            The test tank is full of water so instead of doing some fine trimming at the lake, I am doing it in the tank.

            It is a mater of moving a 1/4 oz lead weight down the side of the piston cylinder wall.
            The boat has/had a slight lean to the right.
            So I marked the location of the existing weight.
            Cleaned off the silicone.
            Cleaned the weight.
            Applied a drop of silicone to the weight and reinstalled on the side of the piston case about 3/8" lower.
            I am giving the silicone an hour to setup before testing again.
            This boat is a dry hull and the weight is inside the hull.
            Letting setup so it does not slide down the side of the piston case.

            Comment

            • Ralph --- SSBN 598
              Junior Member
              • Oct 2012
              • 1417

              #96
              October 26th ======================

              At the lake last Saturday, the Akula II ran very well..
              The only trimming needed was mast arrangement.
              My masts and periscopes are made from solid brass 1/8" rod.
              By picking and choosing masts, I can change the trim of the boat.
              Periscopes are near the front of the sail and the antennas are near the rear.
              Most are on the center line of the sail and some are side by side across the center line.
              While running the boat, I watch to see if the boat has any pitch when the controls are set to level and I watch to see if there is any healing side to side.

              Then I ca bring the boat next to the shoreline and remove or add masts to change this trim.
              This past Saturday, I removed two antenna masts to make the stern come up slightly and I move one mast from the right side to the left side of the sail.
              Before changing the mast arrangement, I was having to work the rear planes constantly to keep periscope depth.
              After the change, I ran about 1 hour operating only the rudder for direction changes.

              One issue that I have had since I got the transmitter about 3 years ago is the throttle and rear planes control sticks do not line up side by side when set to the center neutral notch.
              I would move the rear planes to neutral and then h ave to move down 2 notches to get level.
              It has been an annoying issue for ever.
              Sunday I looked up videos on how to adjust this centering problem.
              The first video did not explain how to do this but was on how to go a lot of neat things with a quad copter.

              Watched it and then continued to find what I needed.
              Found it.
              It turns out to be a simple 1 minute adjustment.
              A single screw on a flat stainless spring is loosened and then the spring is slid in the direction you want the notch to go.

              The spring has a large hole or a slot allowing the spring to be moved.
              The 2 control sticks are no in line when in neutral notch.

              I should have said I have the duel Navy sticks on the left side of Tx.

              I got the Akula II out of the transportation box and set it up on the kitchen table where I leveled the system.
              I then checked the rudder for center, the rear planes for level and the auto leveler for the amount of movement in pitch.
              Only needed to adjust the rear planes which got ride of the 2 notches to level them.
              I hope this will rid me of the annoying stick adjustments at the lake.
              ----------------------
              Today, I opened up the Gato cylinder and removed the front and rear electronics trays.
              Last weeks air leaks during water testing is from the 5 o-rings.
              I can fix this but would require making another end cap.

              Or I can remove the o-rings and go back to the rudder boots.
              Much simpler than making a new end cap.
              Removed the tray fro the end cap.
              Now I hold the soldering iron against one of the control rod through tubes and the twist with pliers.
              It comes right out.
              5 minutes and I have all 3 tubes out of the rear cap.

              I have to make up the three new through tubes which have a shoulder for the rubber boots.
              Cut brass tube pieced to go from 1/8" to 1/4", 2 short tube pieces for each control rod.
              There are 5 control rod in all.
              I cut all the pieces.
              I came up short on 1 tube by not having enough of the larger tube.
              Guess I will go to town to morrow for brass tube.

              I took the end cap out to the tool shed and redrilled the 3 through tube holes so the new tubes will go through.
              I am assembling the through tube pieces.
              Should have them in the end cap tomorrow.

              Comment

              • Ralph --- SSBN 598
                Junior Member
                • Oct 2012
                • 1417

                #97
                October 27th ======================

                Got the brass tubing from town.
                I have made up 5 through tubes.
                I have spun them in the drill press to clean them up and get a fine shinny finish for the rubber boot fit.

                I have installed the 3 tubes in the rear end cap.
                The cap is clamped in the small table vise to hold the cap upright and levels so the glue can cure without running off the cap.

                The front cap has been cleaned and washed with soap to get the silicone grease off.
                I will install the tubes Friday. (tomorrow is a VA hospital day)

                I have gone through my parts box and found several rubber boots of the correct size.

                I test fit a boot to check clearance to the gear box.
                Looks like I need to file a shallow notch on both sides to get clearance for the boot.
                It is the accordion part that touches.
                I need about 1/8" more room.
                Not a problem, there is enough gear box there that I can remove the material needed.

                The original boots and trough tubes stuck out past the gear box but this time I have the boots up against the end cap.
                The magnetic connectors take up more of the control rod so I need it as short as I can get it coming out of the end cap.

                Comment

                • Ralph --- SSBN 598
                  Junior Member
                  • Oct 2012
                  • 1417

                  #98
                  October 28th ======================

                  Not much time but I made it out to the shop.
                  Cleaned off the excess glue on the rear end cap.
                  Needed to open up 1 through tube where glue got in to the tube while pushing through the end cap.
                  Made sure the control rods fit and moved smoothly.

                  Cleaned up the 2 through tubes for the front end cap.
                  Covered with glue and installed.
                  Will cleanup tomorrow.

                  Comment

                  • Ralph --- SSBN 598
                    Junior Member
                    • Oct 2012
                    • 1417

                    #99
                    October 29th ======================

                    Through tubes have been cleaned up.
                    Made sure the control rod tubes slide through easily and smoothly.

                    Checked gear box clearance for boots.
                    Well it looks like I needed to file on the gear box to get the boots to fit straight on to through tubes.

                    Modification to gear box has been done and the boots have clearance to work.

                    One more issue to attack.
                    With the pressure plate that held the o-rings in place no removed, I need to do something to cover the shaft cup seal.
                    Not a problem.
                    The first version of the end cap had rubber boot seals.
                    Looked on the work bench and found the original gear box cover plate that has a tab sticking up to cover the cup seal.
                    Did some measuring and I can just add this cover plate on to the existing gear box end plate.
                    I needed to sand off all the paint and old glue from both sides of the plate and the end of the gear box.
                    Stuck the 2 propeller secondary shafts in to the gear box to line up all the holes. (2 output shafts, motor shaft and 2 mounting bolts)

                    Applied silicone grease to the secondary shafts and pushed through the gear box.
                    Applied glue to all surfaces to be glued and slide them together.
                    Using the secondary shaft dog bone connectors to turn the shafts to make sure they are straight and run free without binding.
                    Slowly clamped in to the small table vise.
                    Checked often that the secondary shafts turn freely.
                    Got the gear box clamped tight in the vise.
                    Turned the secondary shafts and slide them out and cleaned the glue off.

                    Tomorrow I will start reassembly of the front and rear electronics trays to the end caps.

                    Comment

                    • Ralph --- SSBN 598
                      Junior Member
                      • Oct 2012
                      • 1417

                      October 30th ======================

                      Got in to the shop this afternoon.
                      Cleaned up the gear box.
                      I filed in two areas so the rubber boots will fit and have clearance.
                      This was a slow process because one bolt is very close to the area being filed.
                      Got it.

                      Moved on to the front tray and end cap.
                      Mounted the tray to the end cap.
                      Tested system to see which servo is which.
                      Problem.
                      Both worked but the horns did not move.
                      They both make noise but the gears inside are not engaging.
                      This was my fault.
                      I dropped the tray last week and it landed on the control rods.
                      They did not bend so I thought they might be alright.
                      I was wrong.
                      Replace both servos. (I have a different servo to use now)

                      Checked the original control rods.
                      Too short.
                      Looked for the control rods from the original build.
                      Found them but I have already taken parts from them so they are not usable for this.

                      Make new parts from brass tubing and brass rod.
                      Find new clevis for he ends. (I knew I had gotten a new bag of those just 2 weeks ago)
                      Sure do get buried on the bench quickly.
                      Found them. (I had dropped them in to the empty Gato hull)

                      In the process of making the 2 new control rods.

                      That is all the time I had in the shop today.
                      I have more time tomorrow.

                      Comment

                      • Ralph --- SSBN 598
                        Junior Member
                        • Oct 2012
                        • 1417

                        October 31st ======================

                        This afternoon, I was able to finish cleaning up the excess glue off the end caps.

                        Now on to the control rods.
                        I need to make new ones or extend the existing ones.
                        The front 2 control rods had to be rebuild to get the needed length.
                        Made new tubes and soldered them in place after measuring for length.

                        Put the in the end cap and turned on the system to get the control rods adjusted.

                        Then on to the 3 control rods in the rear end cap.

                        I was able to heat the tubes and lengthen them by pulling the 1/16" rod out from in side the 1/8" tube which has shim tubes in them.
                        I had to pull about 3/8" from both ends to have enough inside to make a good solid connections.
                        This made the air vent control rod long enough to work.

                        I had to make 2 new center tubes for the rudder and rear planes to get the needed length.

                        Turned on the system to get the control rods adjusted on the servos for proper movement.

                        Every thing is hooked up and works correctly.

                        Next will be to get everything back in the cylinder and tested before water testing.

                        Here are the two end caps with control rods in place.

                        Comment

                        • Ralph --- SSBN 598
                          Junior Member
                          • Oct 2012
                          • 1417

                          November 2nd ======================

                          Things have been very slow here.
                          Yesterday morning I sold an old junk truck to a scrapper.
                          In the process of removing small wooden junk from the back, I stretched out and lifted too much.
                          I pulled muscles in my lower back.
                          Makes it difficult to stand straight up.

                          So I did not work in the shop yesterday.
                          Today I went out and did a little work.
                          Ended up stopping before I finished what I was doing.

                          Some where I have muscle relaxing medication for this.
                          I am not a meds taking kind of guy but this may require the help.

                          Any way, what I got done.
                          I turned on the radio system and set the bow planes servo to center and the retreacts servo to full up.
                          This will give me a setting point to adjust the control rods coming out of the end cap.

                          I turn everything off and put the electronics tray in the cylinder.
                          The cylinder indexes in the hull on a pin in one of the ballast tank flood hole.
                          Once in place the cylinder will not move front to back or twist side to side.

                          Now I can measure and adjust the control rods from the forward planes.
                          Got that done.

                          Removed the cylinder from the hull and removed the front tray from the cylinder.

                          The rear tray has the rudder and rear planes centered so adjusting the length of the control rods can begin.
                          However, when I stood up to put the cylinder in the hull, my back was very insistent that I was done for the day.

                          I am getting old and I am starting to listen to these messages.
                          --------------------
                          What I am adjusting is the length of the control rods coming from the planes horns.
                          The control rods are adjusted by bending the front rods and resoldering the rear rods.

                          I have 1/4" movement on the control rods coming through the end caps and they are currently set to center of adjustment.
                          You can see the adjustment on the photo above.

                          The magnets I am using are 52N 1/16" diameter.
                          As I was adjusting the rods, the magnets are strong enough to pull the end cap part way out of the cylinder when there was a gap between the magnets. (no o-ring installed)

                          At least I got something done today.
                          Hopefully a little more tomorrow.

                          Comment

                          • Ralph --- SSBN 598
                            Junior Member
                            • Oct 2012
                            • 1417

                            November 18th ======================

                            I am still here. <g>

                            The back issue has gone on for some time but is not better to where I can stand up and get around.
                            Not lifting anything at all so as not to back slide.

                            11 days ago, I was at the VA for more skin cancer surgery.
                            This was between my nose and eye in the socket.
                            Does not hurt but the bandage covering the hole has my eye lid doing strange things.
                            Got the report on the area removed which came back negative. (good)

                            Had other life stuff to do and get through.

                            I hope to be back in the shop this coming Saturday.
                            I want to get the rear electronics tray back in the cylinder and the 3 control rods measured and adjusted.

                            I will do what I can as long as I do not hurt myself at all.

                            Comment

                            • Ralph --- SSBN 598
                              Junior Member
                              • Oct 2012
                              • 1417

                              November 21st ======================

                              Finally back in to the shop.

                              Assembling the cylinder.
                              The front goes in first now instead of the rear.
                              This takes care of all the extra wire length to get through the ballast tank tube.
                              Before all the extra wires would bunch up behind the tray and stop it from going in all the way with out a lot of trouble to get it to fit.

                              Now that the front tray slips in all the way with out the wire issues, I found another issue.
                              The tray is aluminum and when in the cylinder the battery tray bottom touches the cylinder not letting the tray sit straight.
                              Removed the tray from the cylinder and measured it to the end cap.
                              There is room to move the left mounting screw up 1/8" on the end cap.
                              Drilled the hole for the screw and moved it.
                              While drilling the hole I noticed the tray was not sitting at 90 degrees to the end cap.
                              Put the tray in to the short test cylinder.
                              Yep it was not 90 degrees.
                              To fix this, it was a matter of bending the mounting tabs on the tray while on the end cap.
                              When in the cylinder the end cap did not flush up on the cylinder having a 1/8" gap on one side.
                              After straightening the tray, the cap sits flush on the cylinder end.

                              Now to the rear tray.
                              This tray was okay before and it slides right in.
                              After all the small modification to the tray, I have abut 1" empty room between the tray and the ballast tank frame.
                              All the extra wires fit there without pushing on the tray.

                              So all the electronics are in the cylinder and the 2 safety cables are installed.

                              Time to power up the system and test everything.
                              Test was good.

                              Put the cylinder in to the hull.
                              Starting at the front I have to adjust the control rod lengths.
                              They are too long after going back to the boot seals.
                              The bow planes retract and pitch control rods are about 3/8" to long.
                              These control rods have large bends in the to get the rods from centerline at the bow planes control horns to the cylinder push rods which are about 3/4" off center to each side.
                              Adjusting was a matter of changing the bends while having he system turned on so I could adjust for the servo travel.
                              Done.

                              Now to the rear control rods.
                              Rudder and rear planes.
                              These rods are almost straight so to adjust them I will be cutting the shorter.

                              With the system on and all controls center, I can see the over lap of the control rod magnets.
                              The rudder was 1/2" to long and the rear planes was 3/8" to long.

                              I glue the brass rods in to the nylon clevis are make a flat area on the rods.
                              I was able to twist on clevis off but the other rod broke right at the end of the clevis.

                              Cleaned the glue of and put the clevis on the rods and put back in the hull.
                              This I can move the clevis on the rods to find center and mark the rods.
                              Taken out of the hull, I apply glue and slip the clevis n to the rods.
                              This requires pliers due to the flatten rod ends.

                              I have about 3/8" of adjustment on the rod magnet connectors so close is good.
                              I can also bend the rods if need be.

                              The glue on the rods is curing in the small vise.
                              Will install tomorrow.

                              Got to remember to put the 2 rubber boots on these control rods before installing.

                              Comment

                              • Ralph --- SSBN 598
                                Junior Member
                                • Oct 2012
                                • 1417

                                November 23rd ======================

                                The rudder and rear planes control rods have been measured and cut.
                                Put the cylinder int he hull and with the radio on I adjusted the control rod lengths.

                                Put the ballast tank control pieces back on the control rod.
                                Yes, I remembered to put the rubber boots on the control rods.

                                Maybe tomorrow or Friday I will do the in water testing or the cylinder.
                                If that goes okay then trim the boat.

                                Comment

                                Working...
                                X