Search for the perfect rescue boat!

Collapse
X
 
  • Time
  • Show
Clear All
new posts
  • Larry Kuntz
    SubCommittee Member
    • Feb 2003
    • 524

    #46
    Actually the drive I was

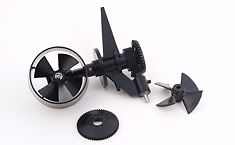
    Actually the drive I was trying to remember was the Schottel II drive from Hobby Lobby for $134.90

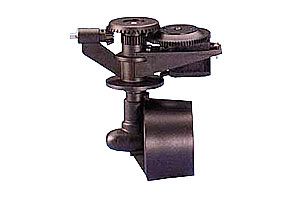
    The second one pictured will do 180 degrees and I believe it's a Graupner.
    These are the fully steerable (up to 180 degrees) drives. This is what you really need Dave.
    You mentioned the "Z" drive which is a model version of an OMC or MerCruiser outdrive.
    "What goes down does not always come back up"

    Comment

    • bigdave
      Junior Member
      • Feb 2003
      • 3596

      #47
      Love the boat but what

      Love the boat but what if the sub is on the bottom of the pond?
      Will you be putting some kind of hooking device on a small rc winch or just hope that the sub safe will surface the sub??
      Ron

      P.S. great work as always
      Thanks.
      Alas, If the sub is sunk that could be a problem.
      The tug is just for stranded surface rescue's. BD.
      sigpic"Eat your pudding Mr Land"
      "I ain't sure it's pudden" 20K

      Comment

      • bigdave
        Junior Member
        • Feb 2003
        • 3596

        #48
        That is what is called

        That is what is called a Z-drive Mr K.
        It is the one I was referring too.
        It is a great way to go but would not work on the hull design.
        They are very pricey as well although not as bad as a Voith drive.
        This drive was easily made from parts I had.
        Always thinking though Mr Kuntz!! BD.
        sigpic"Eat your pudding Mr Land"
        "I ain't sure it's pudden" 20K

        Comment

        • hakkikt
          Junior Member
          • Jun 2006
          • 246

          #49
          You really ought to have

          You really ought to have a Voith-Schneider prop on that boat, Dave

          Comment

          • bigdave
            Junior Member
            • Feb 2003
            • 3596

            #50
            Well! I was able to

            Well! I was able to get a little more done today.
            I finished the shimming and sealing the drive system.
            There is not much clearance between the prop and nozzle so you have to get the mounting right so it will not hit when the nozzle swings.
            I got a little creative and the same screws that hold on the nozzle lower support also seal themselves and hold the motor mount as well.
            I tested the system in the laundry tub moving the nozzle by hand and the thrust is directed nicely.
            Once I get a servo hooked up I can see how she spins.
            After the R/C system is in I will remove all the running gear and finish sanding and priming the hull. Then put the deck on. BD.


            sigpic"Eat your pudding Mr Land"
            "I ain't sure it's pudden" 20K

            Comment

            • bigdave
              Junior Member
              • Feb 2003
              • 3596

              #51
              I had to redesign part

              I had to redesign part of my nozzle support today.
              I was getting to much binding when trying to swivel the nozzle.
              I ended up making an adjustable bearing for the bottom mount that I epoxied in once the alignment was in. I also epoxied in the servo mount.
              I should be able to test her in the tub tomorrow once the epoxy dries. I still have to figure out battery, R/X and ESC mounting. But for know I will just toss the gear in the bottom.
              BD.
              sigpic"Eat your pudding Mr Land"
              "I ain't sure it's pudden" 20K

              Comment

              • bigdave
                Junior Member
                • Feb 2003
                • 3596

                #52
                Here is a short very

                Here is a short very bad video I did today in the laundry tub.
                I really needed my friend Steamboy to run the camera.
                I can safely say as far as I am concerned the Toot is a complete success.
                I was doing 3-point turns in the sink.
                She spins in reverse as good as she does foreword.
                I tried to put the pedal to the metal at the end but the thrust started to swamp the rear end.
                BTW- The batteries in the bottom are just for weight.
                I was powering the little beasty on a small Lipo pack.
                The high wind Venom motors are very efficient. BD.
                I trashed the video.
                It was just to bad to keep.
                sigpic"Eat your pudding Mr Land"
                "I ain't sure it's pudden" 20K

                Comment

                • bigdave
                  Junior Member
                  • Feb 2003
                  • 3596

                  #53
                  I worked a little on

                  I worked a little on fitting the deck today. The deck is cut from a section of premade 12x12x1/16” fiberglass sheet.
                  I used the template for the main hull sections to trace and pre-cut the deck. Then sanded to final fit.
                  I had searched for a way to get into the hull and still have it seal to keep things watertight. I found a nice size Tupperware type container that I will cut the top off under the flange and Goop to an opening in the deck. I will be able to just snap the top on and off to get inside. This will be under the cabin.
                  As for the cabin I am trying to figure out what I want to do. One idea is to modify this cabin I had started for a larger tug. I know it is a little on the big side but I kind of like the “Toon” look it gives the tug.
                  Right now I am thinking of going with an old steam tug look. I don’t know if they ever had steam powered Logging tugs but if they did I would like to try and do her as I would imagine one would look. Lots of wood trim and a steam stack. But time will tell. BD.


                  sigpic"Eat your pudding Mr Land"
                  "I ain't sure it's pudden" 20K

                  Comment

                  • bigdave
                    Junior Member
                    • Feb 2003
                    • 3596

                    #54
                    I epoxied on the deck

                    I epoxied on the deck today. I ended up putting in two access openings.
                    I installed an end cap at the rear over the rudder post and linkage.
                    I did this for two reasons. To make it easier to access the linkages and to add bracing in the rear for the tow post.
                    Not sure that is what you call it but it is where you secure the tow line.
                    The post will go through the end cap and screw into the bottom of the hull. The post will also hold the end cap in place. BD.
                    sigpic"Eat your pudding Mr Land"
                    "I ain't sure it's pudden" 20K

                    Comment

                    • bigdave
                      Junior Member
                      • Feb 2003
                      • 3596

                      #55
                      I just finished making and

                      I just finished making and installing my tow post.
                      I made the parts on my lathe. I tried to take a photo half inside and half outside the hull to see the post installation.
                      You can see the threaded attachment point I made and epoxied to the bottom of the hull. The threaded rod screwed into the post is inserted into the hole in the end cap with an O-ring and then screwed into the attachment point.
                      This is the thickest part of the hull so it should be very strong. BD.


                      sigpic"Eat your pudding Mr Land"
                      "I ain't sure it's pudden" 20K

                      Comment

                      • raalst
                        Senior Member
                        • Feb 2003
                        • 1229

                        #56
                        Dave, what material and glue

                        Dave, what material and glue did you use to fix these rails
                        on which the deck is resting ? I'm looking for info on
                        putting together GRP's with other materials...

                        Comment

                        • bigdave
                          Junior Member
                          • Feb 2003
                          • 3596

                          #57
                          The strips are 1/4"x 1/16"

                          The strips are 1/4"x 1/16" Plastruct strips. It was easy to bend to the hull curve. They are attached with CA glue.
                          The deck was attached with Goop epoxy.
                          I like it very much. It has a 20 min working time stays where you put it and the joints can't be broken.
                          I have tried.
                          The material breaks first. BD.
                          sigpic"Eat your pudding Mr Land"
                          "I ain't sure it's pudden" 20K

                          Comment

                          • crazy ivan
                            SubCommittee Member
                            • Feb 2003
                            • 659

                            #58
                            Hey BD,

                            I can't wait to

                            Hey BD,

                            I can't wait to see the animated little crewmen who are going to heave the tow line connected to that post over to the stricken sub. Maybe you could train some dwarf hamsters to do the job.
                            sigpic
                            "There are the assassins, the dealers in death. I am the Avenger!" - Captain Nemo

                            -George Protchenko

                            Comment

                            • bigdave
                              Junior Member
                              • Feb 2003
                              • 3596

                              #59
                              Actually I was thinking of

                              Actually I was thinking of a harpoon gun to spear the sub so I could drag my victim (I mean rescue-ee) to their fate (I mean safety) Ha!! BD.
                              sigpic"Eat your pudding Mr Land"
                              "I ain't sure it's pudden" 20K

                              Comment

                              • bigdave
                                Junior Member
                                • Feb 2003
                                • 3596

                                #60
                                Well, http://www.subcommittee.com/forum/icon_rolleyes.gif today was the

                                Well, today was the day.
                                I decided I had put it off for to long and did the final sanding and prime the hull. After 4 HRS I had enough fiberglass dust and said that's it!
                                It is a tug boat and this is as far as I go.
                                The shape is right on and the surface is smooth but after the primer I still have some imperfections.
                                But as I said, it is a tug boat and it is good enough for me.

                                My buddy Steamboy would be pulling his hair out (If he had any) and be needing of 02 if his finish looked like this.
                                Here is a photo with fresh primer. It looks OK but if you get close enough it starts to look, well!! Not so good!!
                                But she will be a working tug and this works for me.
                                And as Robert Conrad once said,
                                "Go ahead knock this battery off my shoulder, I dare you!"
                                BD.
                                sigpic"Eat your pudding Mr Land"
                                "I ain't sure it's pudden" 20K

                                Comment

                                Working...