Walrus class 1/60 scale - Scaleshipyard

Collapse
X
 
  • Filter
  • Time
  • Show
Clear All
new posts
  • salmon
    Treasurer
    • Jul 2011
    • 2327

    Walrus class 1/60 scale - Scaleshipyard

    I will make this a build......I just need advice.
    I never had this happen before and sanded it down once already. I was applying a clear gloss coat over the sail and this happened. I need your expert thoughts!
    Click image for larger version

Name:	Walrus_Paint_Disaster.jpg
Views:	1
Size:	89.2 KB
ID:	137559
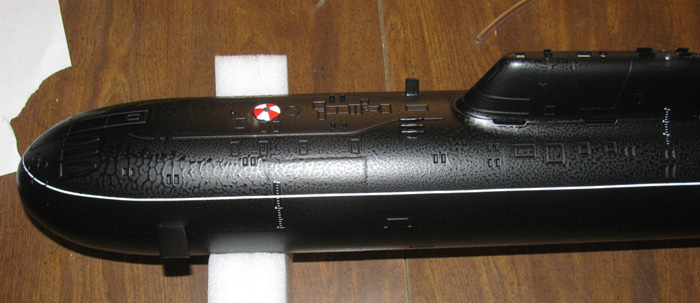
    it also might have destroyed my decal I made. it looks like it is wrinkled up and lifted. I am going to let it dry.
    I painted this indoors (73 degrees F) and humidity is at 55%. Is this a reaction to the base paint also an enamel. Used Rust-oleum for both the black base and clear coat.
    Last edited by salmon; 01-25-2019, 09:15 PM.
    If you can cut, drill, saw, hit things and swear a lot, you're well on the way to building a working model sub.
  • Ralph --- SSBN 598
    Junior Member
    • Oct 2012
    • 1417

    #2
    I know exactly what you are going through.

    When I built the Akula II, I used the Rust-oleum clear to clear coat the hull.
    Results were not what I was expecting.


    I ended up doing a complete refinish of the hull by slowly sanding down the clean coat to remove it and even some of the factory black had to go.

    Now about your decal.
    On my Skipjack when I did a repaint, I taped around the decals with about 3/16" extra past the decals.
    I sanded with 800 wet/dry sand paper to get the ridges down not cutting in to the decal.
    Then I used Turtle Wax Polishing Compound to polish the clear coat on the decal to make it clear again.

    After getting the decal cleaned up, I covered it with blue tape and sanded the rest of the hull.
    I was able to save the decals on the Skipjack but I did not save the draft marks on the Akula II.
    I polished too deep in to the decal instaead of stopping when the clear coat went clear.

    I re clear coated with Krylon Satin Clear and I toss the Rust-olium.

    My Akula II build has the re paint start to finish about half way through the page.


    There are no decals on my Akula II.
    Didn't want to spend the $17 plus shipping to get new ones.
    I do keep an eye out for draft makes that might work but at this point, it really doesn't matter.

    Comment

    • eckloss
      • Nov 2003
      • 1196

      #3
      I'm no expert in paint. But at one of SubComEast's fun build days, the topic of Rustoleum came up. Correct me if I'm wrong, Jim, but wasn't that the paint you used on the rescue craft that bubbled and cracked?

      Comment

      • bob_eissler
        SubCommittee Member
        • Aug 2005
        • 331

        #4
        Hate Rustoleum primer. Almost impossible to get any other black primer out of a spray can around here. I don't think you want a clear gloss or satin finish on a sub in the water. They usually look too weathered for that.

        Comment

        • lhdockyard1
          SubCommittee Member
          • Dec 2011
          • 281

          #5
          Rustoleum will do that if the base coat is not thoroughly cured before applying the clear coat (or another coat of the same color for that matter) And for a thorough cure we are talking a minimum of 3 really good warm dry days. I usually give it at least a week when working with rustoleum. Quite honestly I hate Rustoleum for this among other reasons. In my opinion if looking for paints/primers in a spray can Dupli Color is the best. Their primers dry fast and hard and sand well and their color coats work great as well. They can be tough to find at stores but can be ordered online from a number of places. This is pretty much all I use anymore when working with spray cans for large objects. Dupli color has black, red oxide and gray primers.
          Hope this helps

          Don

          Comment

          • bob the builder
            Former SC President
            • Feb 2003
            • 1364

            #6
            Been there, done that.

            A few things I've learned:

            1.) Be sure to use the same types of paint for primer, color and clear. NEVER use Lacquer over enamel.
            2.) Crazing typically happens due to paint expansion. This can be mitigated by ensuring you use light coats, and properly controlling the temperature and humidity.
            3.) Ensure that you allow all of the previous coats to dry FULLY. Depending on your environment, this could take several days up to a week. Fight the urge to plow ahead, one coat after another. This is important between switching from primer to color and color to clear. I get away with multiple coats of color a few hours apart, but always ensure I wait a few days between switching to the clear coat
            4.) As Bob pointed out, gloss or satin looks terrible on scale submarines. For the best looking results, you want a matte finish.
            The Nautilus Drydocks - Exceptional Products for the World of R/C Submarines - www.nautilusdrydocks.com

            Comment

            • subdude
              Official Peon
              • Feb 2003
              • 664

              #7
              Erich,

              Close. The first coats on the rescue boat were the "new" formula Krylon, which they claim to be "paint and primer in one can". Total crap, it crazed and wrinkled like crazy. I sanded it off and tried again, same results.

              I was using Krylon because I absolutely despise Rustoleum. In my experience Rustoleum drying time can be best measured with a calendar.

              I finally used some cheap generic paint from the local Ace hardware which did okay.

              What really ticked me off is that I've been using Krylon for decades, especially their semi-gloss black which to my eye looks great on subs. But since the new "paint and primer in one" BS, I've given up on it. I actually have a standing request for a bunch of my friends. If they ever are in a store and see cans of old style Krylon semi-gloss black, buy every can they have and I'll pay for it.

              I'll probably go to Dupli-color now. I've been using Tamiya fine primer and Model Master dullcoat lately with good results.

              Jim
              SubCommittee member #0069 (since the dawn of time.....)

              Comment

              • salmon
                Treasurer
                • Jul 2011
                • 2327

                #8
                Thank you all for your help!
                The decals looked great prior to the gloss coat.
                I am using gloss for weathering effects I want to do (it is not the final finish), but I can forgo that. Looks like I am back to sanding and printing out some new decals. I have joined the ranks of not liking Rustoleum.
                If you can cut, drill, saw, hit things and swear a lot, you're well on the way to building a working model sub.

                Comment

                • salmon
                  Treasurer
                  • Jul 2011
                  • 2327

                  #9
                  I went to a San Francisco FunRun. While at the casting ponds, Will Oudmayer handed me his transmitter to his Walrus (I believe). He gave me instructions and let me loose on running his sub. I got it to hover and sent it around the pond only to return to me still in that hovering depth. I then realized I was hooked and Will was a drug dealer only it was not drugs, but piston subs. I was now a piston addict.

                  Will suggested I build my own Walrus. This is how it all started.

                  Tom Anderson made the original master and sold the molds to Scale Shipyard after he made a small run of hulls for himself and two others. Will said I should ask Tom if he had one left. Tom did have one, but it was in rough shape. If I wanted it, it was mine. I accepted his offer.
                  Will sent me a list of parts, he was willing to make me the WTC. I was blown away. The Architect was going to build the WTC! It was going to take time for me to collect the money and parts, but I began looking for component right away.
                  Once the hull arrived, I asked Scale Shipyard if they had any planes. I purchased what they had. I received the aft planes within days of ordering. I did not have a sail plane, I will need to make set.


                  The first thing I did was to make tabs to align the top and bottom hulls.
                  Click image for larger version

Name:	Walrus_Build_001.jpg
Views:	1
Size:	8.3 KB
ID:	132757
                  Placed wax paper down on the side of the hull and several layers of fiberglass, created a curve that will be used to align the hull.
                  Click image for larger version

Name:	Walrus_Build_004.jpg
Views:	1
Size:	7.7 KB
ID:	132758
                  Once it cured, squares were cut out.
                  Click image for larger version

Name:	Walrus_Build_008.jpg
Views:	1
Size:	9.4 KB
ID:	132759
                  and epoxied in
                  Click image for larger version

Name:	Walrus_Build_010.jpg
Views:	1
Size:	12.3 KB
ID:	132760
                  If you can cut, drill, saw, hit things and swear a lot, you're well on the way to building a working model sub.

                  Comment

                  • Ralph --- SSBN 598
                    Junior Member
                    • Oct 2012
                    • 1417

                    #10
                    Tom, do you have full size drawing of the needed planes?
                    Or even a different scale is fine.
                    I build using 1/16" sheet plastic and making planes is a simple task.
                    Because they are made up of several layers of sheet plastic the control rods can be included during laminating.

                    I would be willing to give the planes a go.
                    Ralph

                    Comment

                    • salmon
                      Treasurer
                      • Jul 2011
                      • 2327

                      #11
                      Thank you for the offer. This sub is built and has run at Yorba Linda. I am just documenting the build.
                      Click image for larger version

Name:	Walrus_Build_245.jpg
Views:	1
Size:	19.9 KB
ID:	132768
                      If you can cut, drill, saw, hit things and swear a lot, you're well on the way to building a working model sub.

                      Comment

                      • JWLaRue
                        Managing Editor, SubCommittee Report
                        • Aug 1994
                        • 4281

                        #12
                        Tom,

                        ...20 minute epoxy? What kind of experience have you seen using that? I've had less than stellar luck with any/all epoxies that take less than an hour to cure if the area is exposed to water for long periods of time.

                        -Jeff
                        Rohr 1.....Los!

                        Comment

                        • salmon
                          Treasurer
                          • Jul 2011
                          • 2327

                          #13
                          Jeff,
                          I had figured Marine would work, ultimately, these tabs were removed. I ultimately had trouble getting the tabs to stay (wit a little effort they popped off. I found that cleaning and sanding and still did not get a great bond together. Is that what you found?
                          If you can cut, drill, saw, hit things and swear a lot, you're well on the way to building a working model sub.

                          Comment

                          • JWLaRue
                            Managing Editor, SubCommittee Report
                            • Aug 1994
                            • 4281

                            #14
                            What you've described sounds like there was still some wax on the surface resulting in minimal adhesion. The other possibility is that the 'marine adhesive' may not be an epoxy and as a result is not providing a good bond to polyester hull material. I've been told that to bond poly to poly that a good epoxy is needed. I should note that I've never tried using what you showed in the photo.

                            In those instances where I used the 20- or 30-minute epoxy, the epoxy itself became soft when immersed for other than very short periods of time. It can best be described as rubbery or gummy in texture. Once it became soft, the parts would slowly come apart. I ended up going with the West Systems epoxy which has withstood running periods of many, many hours over many years of use.

                            Hopefully this helps?

                            -Jeff
                            Rohr 1.....Los!

                            Comment

                            • Ralph --- SSBN 598
                              Junior Member
                              • Oct 2012
                              • 1417

                              #15
                              Reading more of the threat I realized this is one of the boat you were running last Saturday.
                              Given time, I will catch up. ;^)

                              Comment

                              Working...
                              X