Engel Akula II Build Questions

Collapse
X
 
  • Time
  • Show
Clear All
new posts
  • Oldus Fartus
    Member
    • Jul 2016
    • 185

    #46
    Under-Pressure Function

    Originally posted by JWLaRue View Post
    ....hmmm.....have you tried to reproduce an under pressure condition to confirm?

    -Jeff
    Yes, I can duplicate exactly what Gregor says and it's the reason everything works on the bench but stops after the first dive.

    As soon as I release the breather everything works normally again...wonder why there is no mention of the under pressure function in the instructions?

    I wonder too if there is a threshold adjustment or if it is a fixed setting?
    Comment

    • Oldus Fartus
      Member
      • Jul 2016
      • 185

      #47
      Originally posted by Ralph --- SSBN 598 View Post
      If the hull halves are hard to take apart, you can also move the piston to fill.
      This movement needs to be very small and might need a couple of hits on the control.
      This reverses the pressure from negative to positive.
      Be careful opening the hull until you hear the pressure release.
      Or just remove the breather plug?

      Comment

      • Ralph --- SSBN 598
        Junior Member
        • Oct 2012
        • 1417

        #48
        On my boat the access hatch on the bottom of the tail cone has screw installed (by me) because I got tired of loosing the hatch when the pistom was emptied and the water was push out the tail cone.
        =================
        This pressure issue, just asking, is the breather plug installed and not leaking?

        Comment

        • Oldus Fartus
          Member
          • Jul 2016
          • 185

          #49
          I use Engel's test procedure for a dry hull:

          1. Close hull with piston in Empty position and breather plug in place.
          2. Fill piston tank dry.
          3. Wait 1 minute.
          4. Open breather plug (escaping air is audible).
          5. Empty piston dry.
          6. Close breather plug.
          7. Fill piston tank (with air).
          8. Place model in water and look for bubbles.

          I observe a few small escaping bubbles from the area in the rear compartment so the leak must be fairly small?

          Comment

          • JWLaRue
            Managing Editor, SubCommittee Report
            • Aug 1994
            • 4281

            #50
            Pete,

            Can you see where the bubbles are coming from? For example, one of the pushrod bellows or the prop shaft? Do they show up only when you fill the piston with water? Have you ever seen any indication of water inside the hull?

            -Jeff
            Rohr 1.....Los!

            Comment

            • Oldus Fartus
              Member
              • Jul 2016
              • 185

              #51
              Originally posted by JWLaRue View Post
              Pete,

              Can you see where the bubbles are coming from? For example, one of the pushrod bellows or the prop shaft? Do they show up only when you fill the piston with water? Have you ever seen any indication of water inside the hull?

              -Jeff
              I'm going to have to set aside some "tub-time" and go after the leak on a step-by-step basis.
              I will try to eliminate each potential source of the leak one at a time.
              There is always a small (<1/2 tsp) amount of residual water in the hull after a few dives...

              Comment

              • Ralph --- SSBN 598
                Junior Member
                • Oct 2012
                • 1417

                #52
                Water in the hull....hum.

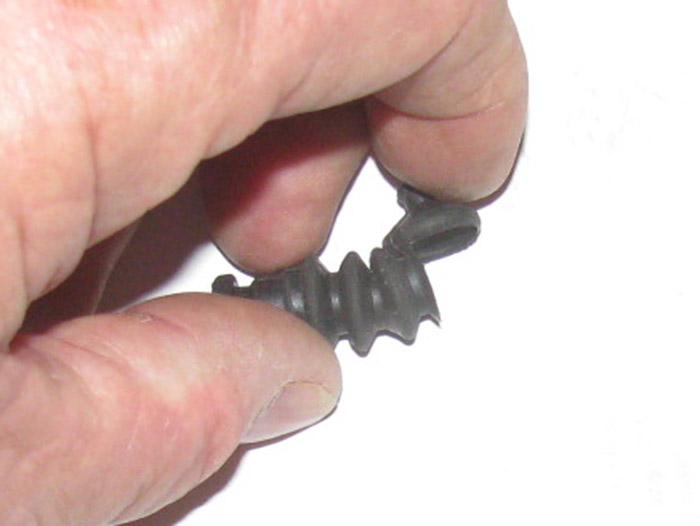
                I use the bellows seals on a couple of my boats.
                I find that the first checking is to look over the bellows.
                They seem to split down in the folds that go towards the shaft.
                These splits are hard to find but if you pull the bellows sections a part, the splits will show themselves.


                Never had a propeller shaft leak.

                Did have the hull half o-ring come up with a knick or cut that let air pass under pressure.
                Replaced it and the leak stopped.

                Basically these are the only place that will leak.

                Bellows. Check the bellows.
                DO NOT apply grease or silicone to the shafts going through the bellows.
                This will also allow air to pass.
                Last edited by Ralph --- SSBN 598; 07-05-2019, 11:21 AM.

                Comment

                • JWLaRue
                  Managing Editor, SubCommittee Report
                  • Aug 1994
                  • 4281

                  #53
                  ...what Ralph said...!

                  -Jeff
                  Rohr 1.....Los!

                  Comment

                  • Oldus Fartus
                    Member
                    • Jul 2016
                    • 185

                    #54
                    I replaced and checked the o-ring so I don't think that is the problem.

                    I will check the bellows for sure.

                    Thanks,

                    Pete

                    Comment

                    • Ralph --- SSBN 598
                      Junior Member
                      • Oct 2012
                      • 1417

                      #55
                      A quick suggestion on checking the bgellows.
                      Remove the control rod from the bellows.
                      I didn't do this a couple of times and continued to have air leaks.
                      It wasn't until I removed the control rod and could bend the bellow did the break show itself.

                      Comment

                      • Oldus Fartus
                        Member
                        • Jul 2016
                        • 185

                        #56
                        Bellows

                        Originally posted by Ralph --- SSBN 598 View Post
                        A quick suggestion on checking the bgellows.
                        Remove the control rod from the bellows.
                        I didn't do this a couple of times and continued to have air leaks.
                        It wasn't until I removed the control rod and could bend the bellow did the break show itself.
                        I will check that this weekend.

                        How long were your bellows in service?

                        Thanks!
                        Last edited by Oldus Fartus; 07-05-2019, 04:40 PM. Reason: additional question

                        Comment

                        • Ralph --- SSBN 598
                          Junior Member
                          • Oct 2012
                          • 1417

                          #57
                          The bellows that came with the kit lasted 2 open water runs.
                          I had bubbles on the first run but did not find the cracks until later.

                          The bellows I am using now have been in the boat about 2 years and run about 6 times a year .
                          Runs are 2.5 to 3.5 hours long with the boat in the water continually.

                          I currently have these in my parts kit.


                          The small end is very tight and hard to get on but it will with a little effort.

                          Comment

                          • Oldus Fartus
                            Member
                            • Jul 2016
                            • 185

                            #58
                            Originally posted by Ralph --- SSBN 598 View Post
                            The bellows that came with the kit lasted 2 open water runs.
                            I had bubbles on the first run but did not find the cracks until later.

                            The bellows I am using now have been in the boat about 2 years and run about 6 times a year .
                            Runs are 2.5 to 3.5 hours long with the boat in the water continually.

                            I currently have these in my parts kit.


                            The small end is very tight and hard to get on but it will with a little effort.
                            Sounds like I should do a PM on those bellows!

                            Comment

                            • Charlotte514
                              Junior Member
                              • Oct 2019
                              • 29

                              #59
                              Hi All - in process of building- have run into the issue of very tight dive plane and rudder linkages. Spoke to Engel but still confused. Do you bend the 2mm linkages in the wet section? How much? Thanks

                              Comment

                              • Ralph --- SSBN 598
                                Junior Member
                                • Oct 2012
                                • 1417

                                #60
                                I remember my rudder and stern planes requiring a little work to get them to operate smoothly and easily.
                                Looked back through my build log.
                                -------------
                                Here was what I did.
                                Disconnect the control rods to the servos.
                                Remove the servo horns to make access to the control rods easier. (this is nt necessary if you can get to the control rods)
                                With needle nose pliers, hold one of the control rods and move it back and forth to test ease of operation of the rudder and then the planes.
                                If they move easily then the problem is not the rubber boot seals or the lcontrol rod linkage.
                                If the rod is hard to move, then removing the rod so you can run a file through the brass bushing tube.
                                Or using 200 sand paper sand the outside of the rod going through the frame. bushing.

                                The ends of the through tube may have slight burs on the end cuts that where not cleaned of before assembly at the factory
                                ---
                                Now where I found the problem was forward of the servos.
                                The frame needed to me modified just a little.
                                Reinstall the servo horns and connect the linkage.
                                Center the servos and level the planes and center the rudder.

                                Tighten the rod in the horn connector.
                                Slowly move one of the servos watching where the front end of the rod goes through the frame.
                                Do this with both servos.
                                I fond the the rod was binding in the hole the rod goes through when the servo was past center in both directions.
                                When the servo is back, the rod may clear the frame complete making this not a problem.
                                But when the rod goes forward, the rod moves to where it rubs on the frame and makes movement harder.

                                I removed what was necessary to cut with a razor knife and or file the hole bigger in the dirrectio where the control rod contacted the frame.
                                I did not have to remove much material to get the rods to clear of the frame holes.
                                All of this took me about 20 to 30 minutes to find the issue and fix it.
                                I have been running my boat for about 2 years now and never a problem. (except running the batterys down enough t have to be rescued by another boat)
                                --------

                                Comment

                                Working...
                                X