I also found that my Akula II sits above the water line. When I removed enough weight to get it back up to the "correct" trim, I found I had a very difficult time getting the boat to submerge, unless I was really moving the prop fast. I ended up putting the weight back in and just dealing with it. As said, once it's in the water at a distance who really cares....
-
-
I tried for some time to get the boat on the waterline.
But I also wanted the boat to dive statically. (without moving)
So I comprimised the waterline.
Where I run the water is clear, 5' to 8' so seeing the water at the waterline is very hard to determine.
I think if the piston tank was longer by 1/2" or maybe even just 1/4" it would get the boat to sit at the waterline and statically dive.
But we work with what the kit has in it.
It is a good kit because everything is there and every thing works if you do your part.
I worked on the boat about 2 to 3 hours a day for 21 days.
I trimmed in the tub and it ran well it's first time in the lake.
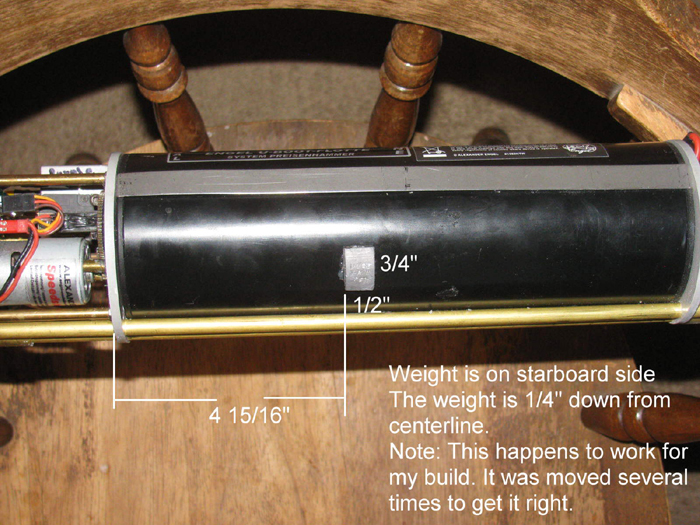
I have moved the small weight a couple of times to compensate for the weight of the piston screw moving.
This was my first piston boat.
I have since modified my Skipjack to the same piston system.
I did order a longer piston and then cut it once the trimming started.
I got what I wanted. static diving and enough positive ballast to get the waterline out of the water by 1/4".Comment
-
This morning, I thought I would open up the Akula II and do some measuring.
Here is what I have.
=============================
Ballast weight locations and sizes.
A. 10 1/2" long. Set back from hull edge. 4 3/8".
B & C. 13" long. Set back from hull edge. 3 1/4"
D. 10 1/2" long. Set back from hull edge. 4 3/8".
E. Weight is 1 3/8" wide and 1" deep. 1/4" gap between E and B & C.
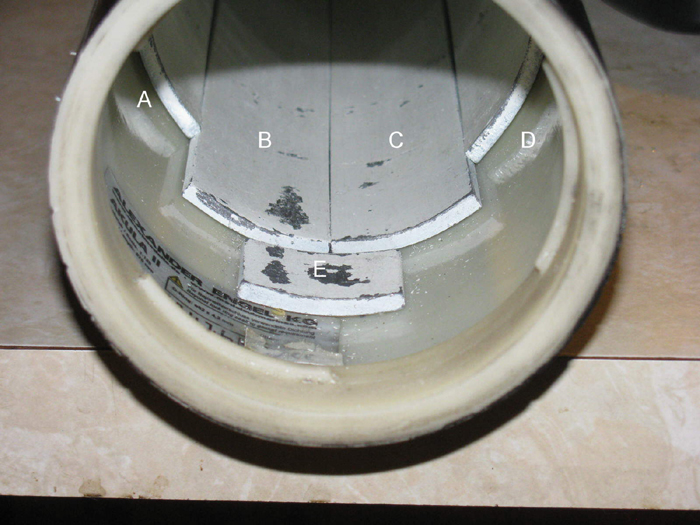
This weight was used to adjust fore and aft pitch and it rolled the hull upright removing list.
It was moved several times.
 Last edited by Ralph --- SSBN 598; 12-11-2019, 02:52 PM.
Comment
-
I agree in clear water it is hard to determine whether it is correct at the waterline and is not a big issue. It does submerge completely and is stern down at surface without the smaller weights. I am real close.
Maiden is set for Sat in a pool.
I joined RCGroups in 2004 and have been rc'ing since - I must say these are the most challenging builds I have ever seen.
Thanks all for the input!
I will start a new post on my next project.Comment
-
Something I had to get over was the trim changing from surfaced to submerged.
While sitting lake side, I dove and surfaces without moving the boat forward.
I did this several times because I was seeing the stern drop after submerging.
Did this so many time I can not count.
Then the light came on.
The change in trim was the piston weight moving back and forth.
Not the ballast water.
So after watching this happen so many times, I decided to split the difference in the stern drop and rise with the small weight.
I kept the boat closer to level submerged and let the rear planes level the boat when it was moving.
When fully surfaced, the boat tries to level out but with any ballast water at all the stern rises but again with any movement at all, the stern planes with pitch controller levels the boat.
So I have been trimming my boats to submerge level when not moving.
The surface trim is stern high but how often do I surface and sit stationary. (not much)
And I have learns if I keep just a little water in the ballast tank, the stern high is not noticable and the boat really doesn't gt lower in the water until I gt more water in the ballast tank.
With a single piston it would require some sort of movable ballast weight maybe operated by the pitch controller.
With 2 pistons, there is an electronic systen to move water back and forth to keep the boat level.
I am not ready to take that on.
=======================
My boats after lots of weight moving will now run at periscope depth with out having to touch the Tx controls once I set it at depth.
This is such a good feeling.
One of our group can set his boat to periscope depth.
Drive it in a large circle and then he can put his Tx down and walk away and the boat will stay at depth running in that circle until he comes back.
I can not do that but I am working to get there.Comment
-
Well, it's due to a change in the location of the center of gravity of the piston (and thus the boat), which is due to the water being taken in. (The jack screw moving impacts it as well)Originally posted by Ralph --- SSBN 598 View Post
-JeffLast edited by JWLaRue; 12-11-2019, 07:50 PM.Rohr 1.....Los!Comment
-
The bayonet lock is extremely tight/hard to close. I am using the Q-Lube grease included in the kit. Should I use a different type?Comment
-
We've been following the Engel instructions with very good success. Rotating the two hull halves takes some force, but I don't believe that any in our group are what I would say are difficult.
Is your hull difficult to open/close with and without the O-ring installed? It should be very easy without the O-ring.
-JeffRohr 1.....Los!Comment
-
I ran out of the supplies Engel's o-ring lube long agao.
I am using a silicone grease that was for lubing underwater camera housing o-rings.
I have had this little jar since about 1975 and it is about to run out.
Guess I should start looking for more.
At the lake, some are using something like STP lube.
I will ask about it this coming Saturday at out bi monthly gathering.
=====================
Note:
After running 3 to 4 hours, the hull halfs are very hard to turn to open.
I found that if I move the piston just a little bit, it will change the internal pressure and the hull will open right up.
But if I move the piston too far, it gets hard to trun again.
Takes a little practice to find the sweat spot.Comment
-
I think I was being too careful with it. Had to dissemble 5x times tonight trimming it, still tight but better. Without the oring was not as hard.
Good news I have it trimmed within 1/8" maybe 1/16" port to starboard. Bow to stern is almost dead on static in the tub.
What is acceptable?
Was hoping to maiden tomorrow looks like the weather and my job may interfere.Comment
-
Sounds like you are sneaking up on the trim.
If you have the small weight on the tech rack, you might move it up or down depending on which way the roll needs to go.
It does not take much.
I would try no more than 1/4" at a time.Comment
-
Silicone lubricant completely solved the O-Ring issue. Trim is pretty much dead on. Weather sucks here, hopefully pool time tomorrow.Comment
-
Hoping your day is good for going to the lake.
Tomorrow is our group's bi monthly gathering.
Taking my Skipjack.
It had a minor issue last time out.
I use 1 Tx for 2 boats.
Turns out the Tx was setup for the Akula II.
WHen running the Skipjack I found the rear planes reacted in reverse.
Made for some exciting time.
The Tx is not computerized.
So reversing a servo is mechanical.
Luck for me, I just had to open the Tx case.
Pull the servo plug from the board and turn it 180 degrees.
Got home and found my setup paper records.
THere it was. . . . Reverse rear planes at Tx.
I just don't remember doing this.
By I fixed the problem so botht eh Akula II and Skipjack will work without reversing the plug.
I opened up the servo and move 4 wires.
2 on the circuit board and 2 on the motor.
That servo now operated in reverse.
And Yes, I put a piece of paper with instruction to change wires on the servo.
If it have to replace it, I will read that and know what to do.
Anyway, hope tomorrow goes well for you.
Boat goes down and runs and more inportantly, it comes back up and still runs.Comment
-
Looked through my video files. (not my video)
Found what I was looking for.
I your want to know how to reverse a servo direction.
Comment
-
Thanks Ralph - New to subs but good or bad looks like my next hobby obsession.Comment


Comment