1/25 Type VIIC/41 Scratch Build.

Collapse
X
 
  • Time
  • Show
Clear All
new posts
  • boss subfixer
    Junior Member
    • Aug 2004
    • 656

    #106
    Mylo,
    Let me see if I

    Mylo,
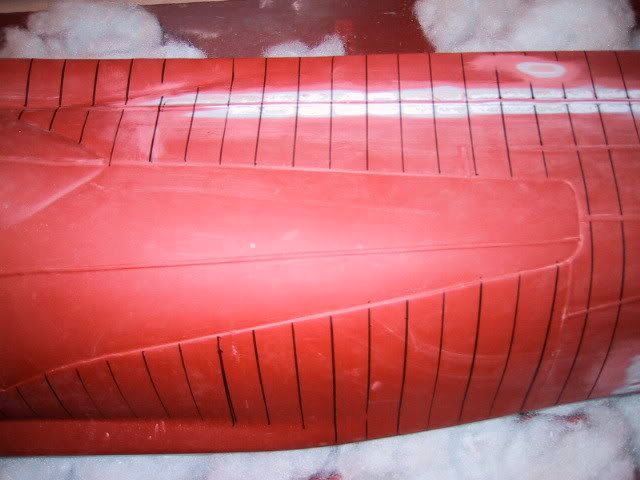
    Let me see if I can shorten that curve for you. A good general rule of thumb is if it's magnetic your safe to grind it using a bench type grinder. Typically if the metal your working with is considered soft by metal standards, aluminum, brass even some alloys like nickel copper they can load up in the pores of the wheel and build up enough pressure to burst the wheel. This by the way even goes for the wheels you use on hand grinders like the 4" and 6" type.
    Take Care.

    Comment

    • spitfiremk3
      Junior Member
      • Dec 2006
      • 43

      #107
      Hi Mylo... On the slots

      Hi Mylo... On the slots in the brass sheet... An end mill in a drill press will work too. I see you have a LONG conning tower on your Type 7. I just got one of those Atlantic Version Type 7 Revell 1/72 models from Tower Hobbies. It has a very detailed long version conning tower. It would be a excellent reference in 3D.
      THANX
      Scott

      Comment

      • mylo
        Junior Member
        • Aug 2005
        • 723

        #108
        Don,

        ....I like your lesson. I'll

        Don,

        ....I like your lesson. I'll be able to remember that.

        Magnetic / hard = grind. Non magnetic / soft = sand. Got it.

        Jeff,

        I've mentioned before, ...I like to put in a little time every day if at all possible. I'm up at 05:00 and put in a few hours before work and then try to put in a little time in the evening. Last thing I do before sacking out for the night, is go down to the shop, think of what I'm going to do next, and prepare my workbench / tools / plans / paint ...etc., etc, for the work to be done in the AM, so I don't waste that time....that's right after I do my post of course. It's my little system, seems to work for me. It's like having two jobs, ...one you really like, ...and one you don't (the paying one). I do feel that the key to my progress though is the fact that I DO NOT watch ANY T.V. ....no satelite, no cable, ...heck, no antanae. I have no idea why I even have one, other than to watch Das Boot. So really, the time I spend on the sub is likely just the time the "average" person spends staring at the tube. I prefer how I spend my time but, to each his/her own.

        That hammer you saw, ...that's my BABY sledge. PAPA sledge sits on the floor around the corner for the serious business.

        Stay tuned.

        Mylo

        Comment

        • clive
          Junior Member
          • Dec 2006
          • 65

          #109
          Many Thanks

          Hello Mylo

          I hope to start on scatchbuilding Thunderbird 4 (the yellow sub) in the near future and your article has been an absolute godsend to me. It would be nice to have your content of this article all in one on a CD.

          You have solved many problems that I was anticipating so perhaps now I will be able to sleep at night instead of laying there worrying about it.

          Many thanks

          Clive

          Comment

          • mylo
            Junior Member
            • Aug 2005
            • 723

            #110
            Clive,

            Your post IS the

            Clive,

            Your post IS the reason I decided to document and post my build on this thread. That's great that it has not only helped you to figure out some modelling challenges, but as well that it has got you motivated to start on your "dream sub" project.

            I am going to be producing a CD of this build for my own records, but likely wouldn't be opposed to burning a few copies for those who are interested. I suspect the build thread to have many (MANY) posts by the time I have this boat functioning in the water.

            Real glad I helped you out. ...oh....and building this sub has given me plenty of "sleepless nights" trying to figure out how to do something, just so you know, you're not alone. Now get going on your Thunderbird 4.

            Mylo

            Comment

            • spitfiremk3
              Junior Member
              • Dec 2006
              • 43

              #111
              Hi Mylo... I should start

              Hi Mylo... I should start a tread on my Type 9 build as I have been posting alot of stuff on it anyway. I will get your pics out really soon like some tomorrow.
              THANX
              Scott

              Comment

              • mylo
                Junior Member
                • Aug 2005
                • 723

                #112
                ** MAJOR SETBACK **

                As

                ** MAJOR SETBACK **

                As a result of yet another screw up on my part, project VIIc/41 has just suffered a major setback. A recent coat of paint that I applied over the hull details has lifed my masking tape from the hull. I will have to remove the remnants of the tape, sand the hull, and reapply all the mask again. I expect this repair to take me approx 40 hours, that is WHEN I get the materials that I need to do the fix. In other words, don't expect a post for a while. To say the least, this disappoints me. Now if you'll excuse me, I need to go cry.

                Thank you ...and God Bless.

                Mylo

                Comment

                • clive
                  Junior Member
                  • Dec 2006
                  • 65

                  #113
                  Learning Curve

                  Hello Mylo

                  Not another screw up its all part of the learning curve. Bet you don't make that mistake again. Thats one of the reasons that olduns like me are so wise we have made so many mistakes during our lives, and learnt from them, that we have to be wise.

                  Clive

                  Comment

                  • mylo
                    Junior Member
                    • Aug 2005
                    • 723

                    #114
                    Clive,

                    Yes, the hard lessons

                    Clive,

                    Yes, the hard lessons are the ones that stick. I had to take a step back, big breath, and tell myself that this FIRST sub is all about figuring out how to do it....and how NOT to do it.

                    The lesson is this : Do NOT spray oil based paint over top of a plug that has the details masked onto it. The paint will lift your mask and make a huge mess of your plug. I did this thinking that the nice thick paint would reallly smooth out my masked weld lines, making thenm look like "welds" instead of masking tape......I was wrong. In the future, I will not attempt to emphasise the weld lines by applying 3 layers of mask. Instead, I will apply one layer and then spray primer over top.....you know.....like you're supposed to do. I didn't think this method was going to provide the look that I was after, but......I'm quite sure that look is better than the "look" I have right now.

                    I hope I just saved someone a few hours.

                    ...break is over.

                    Mylo

                    Comment

                    • anonymous

                      #115
                      Primer. Sand. Primer. Sand.

                      Use a

                      Primer. Sand. Primer. Sand.

                      Use a good fill and sand Dupont or similar. Kyrlon primer works too. I used thick colored tape. Looks like electrical tape but doesn't leave that messy residue behind. Punches well too. They have it at the hardware store.

                      Just a light sand between coats keeps the build up on top of the tape to a minimum.

                      Steve

                      Comment

                      • spitfiremk3
                        Junior Member
                        • Dec 2006
                        • 43

                        #116
                        Hi Mylo... I too have

                        Hi Mylo... I too have have caught myself "burnin and learnin" in all the things I make, including my type 9. MANY TIMES... Hang in there... Get back on track... And advance... And like Clive said... Without experience there is no wisdom... Your boat looks GREAT though!!!
                        THANX
                        Scott

                        Comment

                        • mylo
                          Junior Member
                          • Aug 2005
                          • 723

                          #117
                          The "re do" of the

                          The "re do" of the hull is complete. This consisted of stripping the old mask off that hadn't quite separated, sanding the hull, re applying the mask and applying a coat of primer. This brought the hull back to the state it was in prior to the application of the paint which created all the problems. This fix took 34 hours. I will not be including it in the build log as it is un neccessary.

                          Comment

                          • mylo
                            Junior Member
                            • Aug 2005
                            • 723

                            #118
                            Step 53 ]


                            After spending

                            [b]Step 53 ]


                            After spending so much time looking at the previous "mistake" made in the paint application, I concluded that the only reason it was a "mistake" was because the mask had lifted. Other than that, the heavy paint applied over the mask was in fact creating the look I was after. A close look at the bits of mask that did stay on showed that the paint coat really made the mask look like weld lines as it gave just enough irregularity to the mask with the paint build up, to look like a weld. I decided to attempt this paint application again, only this time, I CA glued the mask to the hull. I don't particularly reccomend this technique. It was time consuming and, generally a pain to do, but I felt I had to further test this technique out to see if I could get it to work. .....afterall.....if it didn't, ....it only meant another 34 hours to fix.

                            With the mask CA glued down (Thin CA, used very sparingly), I applied a layer of red primer to the hull. Once dry, I followed that with 3 coats of my industrial strength garage floor paint that I've been using all along, sprayed on with a paint sprayer. This sprayer simply applies too much paint too fast. It's meant to paint fences and buildings with, not model subs. I cranked it to it's highest pressure setting and held the nozzle as far away from the hull as I could, but it still built up too quick and was causing some running in places. At the lower pressure settings, it wasn't atomizing the paint very well. Again, this tool is not the right one for the job, but it's all I have. An automotive paint gun would have likely worked much better. These runs would have to be sanded out later. Each coat required 16 hours to dry before applying the next. The hull was prepped with a tack cloth before each paint coat. It took some time to get into all the crevices with the tack cloth to ensure no dust/particle build up while making sure none of the details were damaged in the process. This was the most time consuming part of the paint application....other than the cleaning of the sprayer after each coat.


                            [b]Step 54 ]

                            My experiment worked. The mask stayed on. THANK GOD ! Once the third coat of paint was thoroughly dry (24 hours), I sanded it smooth, making sure that I exposed the masked flood holes. The paint had worked well in that the flood hole mask was exactly flush with the paint, which meant that when the mask is removed prior to casting, it will leave a nice indentation in the plug. The paint was clogging the sand paper quickly and so I had to continually clean the paper with a wire brush. While I'm on the topic. I use expensive 3X sand paper. This stuff is almost $2 / sheet. I use it because it holds up to being cleaned with a wire brush, much like cleaning a file. In the end, I'm sure it's much cheaper to use than 10 times as much cheap paper. Like anything of quality, you have to pay for it, ....but it makes life so much easier. I was happy with the results of the "paint experiment", but I will be doing things differently on a future build. This whole weld line application / paint phase took wayyyy too much time.


                            [b]Step 55 ]


                            With the paint coat sanded, 3 coats of primer were applied. This primer filled in all the tiny sanding marks. The Red Oxide colour was used to make it easy to see full coverage over the grey sanded paint. The hull was really beginning to look like a type VIIc/41 now.


                            ....glad to be back.


                            More to come


                            Mylo

                            Comment

                            • mylo
                              Junior Member
                              • Aug 2005
                              • 723

                              #119
                              Step 56 ]


                              I couldn't

                              [b]Step 56 ]


                              I couldn't do it. I couldn't convince myself NOT to include rivet detail on this sub. I feel that a sub this scale has to have some sort of rivet detail on it to make it complete, so I began experimenting with different techniques to include these tiny details.

                              After a trial and error period trying out these techniques, I decided that the best way to do the rivets would be to punch out them out of tape, much like the mask for the flood holes, end then place them on the hull. I found that duct tape was the best material as it was thicker than the masking tape, and cut better than I expected.

                              I built 7 punches out of steel (not brass) with the diameter of the hole (rivet) being 1/16", and then held them all together with hose clamps to make one punch. One good hit with the hammer and I had 7 rivets. With this rivet punch, I was able to make serval 100 rivets in a very short time.


                              With the rivet punch made, I drew lines on the hull with marker to indicate where the rivets would go. Once the lines were drawn, I removed the flood hole masks by lightly sanding the area first to make sure the mask would pull off cleanly. With the flood hole masks peeled off, it left a nice indentation where the flood hole would be, just as suspected.


                              The rivets were then placed one by one onto the hull using a hobby knife to peel them off the mat, and place them. This process was the definition of tedium. If you plan on doing this on your build, get into the right frame of mind, turn on your stereo, and just get ready for a very repetitive process. The result is worth the effort.


                              The rivets really define the U-boat I think. For those of you that count this kind of thing, there are just over 6000 rivets on this hull....give or take a few. Not quite up to OTW standard, but enough to get the effect, which was all I was after. Afterall, I do want to get this build done in my lifetime. MAN I love those OTW boats, they were the inspiration I needed to include this type of detail on my VIIc/41.


                              I'm gone for the next couple weeks without any expectation to get to the sub. Until then....


                              Mylo

                              Comment

                              • paul von braun
                                Junior Member
                                • Jun 2004
                                • 242

                                #120
                                Mylo, I was wondering if

                                Mylo, I was wondering if you were going to go that far and do the rivets!
                                You, mate, are as bad as me...

                                Paul.

                                Comment

                                Working...