Noob SkipJack Build

Collapse
X
 
  • Time
  • Show
Clear All
new posts
  • Oldus Fartus
    Member
    • Jul 2016
    • 185

    #1

    Noob SkipJack Build

    I am new to the world of subs and ABS plastic hulls...but I do have over 25 years building nitro and Fast Electric wood and fiberglass hulls so I am familiar with boat modeling.
    In general what type and viscosity CA should I be using for the various ABS joints?
    My biggest concern is that we never used CA for our race boats as it is not waterproof only used epoxy and glass resins.
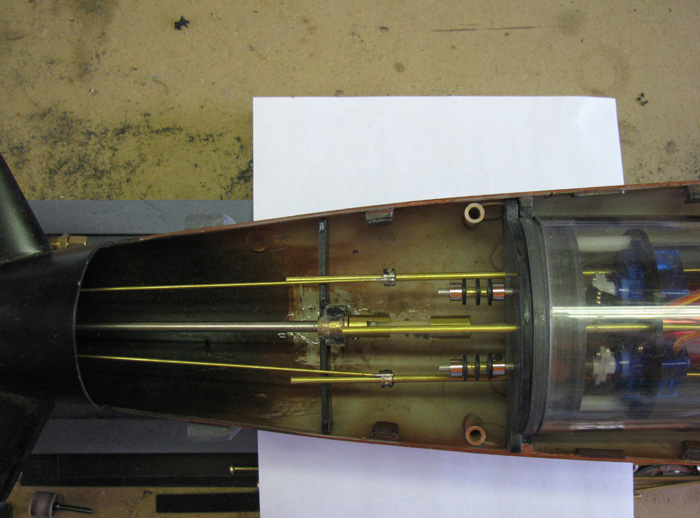
    I also noticed that the pushrod ends had magnets CA'd on them to connect from the WTC to the links for the control surfaces. Again the CA is in general not waterproof. Is that blue fuel tubing I see in the photos supposed to slide over the magnets holding the two ends together or am I missing something?
    The photos are not very clear.
    Second question is on finishing and painting the outer (wet) hull.
    I saw in one of the build threads he was using glazing then sanding & priming.
    What type of "glazing" works best on ABS plastic?
    What type of primer?
    What type of paint?
    I know, these are pretty basic questions but I want to get it right the first time.
    Thanks for your help.
    Pete
  • chips
    Member
    • Feb 2003
    • 494

    #2
    For assembling styrene hulls, use a liquid styrene cement such as Plastruct Plastic Weld. Apply a thin coat to both pieces, then join the pieces, and apply a second coat over the seam. Think of the first coat as preheating steel before welding; the coat applied to the seam does the welding. If you're using a tall round bottle of liquid cement, I recommend drilling a hole in a piece of scrap wood just a little larger than the glue bottle. Glue a 1/16" or 1/8" thick piece of wood on the bottom. Keep the bottle in the block of wood, and you're less likely to knock over the bottle - second picture.

    The magnets are CA'd into resin moldings, not fuel tubing. Most of the Lkil-Ons have a1/16" hole in one end, which can be threaded with a 2-56 tap; You can solder threaded connectors onto the pushrod ends, then thread the magnet on. I have soldered some 1/4" brass tube onto 1/16" wheel collars, then epoxied the magnets resin body into the brass tube - see the first picture. The third picture shows my Trumpeter 1:144th scale KILO, where I drilled and taped the resin body for a small set screw; to secure it on the pushrod shaft. The last two pictures show the magnetic connectors in my 31" Disney NAUTILUS model. The right hand (forward) connector has the brass tube soldered to a wheel collar. The left hand (aft) connector is epoxied to the brass shaft.

    Most of us use Bondo or similar auto body spot glazing compounds.

    Most of my later subs have been painted with Testors Model Master Acryls using an airbrush.
    Attached Files
    Last edited by chips; 07-22-2016, 10:49 PM.

    Comment

    • Ralph --- SSBN 598
      Junior Member
      • Oct 2012
      • 1417

      #3
      Chip, I like your shrink tubing over one end of the dog bone. (photo #3)
      I may have to appropriate that for myself.

      I am not a fan for the extended dog bone using pins. (photo #5)

      This past weekend at an event, a boat went through the bottom weeds again and broke the pinned connection for the second time.
      I do wonder if the tubing has anything to do with the issue.
      The tubing on this particular boat is aluminum and I do not think it can take the torque the motor run in this boat puts out.

      I would use brass and I would most likely grind small flats on both sides of the dog bone plastic and drill a hole through it as well as the pin.
      Then I would use something like Gorilla Glue on the dog bone as I put them in the tubing and pinned.
      Like the way Gorilla glue is water proof and it expands as it cures.
      This expanding has draw backs but if you can keep things clamped and held in place it is excellent.

      I have yet to need an extension.
      I make the propeller shaft long enough to get to the dog bone and I put in stands and oil lite bearings to hold the shaft where it belongs.
      In the photo, I hope you can see the stand which is held in place by a horizontal plastic piece going across the hull to stabilize the stand.

      Comment

      • chips
        Member
        • Feb 2003
        • 494

        #4
        Ralph,

        I've used the heat shrink over the dogbone on a couple of boats. It does make it a little easier lining up the u-joint on the WTC. The dogbone extension in photos 4 & 5 is actually CA'd in place, and then dimpled with a center punch - no through pins. The last two pictures posted above are of my 31" NAUTILUS, where pitch control is done with the prop shaft. On the NAUTILUS, the shaft is two short pieces connected by a length of fuel tube. As the servo moves for or aft, the prop pitches up or down. It worked well on the one run I've had. The 5 photos below are of the NAUTILUS.

        Another thing for OF - replace any mild steel set screws with stainless steel ones. Two sources of supply are Micro Fasteners and RTL Fasteners.

        Click image for larger version

Name:	IMGP7519.jpg
Views:	2
Size:	96.4 KB
ID:	129312Click image for larger version

Name:	IMGP7541.jpg
Views:	2
Size:	87.4 KB
ID:	129313Click image for larger version

Name:	IMGP7542.jpg
Views:	2
Size:	85.3 KB
ID:	129314Click image for larger version

Name:	IMGP7543.jpg
Views:	2
Size:	91.8 KB
ID:	129315Click image for larger version

Name:	IMGP7544.jpg
Views:	2
Size:	83.3 KB
ID:	129316

        Comment

        • Oldus Fartus
          Member
          • Jul 2016
          • 185

          #5
          Gentlemen,
          Thank you all for the great information and photos.
          It's exactly what I needed!
          Pete

          Comment

          • Oldus Fartus
            Member
            • Jul 2016
            • 185

            #6
            Originally posted by Ralph --- SSBN 598 View Post
            Chip, I like your shrink tubing over one end of the dog bone. (photo #3)
            I may have to appropriate that for myself.

            I am not a fan for the extended dog bone using pins. (photo #5)

            This past weekend at an event, a boat went through the bottom weeds again and broke the pinned connection for the second time.
            I do wonder if the tubing has anything to do with the issue.
            The tubing on this particular boat is aluminum and I do not think it can take the torque the motor run in this boat puts out.

            I would use brass and I would most likely grind small flats on both sides of the dog bone plastic and drill a hole through it as well as the pin.
            Then I would use something like Gorilla Glue on the dog bone as I put them in the tubing and pinned.
            Like the way Gorilla glue is water proof and it expands as it cures.
            This expanding has draw backs but if you can keep things clamped and held in place it is excellent.

            I have yet to need an extension.
            I make the propeller shaft long enough to get to the dog bone and I put in stands and oil lite bearings to hold the shaft where it belongs.
            In the photo, I hope you can see the stand which is held in place by a horizontal plastic piece going across the hull to stabilize the stand.
            I like the use of the two collars on the pushrods for easy adjustment.

            What are the two fittings coming out of the WTC with the three black disks?

            Comment

            • Ralph --- SSBN 598
              Junior Member
              • Oct 2012
              • 1417

              #7
              I am not sure you want to know beings your new to this submarine stuff.
              -------------------
              I have been working on a project for several years.
              I have a box full of failed attempts in several different sizes.
              I finally built one that worked on the bench.
              But then I put it in the Skipjack.
              After a year of messing with it on the bench, it worked.
              What are those things you asked about.

              Well, they happen to be winches to work the Mast and Periscope Gizmos.
              You can see two blue servos that were modified to be bi directional, proportional motors. Winches.
              What you asked about are the winch drums which are turned by the servos and when they get to the end of the lines, they will slip so as to not break the control lines.

              Now for the very important part.
              I did make them work in the field.
              I will not ever do it again...at least this way.
              All the problems was I had made the system too complicated and as I simplified the system the better it worked.

              I have an idea for a much simpler system and I may some day build it.

              The boat project on the building bench right now, has no mast or periscopes that go up and down.
              In fact it will be a 3 channel boat.
              Propeller
              Rudder
              Ballast system
              (rear Dive Planes will be on auto leveler)

              I have a web page on the winch drums.
              There is lots of information on my Skipjack build over at SubPirate.

              Another comment.
              I got the thing to work in the field 2 weeks ago.

              I have since put the boat on the work bench and disconnected the control lines.
              Too much involved with setting up the day be for going to the water and once hooked up, it does not allow easy access to the inside to the boat.

              This Gizmo had me thinking I should go back to 2 channel sailboats or fishing under a shade tree without a hook!

              Comment

              Working...