Budget Lathes and Presses for WTC endcap constuction

Collapse
X
 
  • Filter
  • Time
  • Show
Clear All
new posts
  • JWLaRue
    Managing Editor, SubCommittee Report
    • Aug 1994
    • 4281

    #16
    Re: Budget Lathes and Presses for WTC endcap constuction

    The seller locked the drill chuck keys down, into the drill chucks, so I can't get them out.. The only keys I currently have that fit them are the ones that are clamped down in the chucks.. Didn't realize I wouldn't be able to loosen them by hand, until I got the lathe home, oh well.
    Can you use one of the chuck keys to loosen the other one?

    Alternatively, mount a chuck in the lathe and see if you can then get enough leverage to loosen it.

    btw: looks like you got a good deal on the lathe.

    -Jeff
    Rohr 1.....Los!

    Comment

    • warpatroller
      Junior Member
      • Feb 2006
      • 308

      #17
      Re: Budget Lathes and Presses for WTC endcap constuction

      [quote]
      Can you use one of the chuck keys to loosen the other one?

      Alternatively, mount a chuck in the lathe and see if you can then get enough leverage to loosen it.

      btw]

      No, the keys are different, each key only fits the chuck it is clamped into.. I found one key in my toolbox, but it doesn't fit either one of the chucks. My current hand drill, a Ryobi, is keyless, old and has a dead battery. I have no other keys available to try. I might just bring the chucks into an Ace Hardware Store and see if they have some keys that fit them..

      Since the seller is a machinist, he probably had a dozen keys laying around, when he locked them into the chucks.. He probably was trying to keep them together with the chucks so they wouldn't get lost.

      Comment

      • warpatroller
        Junior Member
        • Feb 2006
        • 308

        #18
        It has been over a year since I last posted in this thread.. I did get the keys out of the drill chucks.. Found that the motor mount bracket was slightly twisted and not a true 90 degree L shape. Need to order a replacement motor bracket so the pulleys are lined up properly. I noticed this slight misalignment when I bought the lathe. I could use it as is, but I want them aligned perfectly..

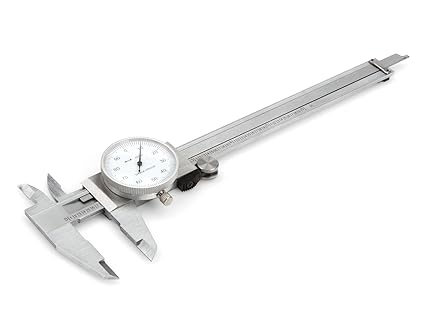
        Got a 0" to 6" Brown and Sharpe Dial Caliper and a 0" to 1" Brown and Sharpe Micrometer today, off craigslist. Both in their original wood cases. Seller was a retired Machinist/Biker. Had 3 motorcycles in his garage, and his arms were covered with colored tattoos. He had Marilyn Monroe and Pin Head (from Hellraiser) on his right arm, together on the same arm.. The Tat artist did a good job on the illustrations! I've run in to the most unusual people from craigslist deals.. The caliper and micrometer were last calibrated at an Aerospace Machine Shop this past June and labelled as such, so fairly recently.

        After the purchase I realized my 6" caliper's jaw depth is only deep enough for turning up to 3" endcaps! The jaw depth is 1 9/16". I didn't think of this until I got home with them lol. For my current boats this is adequate, but in the future I'd like to be able to make 3.5" to 4" endcaps. Seems crazy to have to get a 12" caliper just so the jaw depth is deep enough.. I guess I either have to buy a bigger caliper for larger work, or I've seen some extensions that can be clamped to the jaws. Don't know how well those extensions work..

        Comment


        • #19
          6" calipers should be perfectly acceptable for anything up to 6" diameter. You just tilt the calipers slightly, so they clear the work.

          You're not machining stuff to go into outer space, you do have quite a bit of tolerance with this sort of work.

          Comment

          • warpatroller
            Junior Member
            • Feb 2006
            • 308

            #20
            I was thinking I would need to measure the O-ring groove, with the calipers.. How would I measure the mid-point diameter of the groove, when I can't tilt the calipers while they are in the groove. Maybe I don't need to measure the groove? Just turn a little, put on the O-ring, test fit with a piece of the poly carbonate tube, and repeat until it fits properly. It has been over a year since I watched your endcap tutorial video.. I'll have to look at it again. If I only need the 6" caliper, to do the job, then great!

            Comment

            • Ralph --- SSBN 598
              Junior Member
              • Oct 2012
              • 1417

              #21
              You can measure the groove by using the tail of the calipers.
              You can do the math to find out the groove depth needed.
              Then using the tail end of the calipers, you move the slide out and then push the slide tail in to the groove until it bottoms out and continue pushing on the caliper body until it rests on the end cap shoulder.


              Looking at the photo, you measure using the right end of the calipers.

              Comment


              • #22
                What Ralph says. I use the dials on my cross slide to set the groove depth.

                I machine the endcap to fit the tube first, then machine the groove after. This is because extruded tube has a very variable tolerance inside compared with external tolerance which is usually very accurate.

                I touch on the work, zero my dial then feed in until I have the required depth. Simple, and more than accurate enough for this type of work. If your lathe doesn't have dials, or ones that can be set (smaller lathes often are more basic), then use the method Ralph suggest, or buy yourself a verdict gauge and clock it it up.

                Comment

                • warpatroller
                  Junior Member
                  • Feb 2006
                  • 308

                  #23
                  Thanks guys! Learned something new about using the tail end of the caliper.. The hand wheel on my lathe's carriage is marked in increments, 0 to 50.

                  Comment

                  • tommydeen
                    • Nov 2003
                    • 326

                    #24
                    Originally posted by warpatroller View Post
                    Thanks guys! Learned something new about using the tail end of the caliper.. The hand wheel on my lathe's carriage is marked in increments, 0 to 50.
                    Another book you want to get is "tabletop machining" by Joe Martin the author is the owner of sheerline and the whole book is about how to use, care for, and tips on machining with sheerline products also you want to visit the web site. The tooling for the lathe you have is very good sherline has great tech support. If you want to turn bigger work you can purchase riser blocks for your lathe. You also might want to look at
                    A to Z machine shop and buy a quick change tool post for your lathe it makes changing tooling out a lot faster.

                    Have fun....Tom

                    The premier source of tooling, parts, and accessories for bench top machinists.
                    Last edited by tommydeen; 03-09-2016, 05:06 AM.
                    sigpic. You have to ask yourself one question...would the admiral approve

                    Comment

                    • wingtip
                      SubCommittee Member
                      • Dec 2004
                      • 323

                      #25
                      I was watching Subculture's Encap video tutorials,
                      Ummm where are these tutorials to compare with a few i made having never tried before lol....

                      Comment

                      • vasily
                        Junior Member
                        • Jun 2014
                        • 42

                        #26
                        Here is an article on O Ring Groove Design, which calls out the depth and width of grooves for various o rings:
                        This O-ring groove design diagram will guide you in selecting the proper gland depth and width dimensions relative to your O-ring cross section for an optimal O-ring seal compression squeeze.

                        The beauty of an o-ring sealed design is that if you turn the end cap a tiny bit too loose, you can simply cut the o ring groove a tiny bit less deep. But we're talking thousandths of an inch, here.

                        Comment

                        • tommydeen
                          • Nov 2003
                          • 326

                          #27
                          Originally posted by vasily View Post
                          Here is an article on O Ring Groove Design, which calls out the depth and width of grooves for various o rings:
                          This O-ring groove design diagram will guide you in selecting the proper gland depth and width dimensions relative to your O-ring cross section for an optimal O-ring seal compression squeeze.

                          The beauty of an o-ring sealed design is that if you turn the end cap a tiny bit too loose, you can simply cut the o ring groove a tiny bit less deep. But we're talking thousandths of an inch, here.
                          Another source for O-ring specs
                          sigpic. You have to ask yourself one question...would the admiral approve

                          Comment

                          • wingtip
                            SubCommittee Member
                            • Dec 2004
                            • 323

                            #28
                            those are nice links but still would like to see the videos he's talking about...

                            Comment


                            • #29
                              They were made 'off the cuff' e.g. unscripted, so they're a little bit rambling, but I tried to cover everything I could think of that might be a stumbling block for someone new to making parts like this. In part two it shows the machining in real time.

                              You can probably fast forward through much of it if you know how to size o-rings. Part one solely covered o-rings, different materials etc. and part three just shows an alternative way of holding the work.

                              This video goes over the basics of what you need to know about o-rings used to effect a watertight seal on a cylinder inside a model submarine. It requires n...


                              In part two we explore the two main methods of mounting a reliable o-ring seal on a cylinder using either axial or radial compression. Also covered is endcap...


                              Final part in the end caps series of films. This shows the stages in making an end cap using a mandrel.and also a few details on how to fit them in the cylin...


                              PVC is a good plastic to choose for machining endcaps, as it works very nicely, holds a tolerance well and is cheap. Lexan and acrylic tend to be a bit more tricky, so I would only use those if I had no PVC. Delrin also is nice to work with, but a difficult material to bond to.

                              Comment

                              Working...
                              X