Need USS Gato antenna diagram

Collapse
X
 
  • Filter
  • Time
  • Show
Clear All
new posts
  • fpb
    Junior Member
    • Nov 2006
    • 5

    Need USS Gato antenna diagram

    Hi there,
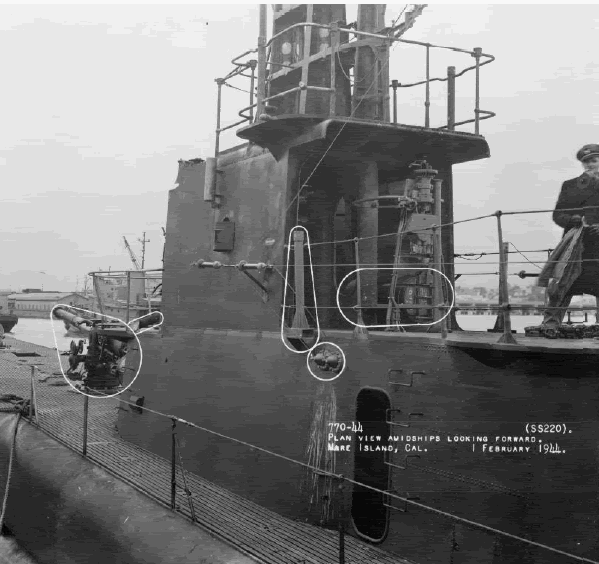
    I'm finishing the Revell Germany 1/72 USS Gato and the instructions really aren't clear on the antenna rigging. Can someone help me out. You can see the model in it's unpainted form on my website (www.bishophobbies.com). Go down the right side to WORKBENCH and click on that.

    Thanks a bunch,
    Paul
  • ricknelson
    Junior Member
    • Dec 2006
    • 186

    #2
    Hi Paul,

    The antennas on the

    Hi Paul,

    The antennas on the mid-war Gatos ran from the Aerial Outriggers (2) (items 84) mounted on the side of the fairwater, which I see you have installed, back to the "T" bar mount or Aerial Mast (item 52) on the stern over the aft engine-room/maneuver-room area. Each antenna attaches to the appropriate port or starboard "end" of the "T". Then the antenna downlead is run from the Aerial Outriggers to the two feedthrough insulators on the port side of the fairwater which are just over the port side access arch. Connecting the portside antenna downlead to the feedthrough is easy but you'll have to get a little creative with your routing of the starboard side one. So to summarize: From the feedthrough to the outrigger, from the outrigger to the "T" bar. One for each side.

    The best material I have found for stringing antennas is EZ Line. Go to http://www.bobeshobbyhouse.com/ and scroll down to a link which will take you to a page that lists various kinds of EZ Line. It is elastic and allows you to stretch it when installing it so that it is tight when done. It comes in .003 and .006 inch diameters. I would use the .006 as that would represent a 1/2" antenna wire.

    It may be too late for you to make any changes but I would like to mention a few of the errors Revell made when they did the 1/72 Gato:

    1. There are no "doors" on the fairwater. The real boats had open access arches. Museums have installed doors or limited access for liability reasons. I suggest you remove the two "doors" if you can.

    2. The #1 'scope (Forward 'scope) should be shorter than the #2 (Rear 'scope) 'scope. They were not of equal height. The #1 was 36 feet overall and the #2 was 40 feet overall. So on the 1/72 Gato you should shorten the #1 'scope's "Tube" 0.66 inches (4 feet scaled to 1/72).

    3. There was no such item as "Breather" (item 49) on Gatos.

    4. For a stock Gato the broom (part of item #94) should be removed. That was only done sometimes when returning from a successful war patrol. Replace it with something that resembles the antenna on part #94.

    Revell copied the USS Cobia too literally. Hope my nits didn't ruin your day.

    Comment

    • fpb
      Junior Member
      • Nov 2006
      • 5

      #3
      Rick,
      Thanks for your quick reply.

      Rick,
      Thanks for your quick reply. My apologies for posting on 3 forums and not mentioning where I was posting. I didn't realize the redundancy in posting here and modelwarships.com!

      As to your comments - I have already removed the breather and broom as well as the aft TBT as these aren’t needed. I will look at the fairwater doors - but the sub is already painted and weathered. I don't know if I want to get into that. I had already planned on using EZ line to rig - this is great stuff. I can shorten the forward scope too - that should be easy.

      With regard to the t-bar - is there a back brace line from the t-bar aft to the deck?

      When it's finished I'll post it on my website and let you know.

      Thanks again,
      Paul

      Comment

      • ricknelson
        Junior Member
        • Dec 2006
        • 186

        #4
        Hi again Paul,

        No, there is

        Hi again Paul,

        No, there is no bracing for the "T" bar so don't put too much tension on the EZ Line.

        You should keep the aft TBT as all the boats ran with them once TBTs were installed.

        Good to hear you were able to effect most of the changes. I sure hope you can remove the doors as they are the most egregious mistake.

        Comment

        • ricknelson
          Junior Member
          • Dec 2006
          • 186

          #5
          Another thought, Paul,

          You might want

          Another thought, Paul,

          You might want to fabricate something resembling insulators for the antenna runs. Each antenna should have an insulator at each end; the T bar end, and the outrigger end. The downlead to the feedthrough would then connect to the antenna behind the insulator at the outrigger end (i.e. on the antenna side of the insulator). If you need an idea of what the insulator should look like let me know.

          Comment

          • fpb
            Junior Member
            • Nov 2006
            • 5

            #6
            Rick,
            Can I use white glue

            Rick,
            Can I use white glue to replicate insulators? Not sure what they look like.

            About the doors - I will try and remove them - I'm unclear about what you mean when you say there were open access arches - what do these look like?

            I have always loved lines of the American fleet boat - maybe from movies I saw as a kid. I also had the opportunity to sleep overnight on the Pampanito with my scout troop 2 years ago - that was a hoot!

            Thanks for the help again,
            Paul

            Comment

            • ricknelson
              Junior Member
              • Dec 2006
              • 186

              #7
              Paul,

              As they say, "A

              Paul,

              As they say, "A picture is worth a thousand words". Give me a few hours and I'll send you pictures of insulators and the access arches. At 1/72 I don't think white glue will do an adaquate job. The insultors are long.

              Comment

              • ricknelson
                Junior Member
                • Dec 2006
                • 186

                #8
                Paul,

                Here is a photo out

                Paul,

                Here is a photo out of the Floating Drydocl Gato and Balao Plans book CD. It not only shows what the insulators look like but it also shows the Access Arch.


                This photo shows a plane viewe of the insultors.

                Comment

                • fpb
                  Junior Member
                  • Nov 2006
                  • 5

                  #9
                  Rick,
                  Thanks a lot for the

                  Rick,
                  Thanks a lot for the pics - they have been a big help! I've removed the doors with my Dremmel and adjusted the forward periscope. I've also sanded down the rectangles on the fairwater on both sides. The conning tower looks much better.

                  Cheers,
                  Paul

                  Comment

                  • ricknelson
                    Junior Member
                    • Dec 2006
                    • 186

                    #10
                    Terrific work Paul. Glad to

                    Terrific work Paul. Glad to hear you were able to make the mods to the fairwater. Let me know when you have more photos on your web site. I'd like to see the changes. I had not mentioned removing the rectangles because I didn't want to go too far with my suggestions but I'm glad you did that mod too.

                    If you plan on doing more submarine modeling I suggest you checkout http://www.floatingdrydock.com/ Tom has an excellent CD version of his infamous "Gato/Balao class Submarine of World War Two PLAN BOOK". That's where I got the two pictures I sent you.

                    Keep up the good work.

                    Comment

                    • fpb
                      Junior Member
                      • Nov 2006
                      • 5

                      #11
                      After incorporating all of the

                      After incorporating all of the suggestions - I have uploaded the latest pics to my website (www.bishophobbies.com - go to workbench on right side). If anyone has any comments or suggestions - let her rip - I'm interested.

                      thanks a bunch for all of the help,
                      Paul

                      Comment

                      • ricknelson
                        Junior Member
                        • Dec 2006
                        • 186

                        #12
                        Hi Paul,

                        Your boat really looks

                        Hi Paul,

                        Your boat really looks great now. I am so happy to see the "Doors" removed. Looks like the real deal.

                        Comment

                        • goose814
                          Junior Member
                          • Jul 2004
                          • 37

                          #13
                          From the mid-war Gatos on

                          From the mid-war Gatos on through to the Balaos, there were three antennas. Two ran to the port side outrigger and one to the starboard side. There are two antenna lead-ins on the port side of the tower and one on the starboard side. Also, the port outrigger is slighty longer than the starboard. These photos of the Cod and Flier better show this:

                          http://img.photobucket.com/albums/v82/g ... 822424.jpg
                          http://img.photobucket.com/albums/v82/g ... h98326.jpg

                          Usually, depending on where the deck gun was located, dictated where the T-shaped support was. If the deck gun was mounted forward then the support was located on the aft deck, and vice versa. This is so the antenna wires don't interfere with the deck gun's firing arc. I say usually because I have seen a few instances where the deck gun and T-support are on the same side. The antenna wires were evenly spaced on the support with one on either end and one in the center. The insulators were located at both ends of the antennas, at the T-support and at the outriggers. On some boats the center antenna ran up to the top of the periscope shears and then down to the outrigger before going to the antenna lead-in]http://img.photobucket.com/albums/v82/g ... h72313.jpg[/url]

                          Also, the T-support may have braces between the horizontal bar and vertical bar, and it may also have one or more bracing wires from the top of it down to the deck. Here are some photos]http://img.photobucket.com/albums/v82/g ... 837102.jpg[/url]
                          http://img.photobucket.com/albums/v82/g ... 837812.jpg
                          http://img.photobucket.com/albums/v82/g ... drew17.jpg
                          http://img.photobucket.com/albums/v82/g ... target.jpg

                          On some subs, there wasn't any T-support but individual supports. This configuration was used on forward mounted antennas. Aft mounted ones had the T-support]http://img.photobucket.com/albums/v82/g ... h72314.jpg[/url]

                          All this goes to show that there was no hard and fast rules to this. Pick your sub and try to find photos of how it was configured.

                          Gus

                          Comment

                          • ricknelson
                            Junior Member
                            • Dec 2006
                            • 186

                            #14
                            The Revell 1/72 Gato kit

                            The Revell 1/72 Gato kit only has two (2) antenna feed-throughs and they are on the port side. The port and starboard antenna outriggers are identical and will only accommodate one antenna each. To implement anything else would require some scratch building.

                            Comment

                            • reckless
                              Junior Member
                              • Feb 2008
                              • 21

                              #15
                              hey guys .. thanks for

                              hey guys .. thanks for all the pics! .. I'm trying to add the safety railing/cabling and figured I should add the attennea's that I can too while I'm at it ...

                              my detail won't be the same as exact (1/144 baby compared to the 1/72's!) .. but the pictures are nice to work with...

                              unfortunately my lower hull is a little butchered with my first RC convert ... so I'd atleast like to make the top side look nice for when it's in the water ... BTW there were no doors on mine just arcways

                              Comment

                              Working...
                              X