Have you ever needed just the right sized of plastic container to float your sub in for ballasting? 
Something you can set up on your workbench to make the tedious job of ballasting easier.
Well I have.
I just wanted to show how to make an easy container in the size you would like.
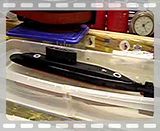
First you will need a few plastic containers. The ones I used were the shoebox sized ones that I paid $1 each for.
I wanted to get a size of about 24" long to fit the 1/144 Kilo model I will be ballasting.
Two of this size will give me right about 23"x 8"x 4.5".
What I did was take a Dremil tool with a tough grind wheel and cut one end off of each box as close to the end as I could.
Then I overlapped each side by about 1/2" and drilled small holes through each container so I could connect them with small brass screws and nuts.
Then I used some Goop to seal the joint along the overlapping surface and added the screws to hold it together while the Goop dries.
The screws also add support to the joint as well. Goop is one of my favorite bonding agents.

I don't think there is anything it won't bond and seal.
I am going to add a stiffener to the center of the container to keep the side walls from bulging out under the water pressure.
For those that have visited my dockyard in the past you may remember I made a larger version of this type of ballasting tank using a wrapping paper container cut in half. That one was about 60" long. You are only limited to the size of the container you are starting with. BD.


Something you can set up on your workbench to make the tedious job of ballasting easier.
Well I have.
I just wanted to show how to make an easy container in the size you would like.
First you will need a few plastic containers. The ones I used were the shoebox sized ones that I paid $1 each for.
I wanted to get a size of about 24" long to fit the 1/144 Kilo model I will be ballasting.
Two of this size will give me right about 23"x 8"x 4.5".
What I did was take a Dremil tool with a tough grind wheel and cut one end off of each box as close to the end as I could.
Then I overlapped each side by about 1/2" and drilled small holes through each container so I could connect them with small brass screws and nuts.
Then I used some Goop to seal the joint along the overlapping surface and added the screws to hold it together while the Goop dries.
The screws also add support to the joint as well. Goop is one of my favorite bonding agents.
I don't think there is anything it won't bond and seal.
I am going to add a stiffener to the center of the container to keep the side walls from bulging out under the water pressure.
For those that have visited my dockyard in the past you may remember I made a larger version of this type of ballasting tank using a wrapping paper container cut in half. That one was about 60" long. You are only limited to the size of the container you are starting with. BD.
Comment