212A Arkmodel build

Collapse
X
 
  • Time
  • Show
Clear All
new posts
  • bigdave
    Junior Member
    • Feb 2003
    • 3596

    #1

    212A Arkmodel build

    I had purchased one of the 1/48 212A kits from Arkmodel and will be doing a build. I hope to have it at least running by the Carmel regatta.
    It should be a fun build.
    I have already modified one of my 3.1-R cylinders with a larger ballast tank for this beast.
    It may be only 46" long but at 6" wide there is a lot of volume.
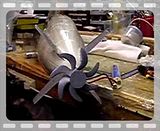
    I will post some photos soon. BD.
    sigpic"Eat your pudding Mr Land"
    "I ain't sure it's pudden" 20K
  • bigdave
    Junior Member
    • Feb 2003
    • 3596

    #2
    Here are some photos of

    Here are some photos of the build so far.
    I have opened up the two access holes in the lower front and rear of the hull.
    I put in a brass bearing holder to mount a 5MM oilite bearing.
    The 5MM included SS shaft will ride on this and the supplied rear bushing.
    The kit is supplied with two props, one seven and one 6 blade.
    I taped the two hull sections together and placed the cylinder in front of them in the other photo to get a feel for the size. BD.


    sigpic"Eat your pudding Mr Land"
    "I ain't sure it's pudden" 20K

    Comment

    • bigdave
      Junior Member
      • Feb 2003
      • 3596

      #3
      I got a bit more

      I got a bit more done. I have the bayonet ring and bulkhead mounted on the rear section. This took a while and is very critical to get this done right or you will end up with a gap or not fit at all.
      Some things need to be done before the front section bulkhead is installed like adding the upper mounting plate for the scopes.
      I made my scopes removable and also made one of them the intake for my low pressure air system.
      It actually plugs into an O-ring receptacle to seal the input.
      You can see this in the inside photo. BD.


      sigpic"Eat your pudding Mr Land"
      "I ain't sure it's pudden" 20K

      Comment

      • redboat219
        Member
        • Jan 2005
        • 523

        #4
        Hmmm, I'm curious to learn

        Hmmm, I'm curious to learn more about your low pressure air system.

        Do you have any photos or diagrams.

        Comment

        • bigdave
          Junior Member
          • Feb 2003
          • 3596

          #5
          I will post some photos

          I will post some photos of my system.
          It is nothing new, its the same system I have in my personal Seaview I made last year. It has been around in one form or another for many years. No matter what you call it, it's just low pressure air.
          sigpic"Eat your pudding Mr Land"
          "I ain't sure it's pudden" 20K

          Comment

          • redboat219
            Member
            • Jan 2005
            • 523

            #6
            Doesn't your Seaview use the

            Doesn't your Seaview use the RCABS-R ?? I was assuming that when you mentioned "low pressure air system" along with the photo of the mast mounted tube you were talking about a snorkel-based ballast system.

            Comment

            • bigdave
              Junior Member
              • Feb 2003
              • 3596

              #7
              I call my systems hybrid

              I call my systems hybrid as they are two separate systems.
              I have two ballast switches on the transmitter. One marked low and one high pressure.
              The low pressure controls the sub from waterline down to decks awash.
              The high pressure controls the sub from decks awash down to the desired depth.
              Here is a block diagram of the system. BD.

              sigpic"Eat your pudding Mr Land"
              "I ain't sure it's pudden" 20K

              Comment

              • redboat219
                Member
                • Jan 2005
                • 523

                #8
                Neat system. Thanks http://www.subcommittee.com/forum/icon_biggrin.gif

                Neat system. Thanks

                Comment

                • bigdave
                  Junior Member
                  • Feb 2003
                  • 3596

                  #9
                  I have some more work

                  I have some more work done.
                  I have made my battery tube which has two A123 3400MA cells inside.
                  This sits in the keel under the cylinder carrier tube.
                  The battery tube has a power switch mounted on one end that will be accessed through a small opening in the keel with a tool I made.
                  You can see the carrier tube I made that the cylinder will mount in.
                  This rests on the supplied bulkheads and is removeable to access the inside of the hull for trimming and to remove the battery tube.
                  The carrier tube has a 1/16" gap to allow the cylinder to slide in and out easily. There are also openings drilled into the carrier tube that line up with the vent openings in the cylinder. So far this has been a really fun build. BD.


                  The business end of the beast!!
                  sigpic"Eat your pudding Mr Land"
                  "I ain't sure it's pudden" 20K

                  Comment

                  • junglelord
                    Junior Member
                    • Jan 2009
                    • 347

                    #10
                    Wow, that looks really nice

                    Wow, that looks really nice Big Dave. I can tell your having fun!
                    Cheers
                    Dean

                    Comment

                    • bigdave
                      Junior Member
                      • Feb 2003
                      • 3596

                      #11
                      Fun Fun Fun!! As Brian

                      Fun Fun Fun!! As Brian Wilson once said!!
                      Here are a few photos of my rear linkages.
                      It is basically a mix of the stock kit parts and my parts.
                      I will try and get a short video of the X-tails working. BD.


                      sigpic"Eat your pudding Mr Land"
                      "I ain't sure it's pudden" 20K

                      Comment

                      • bigdave
                        Junior Member
                        • Feb 2003
                        • 3596

                        #12
                        Here are a few more

                        Here are a few more photos.
                        I just had to put the scopes in with the tail one.
                        She will look great painted with all the extra do-dads on her.
                        Yes I actually said paint 8-balls!!
                        Those that know me are aware of my oversion to paint.


                        sigpic"Eat your pudding Mr Land"
                        "I ain't sure it's pudden" 20K

                        Comment

                        • bigdave
                          Junior Member
                          • Feb 2003
                          • 3596

                          #13
                          Here is a short video

                          Here is a short video of the X-tails working. BD.

                          sigpic"Eat your pudding Mr Land"
                          "I ain't sure it's pudden" 20K

                          Comment

                          • seahorse
                            SubCommittee Member
                            • Mar 2005
                            • 320

                            #14
                            Very nice there Big Dave

                            Very nice there Big Dave ! Can't wait to see her at the pond !

                            Comment

                            • bigdave
                              Junior Member
                              • Feb 2003
                              • 3596

                              #15
                              Well thank you Steamboy!! http://www.subcommittee.com/forum/icon_biggrin.gif

                              Well thank you Steamboy!!
                              I was actually able to button her up enough this morning to do the first in water test.
                              The main thing I found out was I need a deeper test tank!!
                              Looks like I guestimated right on the cylinder size. No foam should be required for lift. Just more weight in the keel.
                              The hull sits high in the water with no tipping but a little tail heavy.
                              I will make some ballasting tubes for the keel that I can add lead shot to so I can adjust the trim.
                              There is still a ton of little things to do but it looks like she will make the regatta. Running at least. BD.
                              sigpic"Eat your pudding Mr Land"
                              "I ain't sure it's pudden" 20K

                              Comment

                              Working...