Side Project

Collapse
X
 
  • Time
  • Show
Clear All
new posts
  • bigdave
    Junior Member
    • Feb 2003
    • 3596

    #1

    Side Project

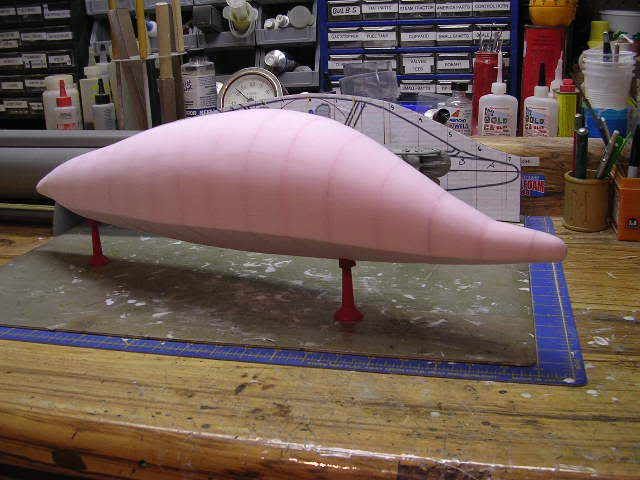
    I just wanted to post a few photos of my latest side project. Some of you may recognize this as the Innaspace Dolphin Boat. (No it is not Mothura!)
    I am attempting to build a lost foam hull in 1/8 scale of their new Seabreacher version using the technique stolen from Steve Neill. I have the plug about 90% done and am waiting for the epoxyglass resin and cloth to arrive. I wish I had more time to work on her but my kits come first. It should be a fun boat to run. Hopefully I won't screw it up, as making hulls is not my thing. I guess you never know till you try. BD.


    sigpic"Eat your pudding Mr Land"
    "I ain't sure it's pudden" 20K
  • bigdave
    Junior Member
    • Feb 2003
    • 3596

    #2
    I have started to put

    I have started to put the epoxyglass on the outside. So far so good! It is a bit tricky to cover with all the curves. It would also help if I knew what I was doing!! BD.
    sigpic"Eat your pudding Mr Land"
    "I ain't sure it's pudden" 20K

    Comment

    • bigdave
      Junior Member
      • Feb 2003
      • 3596

      #3
      I'm back!! I have got

      I'm back!! I have got a few more hours into the Dolphin boat. The hull is done. (Glassed and sanded anyway!!) I hate sanding glass with a passion!! I itch all over!!! I have 4 layers of 5 OZ and 0ne layer of 2 OZ on the bottom, and one layer of 5 OZ and 3 layers of 2 OZ on the top. Sanding between each layer. I came out much better than I thought it would. Next will be to cut out the engine hatch and canopy. Then gouge and melt out the foam. That will be fun!! NOT!!!! BD.


      sigpic"Eat your pudding Mr Land"
      "I ain't sure it's pudden" 20K

      Comment

      • tmsmalley
        SubCommittee Member
        • Feb 2003
        • 2376

        #4
        Nice Dave - Better keep

        Nice Dave - Better keep working so it is done by August 18!

        Comment

        • bigdave
          Junior Member
          • Feb 2003
          • 3596

          #5
          Thanks Tim! http://www.subcommittee.com/forum/icon_biggrin.gif
          That is

          Thanks Tim!
          That is my plan anyway!
          Here are a few more photos. I have removed the foam, cut the engine hatch, and the canopy out. It is nice and strong! I am Happy Happy Happy
          Now on to making all the ideas in my head work in the boat!
          Or try anyway BD.


          sigpic"Eat your pudding Mr Land"
          "I ain't sure it's pudden" 20K

          Comment

          • bigdave
            Junior Member
            • Feb 2003
            • 3596

            #6
            I have a little more

            I have a little more done. I have all the output seals and bushings installed, and a drive system. All scratch built except for the prop. I have ordered a 540 sized brushless motor and ESC for the power plant. That has got to get Flipper moving . It is good for 55 AMPS! As Dr Frankenstein said!! IT"S ALIVE!!!!!!!!!!!!!!!!!!!!! BTW-Tim. I am using the Sintra on the flippers. Nice stuff! Thanks!! Very easy to work with. It should work great because it gives a little. Just in case I BOP them on something. BD.


            sigpic"Eat your pudding Mr Land"
            "I ain't sure it's pudden" 20K

            Comment

            • tmsmalley
              SubCommittee Member
              • Feb 2003
              • 2376

              #7
              What do you mean "in

              What do you mean "in case"? Better make a few extras
              T

              Comment

              • bigdave
                Junior Member
                • Feb 2003
                • 3596

                #8
                Everyones a critic!! http://www.subcommittee.com/forum/icon_rolleyes.gif


                Everyones a critic!!
                But then again, you have seen me run!!
                It did not take me long to break the Sushi last year.
                sigpic"Eat your pudding Mr Land"
                "I ain't sure it's pudden" 20K

                Comment

                • bigdave
                  Junior Member
                  • Feb 2003
                  • 3596

                  #9
                  Here is a view of

                  Here is a view of the bottom showing the four flippers prop and rudder. BD.
                  sigpic"Eat your pudding Mr Land"
                  "I ain't sure it's pudden" 20K

                  Comment

                  • bigdave
                    Junior Member
                    • Feb 2003
                    • 3596

                    #10
                    I have installed the servos

                    I have installed the servos and linkages, and have set it up like the real boat.
                    The left stick will control the throttle and rudder. The rudder is coupled to the rear flippers. So when the rudder turns the flippers will turn just like they were a V-tail on a plane (Or X-tail on a sub). The builders of the real boat found on this second version that the rudder behind the prop and the rear flippers made for better surface turning. The original Dolphin boat only had the flippers. The front flippers are on the right stick. They are set up like the elevator and ailerons on a plane. I am using the radio mixer so when I push the stick front to back both flippers will move like dive planes. If you move the stick side to side the flippers will act like ailerons on a plane and roll the boat. (Upside down) So it is just like flying a plane through the water. BD.


                    sigpic"Eat your pudding Mr Land"
                    "I ain't sure it's pudden" 20K

                    Comment

                    • talwar
                      Junior Member
                      • Mar 2007
                      • 20

                      #11
                      Hello Master D.

                      That's looking

                      Hello Master D.

                      That's looking terrific!
                      How did you cut the frames? Did you first make the cardboard templates and then stuck them to the foam on both sides?
                      Did you leave some spare to sand them to shape once you have them all put next to each other? And what's the small device you have stuck to the frame in the third picture of your first post?

                      This is one funny looking model! I hope you'll be painting it this time though, it would look even more exciting then! Maybe bright orange would do?

                      Comment

                      • bigdave
                        Junior Member
                        • Feb 2003
                        • 3596

                        #12
                        The patterns were applied to

                        The patterns were applied to the thin cardboard with white glue. Then the cardboard was cut and sanded to the edge of the patterns. I run a bead of thin CA glue on the edge of the cardboard to stiffen it up for the wire cutter. The templates are placed on either side of the foam blank and held together with long bolts. (That is what you see in the photo) Running the hot wire around the foam blank riding on the two templates will leave you with a hull section when you remove the bolts. Then I just tack glue the sections together with contact cement. Very little shaping and sanding is required to finish the foam hull plug. BD.
                        sigpic"Eat your pudding Mr Land"
                        "I ain't sure it's pudden" 20K

                        Comment

                        • talwar
                          Junior Member
                          • Mar 2007
                          • 20

                          #13
                          Hmm, I don't have a

                          Hmm, I don't have a wire cutter, so I guess I might use the same method as you, but with the jugsaw and leave a little edge around the template. Then put them all together and sand to a smooth finish.
                          Do you think that would work out?
                          I've been following steve's method at SP too, but when I gave it a try, it didn't really work out fine (expressed really softly here). Also when I put them together, I didn't have a curve but just had a bunch of angled surfaces, hence it would require more sanding to get the right curve when they are put together.
                          I suppose I'll have to use this method combined with CStranc's method for his Sierra, using a rod to put all the sections together.
                          New stuff to think about!

                          Comment

                          • bigdave
                            Junior Member
                            • Feb 2003
                            • 3596

                            #14
                            You would have to be

                            You would have to be careful not to cut the cardboard templates with the saw blade. I would buy or make a wire cutter, they are cheap. You just need to pratice cutting with the wire. It took me some pratice before I could get a good smooth cut. BD.
                            sigpic"Eat your pudding Mr Land"
                            "I ain't sure it's pudden" 20K

                            Comment

                            • clive
                              Junior Member
                              • Dec 2006
                              • 65

                              #15
                              Dolphin

                              I have been very interested in your efforts with this project and my interest has been helped with the photos yoou have put up.

                              I am waiting patiently to see how you manage the moulding of the cockpit screen. Even at my tender age I am always willing to learn.

                              Thank you and keep up the good work

                              Clive[/b]

                              Comment

                              Working...