1/25 Type VIIC/41 Scratch Build.

Collapse
X
 
  • Time
  • Show
Clear All
new posts
  • mylo
    Junior Member
    • Aug 2005
    • 723

    #76
    Steve,

    Oh don't worry, you'll

    Steve,

    Oh don't worry, you'll have more to say when I start asking about the moulding process. .....get ready.

    Tim,

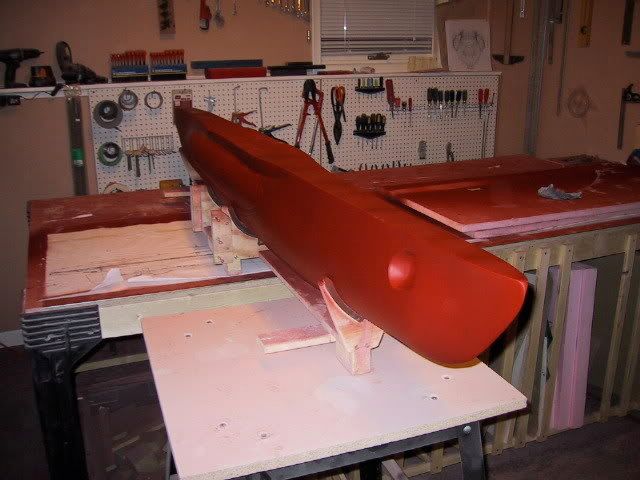
    I seriously hope that this is going to make a fine r/c model. While my intention with this sub is to go on patrol at my local lake, I would also like something that is "reasonably" decent while on static display at home in dry dock. I am leaning more towards function than presentation as I expect it to take some bumping and knocking around during it's patrol missions......and I don't want to break into tears if I get a little scratch on it.

    Brian,

    Thanks for that, and no apology required. I'm not doing this for praise, just to help educate, enlighten, and maybe present an idea or two. I too look forward to getting this thing in the water. That very thought helps to keep me motivated. I WILL have my dive mask handy and I WILL retrieve it if she sinks.....and doesn't come up....even if I have to drain the lake. I'm quickly realizing that my deadline of "next Summer" is going to push me. ....just shy of 200 hours into it in 2 months and I don't even have the masters done yet.

    Very respectful, but please, don't call me "Sir.".......just doesn't sit well, not natural. ....but your point is made, it's a respect thing. Again, thanks.

    This is my first "real" build. I mean, I've dabbled with some scale "out of the box" models and have a small 12' x 7' HO scale railroad that I tinker with from time to time, but as far as REALLY building anything from scratch, this is it. I'm learning a lot (LOT !!) and am developing some skills along the way. I believe the time I've put into this project so far reflects that......and like I've said before, that time does not include my "do overs". Like learning anything new, there is a learning curve and we have to expect screw ups as well as an investment in time. I'm finding that the trick is to accept each new learning process as it comes and take some time to do it the best you can. I used to get frustrated when facing a modelling task that I didn't know how to do. Now, I enjoy figuring it out and adding to my skill set. I find a lot of satisfaction in producing a nice (not neccessarily perfect....just nice is good) result using a new technique, material, skill. .......if this sub takes me 5 years......I'll consider that pretty cheap entertainment. Having said all that, I'm trying my best to stick to my goal of a minimum 20 hours / week. There have been plenty of evenings where I just haven't felt like going into the shop and sanding, but I convince myself to put in 1 hour. That 1 hour usually leads to more and in a few evenings, that daunting sanding job is done.

    I feel that staying motivated with a project is THE most important requirement of getting anything accomplished. The guys that have something in the water know that......and the guys that still have that 20 year project on their workbench know that too. I personally imagine myself operating the sub ...... DIVE DIVE DIVE !!!

    Mylo

    Comment

    • stark
      Junior Member
      • Jul 2006
      • 243

      #77
      Ok no sir crap, hey

      Ok no sir crap, hey I am only 41 this year and pimple faced kids don't even say that anymore, but when they do I still think Hey I ain't that old looking to derserve that!

      Praise, for me is to express approval of ones work, all are mortal in my book! And I like your work. To build for approval, well your only as good as your next post.

      Glory of a build, sure hey if You do what others only think of doing , or say they will one day, but don't, you deserve a pat on the back, even if you gota do it your self.

      I make myself happy with my builds, and others share in my achievement, it can help others to strive for the better in them selves, sure it can go to your head but that is where your character is at risk and this is yours and yours alone. I post to show my way, with hope it helps others to get off their butt and build something, and for the respect of my peers, to do all the wright up, stop and take photos, a lot of extra work my friend, so for me to get compliments from my work is good and I do it for that too!!

      I like to wright about what I do now, model magazines, How to books these are the things I like to read. What one man does, I bevive another can put a simple spin on, and make it easyer for all, but only if he tell's!

      To share is a important Key in our small hobby, another point drove home to me by David Merriman. So to the Guy's here and at Sub Pirates and the other sites and magazines that take the time to post and tell all, Hurrah to you!!

      Molds, good to know you plan copies, a daunting task and with so many U Boat lovers out their you may very well be looking at a long on going task of making this one. Steve, Kevin, Pete, Merriman to name a few can answer those question quite well. A good mold set up right will go a long way, and is worth it's weight!

      Overwhelm I too become with some of my projects, a break now and then is not only normal but a good thing. Some of my builds I can not turn away from at times, to a point where all other things can get too takeing a back seat! Other times I go days/weeks with out looking at it, but I allways return sooner or later.

      Once again I find myself in awe of another modelers First Build, so Kudos to you in your build! And keep them comming I like to read build post.

      Brian

      Comment

      • mylo
        Junior Member
        • Aug 2005
        • 723

        #78
        Brian,

        Cool post. I agree

        Brian,

        Cool post. I agree on all points.

        I'm a believer in action over words. Words don't hold a squirt of pee to me. "Hey everybody, I'm the self proclaimed King of the World." .....see...it doesn't mean Jack. I have a lot of respect for anybody who builds anything for the simple pleasure / experience of it....and I don't just mean models. This is also why I hold many of the modelers here at Subcommittee in high regard....I simply don't care about their skill level or the quality of the final product, just their motivation level and the fact that they got away from the T.V. to do something productive. I hope this thread inspires in some way, that's all the praise I need. I would definately feel a certain sense of pride if I have contributed to this hobby in some small way by showing this build.

        Like you, I am quick to post a reply in other builder's threads expressing my appreciation of their work as well as the extra effort it takes to document and post it, as it is a lot of extra work. I always find something of value and enjoy seeing how others do stuff. ...10 ways to skin a cat....which one is right ? For me, I have to put in a little time, if not every day, then every other day. I also like to put in a full 12-16 hour day once in a while too, to get a good start on some of the bigger tasks, or finish a certain part all in one day. I don't like leaving a project sit too long, I find that I forget where I'm at and what I need to do next. ....but that's me. Time that I spend in my work shop is time well invested to me. Turn on the radio, have a beer while I contemplate my next move....think a little more...that kind of thing. I'm lucky, my free time is my own.....my divorce papers say so. (unrelated to this sub).

        I've already got a couple of my buddies wanting copies of this hull and are thinking about getting into r/c subs. Their wives aren't quite as thrilled

        Thanks for the response.

        Mylo, the 37 year old kid who likes to play with toy boats.

        Comment

        • mylo
          Junior Member
          • Aug 2005
          • 723

          #79
          ** TIP OF THE DAY

          ** TIP OF THE DAY **

          ....When handling a mould plug that is still wet and slippery from being wet sanded, use extra caution to avoid.....oh I don't know....say...having it slip out of your hands and hitting one of the tools on your work table, resulting in damage to the plug....that you are going to have to spend another couple hours fixing by sanding / filling / sanding...etc., etc., etc.

          It brings me such great joy to share these jems of information with you all.

          Needless to say, my progress post for today is going to be delayed.

          Not happy.........NOT HAPPY


          Mylo

          Comment

          • raalst
            Senior Member
            • Feb 2003
            • 1229

            #80
            Mylo,

            Sorry about the damage to

            Mylo,

            Sorry about the damage to the plug, but

            reporting what problems you encounter is very much appreciated by me !

            I learn most from this sort of threads. I've seen quite enough
            "look I am perfect and this beautiful model took me only one
            afternoon to build
            " type of threads.
            They only serve to give me a sense of failure when it takes me a week....

            Now, a deep breath and some sanding paper will get you on track again
            and give you a marvellous one of a kind model ! Go !

            Comment

            • mylo
              Junior Member
              • Aug 2005
              • 723

              #81
              Ronald,

              ....It's 04:52 AM where I'm

              Ronald,

              ....It's 04:52 AM where I'm at right now and I've been up all night with this thing, because I was so pissed off at myself. ...remember when I said a couple hours to fix, ...well, ....I've been at it for 7 or so, and I'm still not done. My little bump put a dent in the hull that I didn't see, throwing the shape out of symetry. I'm paying an extra little price for not adding the fibreglass cloth to the resin, because my resin only plug here is not quite as durable, but I wasn't expecting to drop the thing. ...and of course, in the process of fixing this little ding, I've noticed other areas that could use some improvement and refining. I'm determined to get this hull plug as good as I can, but there is going to have to come a point where it'll just have to do.....I can justify it by just saying that I'm sure the actual boat had flaws too. What I remain focused on is making sure I get the shape and symetry accurate. I would rather log the hours now, then get it in the lake an not like how it looks. I guess it all depends on each person's level of pickiness (is that a word ?).

              I have no ego and no visions of being grand. I'll tell everyone all about my screw ups in the hopes someone can avoid the same. If there are PRO builders out there that can do this stuff without a hitch at break neck speed, I envy them. Me on the other hand, I am a mere mortal. ....just take a look at my "Hours to date" log, I believe that tells the story.

              If I have any advice for guys contemplating a build, simply make sure you are not pressed for time...that you NEED to get it done RIGHT AWAY. If that's the case, buy one already built. If like me, you like the process (other than the self inflicted wounds), then I highly recomend taking it on. It's certainly a project unlike any other I've tried.

              .....well, ....couple hours sleep and I'll be back at it. That's the way I am. When I mess up one of my projects, I just HAVE to fix it right away, or I go nuts thinking about it. ....I'm sure there is a medical term for my affliction....and maybe drugs I could take to remedy it.

              Till next time,

              Mylo

              Comment

              • sam reichart
                Past President
                • Feb 2003
                • 1325

                #82
                Mylo-
                I just wanted to let

                Mylo-
                I just wanted to let you know I think that your build thread here is great, and like raalst stated, informative even where you have a problem develop.

                Keep up the great work, and the writing...even the tongue in cheek comments add to the flavor!

                Comment

                • mylo
                  Junior Member
                  • Aug 2005
                  • 723

                  #83
                  Sam,

                  I see no reason

                  Sam,

                  I see no reason why this thread can't be entertaining as well as educational. If I start to sound too serious, please dispatch the authorities to my house as I may be contemplating sticking my head in the oven. Don't think the thought didn't cross my mind when I dropped my plug (which weighs about 50lb / 22kg). The neighbourhood was treated to some choice words. I'm sure they already think I'm nuts, and yelling profanities in my basement doesn't help bring me in good standing. The bonus is, my neighbours leave me alone, and I don't think they dare complain . Every town has a nut case, I guess I'm it.

                  My little break is over and I'm heading back to the shop. I'm basically just tinkering and adjusting, and fixing, and eyeballing, and running my hand over to check smoothness, and drinking coffee, and....., and. ...nothing really to report.

                  ...but before I forget, I DO want to let everyone know that I actually developed tendonitis in BOTH my elbows from the amount of sanding I've done in the last month. I kid you not, ....sharp pain in my elbows. Turns out I had a medical to get done for work so I asked the Dr. about this pain, ...what the deal was. He asked, "Have you been doing any repetitive physical labour with your arms lately ?" .....Uhhhhhhh......now that you mention......yes, .....just a little....to the tune of maybe 100 hours of rubbing sand paper in a circular motion. "Yep, that'll do it." he says, laughing at me when I told him what I was up to. I'm 'supposed' to let off on the sanding for a while, there is no other fix I guess. For what it's worth, I'm not listening to him. There'll be plenty of time to rest my elbows when I get this thing in the lake.

                  That's the scoop from the Mylo U-Boat Production Facility.

                  Comment

                  • mylo
                    Junior Member
                    • Aug 2005
                    • 723

                    #84
                    As per my previous post,

                    As per my previous post, I have completed the repair as a result of my clutsy-ness. 9 hours to fix a 1 second lack of good judgement. I am not adding this to my hourly build log as it was completely un-neccessary. Mental Note ** a smooth resin finish is very slippery when wet. BE CAREFUL when handling. **


                    [b]Step 43 ]

                    After finishing the aforementioned plug fix, I just wanted a simple little job to do, to say that I at least made some progress today. Looking around, I noticed that I neglected to do the Direction Finding Loop housing for the conning tower bridge. Why ??....I don't know. This step should have been done along with the RADAR antanae enclosure when I was building the bridge section, but for whatever reason, I forgot. Now was a perfect time to get it done.

                    No mystery here:

                    Trace from plans, copy to MDF, cut, sand / shape, glue to inside of bridge enclosure, fill gaps with drywall (sheetrock) mud, sand, paint, sand, prime. ....done. A nice easy job, just what I needed today.


                    More to come,

                    Mylo

                    Comment

                    • mylo
                      Junior Member
                      • Aug 2005
                      • 723

                      #85
                      Step 44 ]

                      After completing the

                      [b]Step 44 ]

                      After completing the repair on the plug (after dropping it), I prepped the entire plug for the initial primer coats by going over it with 220 grit. I find this about the right grit to use. It has some bite, yet the primer will fill in any scratches the paper makes to the surface.

                      After sanding with 220 grit, the entire plug received 4 layers (coats I guess) of primer from a spray can, one can for each layer. After the primer was dry, the hull was then wet sanded with 350 grit followed by 1500 grit. Wet sanding with 1500 is like polishing. This is where I left off from dropping the plug a few "steps" ago.


                      [b]Step 45 ]

                      Once I was done wet sanding the plug with 1500 grit, there was no doubt it was smooth, but I had noticed a number of problems that were going to need fixing.

                      The most significant being the shape of the fore deck. I had it all wrong. I had too much slope on the vertical area where it flushes up to the saddle tanks. The top "footprint" was also too wide by 1/4" on both sides, which is why this slope was wrong too. I discovered that the problem was in my master former templates. If you remember ...wayyyyy back near the beginning, I had commented on how difficult it was to cut the paper template from the copied plans. It turns out I made a mistake cutting out the paper templates in the area of the fore deck and made them too wide. It simply didn't occur to me that I had screwed that up when I was building the foam plug. What I should have done, which is what I did at this time, was to cut the paper plan out and spray glue it to a piece of .040 styrene sheet. I then used this as a template to check the shape of the foredeck. I should have checked my paper template cutouts with this fore deck template, and THEN construct the master formers. I dug out my belt sander and .....GROUND....the foredeck down to close to the proper shape, then finishing with sanding by hand using the fore deck template as a guide.


                      I was not thinking pleasant thoughts while doing this. I had JUST finished fixing the plug after being a cluts....now I was hacking away at the plug with a belt sander because of some other screw up I made way back near the beginning. The lesson of being maticulous with planning and measurements was being beat into my head. Once the fore deck was shaped properly, a coat of mud was applied and sanded. This was then painted....and sanded. Followed by resin....and sanded. Finally, spot putty.....and.........sanded. In other words, totally rebuilt. When I was done fixing the fore deck, I stood back, looked at it...and thought, ...."There, THAT's how it supposed to look." I was happy with the fixed results.

                      After the episode with the fore deck, I decided to go over every inch of the plug with my contour gage. This is a very handy tool. It's cheap to buy, simple to use, and works very well for this kind of project. In doing this, I found two other areas that needed additional work.


                      There was a spot near back of the saddle tanks, close to the top of the deck, that was contoured inwards. Kind of like a little dip. Not good. The fix included the usual steps with obviously the time to let the materials cure before sanding]http://i119.photobucket.com/albums/o153/Mylo42/45b.jpg[/img]


                      [b]Step 46 ]

                      The saddle tanks on an actual type VIIc have a defined shape to them where they meet with the hull, kind of as if they were an "afterthought" that was welded onto the outer hull.


                      In the making of the plug, it was not possible to get this defined shape during the actual plug making process. I tried to figure out how to do it, but decided that the best approach would be to shape the tanks once I had the plug basically made. In making the plug, the saddle tanks had a very rounded, almost streamlined look, like it was a futuristic type VIIc maybe. In any case, this is obviously WRONG and so I was now ready to give them the proper shape.

                      I started by taking a paper template from the plans of what the shape of the saddle tank is and traced a line onto the plug.


                      Using my rotary tool with a small sanding drum, I cut along this line and trimmed the excess material (the stuff that made the tanks round) away. In many parts, this took me right down to the pink foam core.


                      After grinding this material away, the area was sanded and a layer of mud applied. The mud was then sanded followed by the paint. While the paint was setting up, I used a smudging pencil (I have all kind of these types of tools from the construction of my model railroad) to run along the edge of the tank in order to wipe the excess paint out of there in order to keep the area defined. I just kept running the pencil on the edge of the tank to clear the paint as it set up. This took about 15 minutes.


                      Once the paint was dry, it was sanded, being careful of the area where the tank meets the hull. Then the resin was applied. I used the same technique with keeping the excess resin from building up in the area where I was trying to keep defined, except the resin was sticking too much to my smudging pencil, which is basically just a really tightly rolled piece of paper with tips at both ends. I substituted a souvlaki meat skewer (yes, the food thing) for the tool and just like the paint, kept running it along the tank/hull joint to keep excess resin from building up. I had to do this for about 10 minutes.


                      Once cured, the resin was sanded and then I took a file to the joint to add a little more definition and sharpen it up.


                      After the filing, a final go over the saddle tank area with 220 finished it up.


                      The plug was now ready for a second application of primer coats. What flaws remain, I am going to justify by saying that those same flaws exist on the real boat, .....and that I'm just REAL maticulous with my modelling. The last few steps have been slow with all the downtime waiting for materials to dry/cure. Plus, it just isn't a whole lot of fun fixing screw ups. I believe I have redone every part of this plug now. Initial planning, I can not say enough about being thorough with initial planning, it could save....HOURS.

                      More to come.

                      Mylo.

                      Comment

                      • mylo
                        Junior Member
                        • Aug 2005
                        • 723

                        #86
                        Step 47 ]

                        The plug that

                        [b]Step 47 ]

                        The plug that was previously sanded down with 220 grit was now primered in preparation for the application of the weld line and other hull details. I had thought that I was going to then have to 1500 grit wet sand this primer coat before adding the weld line tape, but it turns out that when this primer coat dried, it was already nice and smooth with the tape able to adhere so....I decided to actually SAVE myself a few hours by not sanding it prior, as it was going to be 1500 grit wet sanded once the hull details were applied and primered over again anyway. It could have something to do with the primer I used this time. I bought some Tremclad Rust Paint primer, only because it was the only kind that the store had. It turns out, this stuff is way thicker than the other primer I used. It covered much better and took fewer coats. Go figure, it also cost more. I would recomend using this stuff for this application though. This was the first real time to see how the hull was shaping up. I'm done "fixing" the plug, and to me, things look correct. If not perfect, I'm ok with it, this plug represents my best effort. I'm looking forward to the detailing process as I suspect the plug is really going to start looking like a type VIIc/41 U-Boat. I'm hoping the "grunt work" is pretty much done in terms of the heavy duty molding, shaping, sanding, grinding, plastering, putty, ....and the like.


                        More to come,


                        Mylo

                        Comment

                        • mylo
                          Junior Member
                          • Aug 2005
                          • 723

                          #87
                          Step 48 ]

                          The tower was

                          [b]Step 48 ]

                          The tower was gone over again with 220 grit in preparation for the primer. The same Tremclad Rust primer was applied to the tower and hand rails as the hull.

                          The handrails were placed on the tower, and the tower on the hull for "visual effect". for the photos, get an idea how the sub is looking.


                          I am currently working on the weld line detailing. There could be a few days before my next post.

                          Until then,

                          Mylo

                          Comment

                          • oracle_9
                            Junior Member
                            • Jan 2007
                            • 15

                            #88
                            Awesome build thread!!

                            I dont know

                            Awesome build thread!!

                            I dont know if it was mention concerning for the mold making process, but here is a link:


                            Look under the "3/6/2006" section shows more about the mold making of a large r/c SR-71 blackbird jet, just to give some ideas.

                            Comment

                            • mylo
                              Junior Member
                              • Aug 2005
                              • 723

                              #89
                              oracle_9

                              Thanks for the link,

                              oracle_9

                              Thanks for the link, ...and compliment. Glad you found it of interest.

                              Mylo

                              Comment

                              • mylo
                                Junior Member
                                • Aug 2005
                                • 723

                                #90
                                Step 49 ]

                                It was

                                [b]Step 49 ]

                                It was finally time to get down to the part that I really enjoy, and that is detailing. After some much appreciated input from Steve Neil in regards to the extent of detail that a mould is able to capture, I decided to "tone down" my efforts from what I had originally planned. The detailing on this VIIc/41 is going to consist of the Pressure hull / outer hull separation, weld lines, and flood holes.....and maybe a couple other things.

                                My first obstacle was that my plans, both the original 1/100 scale and the 1/25 scale enlargements had virtually NO weld line details and were quite useless. It wasn't until I spent a few hours researching and gathering all the photos I could find, that it occured to me that I could use my Revell Type VII/c 1:72 (yes, the one EVERYBODY has) to get this information as this hull, as we know, is quite well done and would most definately be the best resource available to me for this. After doing some math by dividing the two scales, I would come up with a multiplier to add to any measurement taken from the Revell Hull. 72/25 = 2.88. In other words, if I measured a weld line on the Revell Hull that was 10 mm, I would multiply this measurement by 2.88, which in this case would be 28.8 mm. The result would be how long this weld line would be on my 1/25. I decided to round the result to the nearest mm.....I mean, there's no point be anal about it. So the entire weld line / hull separation detail process was.....measure a portion of weld line on the Revell, multiply by 2.88, and draw the result on the 1/25 plug being VERY CAREFUL to draw the line in the correct place by using a whole bunch of references to where the line should be (eg: how close is the line to the anchor well, how close is the line to the upper deck, how close is the line to the tip of the saddle tanks, etc., etc.).


                                After drawing a couple lines, I would step back with Revell hull in hand, look back and forth from the Revell to the 1/25. If my brain said, "Yep, looks the same", then I continued on to the next series of lines. It was quite the excersise in geometry and mathematics.....and ....."eyeballing". A tool that I found very handy was my "floppy" ruler. This ruler is stainless steel and quite thin and "floppy". It was great because it would conform to the hull easily. I used many, many different drawing/measuring tools to get this job done from 4' aluminum construction ruler to one of those chinsy plastic protractors, and pretty much everything in between, but the one used the most was Mr. Floppy. The lines were drawn on with a black marker that has a pretty fine tip. In putting on the lines, it was important to get the plug level to the table so that lines that needed to be square with the keel, I could do that.


                                I decided that to do the flood holes, I was going to require stencils. To build the stencils, I was going to have to build a hole punch for every different size/shape of flood hole. The idea behind the punches is to "punch" out the stencil from the plan. The punch is nice because it ensures that each hole is the exact same. These same punches would be used to punch out tape for the process of defining the flood holes in the plug. This is a technique that I would especially like to thank Steve Neil for. When I read his XVII build thread, I thought it was a hell of an idea.


                                I built the hole punches using corresponding sizes of brass tube. The ends were then shaped according to the shape/size of the flood hole. On the round flood holes, this took little more effort than to pick out the right size of brass tube. For the elongated holes (most of them), the brass tube had to be worked until the right shape was obtained. At first, you would think that just sqeezing a round tube would make it elongated. In fact, it does, but it's FAR from being semmetrical, especially the rounded ends, which are what required the most working. It looked more like I was making horse shoes from the techniques and tools I was using to do this. After the brass tube was shaped, the ends were sharpened using a grinder and filing. It took 4 hours to build these punches.

                                Once the punches were built I just, ....punched out the flood holes on the side profile plan.


                                To do this, I had to put a piece of plywood under the plan so that the punch had a soft backing. The malamine table surface did NOT work, as I found out after hitting my first punch, flattening the sharpened end of the punch, and spending another 1/2 hour fixing it. (fix, fix, ....fix, ....fix, fix, fix....I have nightmares about "fixing stuff" lately). Even using the soft plywood backing, I had to periodically check my punch, and give it a minor tweaking with needle nose plyars or a rasp with a file. The brass is just too soft. I think I would try making these out of steel next time. It didn't help that the paper that the plans are printed on is very heavy guage so I had to hit the punch pretty good to cut through. Some of the holes needed to be cleaned up with a hobby knife before the punched part would separate.


                                After punching out the flood holes of a certain area, I then cut around to make the stencil. I made sure that I left some type of reference line/mark on the paper so that I could line it up properly on the plug. For eg, for the flood holes that run near the upper deck, I cut the stencil out flush with the upper deck on the plans. In this way, all I had to do was put the stencil flush with the upper deck of the plug, and it would be alligned properly. In the two photos above, this stencil fits neatly between the torpedo outer doors, it was specifically trimmed to allow that. If I couldn't use something like the upper deck, I had to figure out some other reference. The point being, each stencil had a reference of some sort on it.

                                Once the stencils were cut out, they were applied to the plug using their references to ensure proper placement. The area around the stencil was then masked off.


                                Once masked, black spray paint was applied. The "theory" is that there would be black paint left on the plug where the stencil was cut out, which, represented the flood holes. This technique worked well. However, there was some running of the paint as well as some holes being a little vague because the paint overspray had made it's way around some of the stencil. This was not the end of the world. The markings that I'm putting on at this point with these stencils are simply guides to be used for applying the tape, which are going to be what actually leaves the indentations in the mould. (this process will likely make more sense when I actually get to it and show what is happening). These painted on guides will serve their purpose well, even if they don't perfectly represent the actual flood hole due to some distortion. Once the paint was dry, the stencils and mask were removed.


                                The plug now had the detail lines drawn on. The next step would involve actually applying the tape which will make these details show up in the mould.


                                This final photo has the ever popular 1/72 Revell Type VIIc next to my VIIc/41 to give an idea of scale. I was hoping that all the detail put on the plug would be visible in the photo so that I could get some of the critics piping up, but.......


                                Step 49 was completed in one day, 18 hours. I was up at 05:00 this AM to start. I'm getting the feeling that there will be more such days if this thing is going to be ready to go for this coming up summer. For those contemplating a build of this magnitude and complexity, ....ask yourself two questions :

                                1) Do I have a life ?
                                2) Would I like a life ?

                                If you answered "Yes" to either question 1 or 2, you may want to put a lot of thought as to what it is you are getting yourself into.

                                ...and...for those of you wondering, yes, I do have a job that I put 40+ hours / week into. How do you think I pay for this stuff ?

                                More to come......I'm not about to stop now.


                                Mylo the Moron.

                                Comment

                                Working...