1/96 688i anechoic tile

Collapse
X
 
  • Time
  • Show
Clear All
new posts
  • PaulC
    Administrator
    • Feb 2003
    • 1542

    #1

    1/96 688i anechoic tile


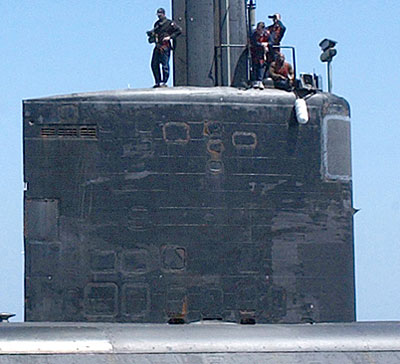
    While recently upgrading my ThorDesign 1/96 flight three LA, I've studied countless pictures of Los Angeles class boats. One feature that can't be avoided in 1]http://www.warfish.com/images/LA/sail-01.jpg[/img]

    The sail became my test project. It is small and if my planned methods didn't work, I could easily touch it back up to the way it was before. By studying real LA sails I noticed that the tiles aren't a uniform covering over the entire sail but rather are cut out around different parts such as diesel exhausts, sonar windows and trailing antenna flushing tubes. By paying attention to several photos (downloaded from the NavSource Online submarine photo index) I carefully masked off my sail to cover all areas that would not receive the tiling. As no two boats have the exact same patterm of tiles I felt no pressure to get it "perfect" (sorry about the burred image).

    I then applied approximately 5 coats of flat black to the masked areas. I allowed them to surface dry quickly in direct sunlight between coats. Attention was paid to make sure paint was built up along the masked edges. This was where the thickness of the tiles would be visible.
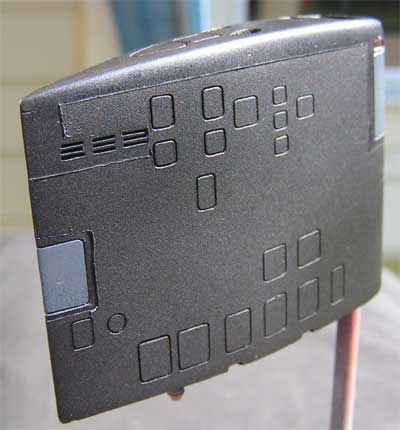


    With the tape removed, the thicker layers of paint created a slight relief defining the tiled area. The edge was knocked down with a light wet sanding of 2000 grit. At this point I was pretty pleased with the results. Special note goes to Steve Neill and Kevin McCleod -- I learned this trick by reading their prospective scratchbuilding threads.
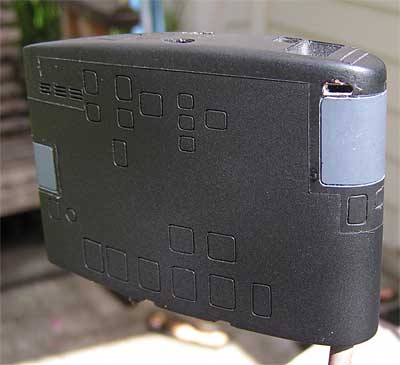


    I was pretty thrilled by the initial results. The extra layer was visible without looking out of scale. But I was only half way there. I had to simulate the tiles themselves. Having considered recommended paint masks, etc. I decided to give the old tried and true method, scribing, a try to see if the effect would produce the results I was looking for.
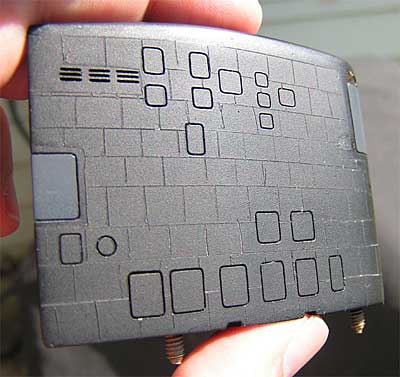


    Using a plastic straight edge and scriber, I first laid down the horizontal lines on each side of the sail. Each line was made with a single light pass of the scriber. Care was taken to start a slight bit in from the paint edge. My goal was to suggest the tiles rather than define them like the access hatches and sonar window edges. With both sides done I carefully worked the lines around the curved leading edge of the sail.
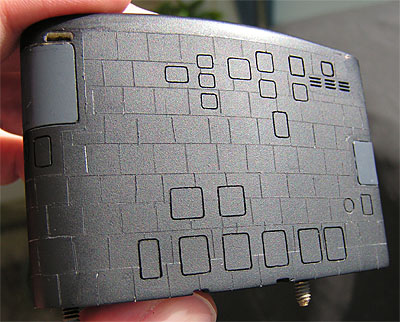


    The vertical lines were scribed individually in a staggered brick pattern to follow the originals. Spacing was generally kept uniform but since the tiles are custom cut in many places to fit the real boats, I again felt free to improvise. A little paint weathering will tend to hide mistakes and further soften the scribed lines.

    Overall, I am extremely pleased with the look. From a distance, one has to catch the model with the right light and angle to see the detail -- just like the real boats. But up close it is easy to see and gives it a unique texture. With my courage up I've decided to apply the same techniques to the hull next using a jig and surface marking tool to hold the scriber. I'll post the results when I'm done.


    Edited By PaulC on 1148511446
    Warm regards,

    Paul Crozier
    <><
  • anonymous

    #2
    Very nice Paul! I was

    Very nice Paul! I was weighing the tape method followed by heavy coats of primer (per Marc from FX) for my PARCHE. Basically, lay out the pattern with Chartpak and apply multiple heavy coats of primer. Pull the tape before full cure and (in theory) you get a nice representation.

    Your way looks a bit easier....

    Comment

    • PaulC
      Administrator
      • Feb 2003
      • 1542

      #3
      Thanks, Chris! It's one of

      Thanks, Chris! It's one of those things that always bugged me. Especially when the boat was sitting next to my Thresher - which didn't have any tiles - and the two hulls looked the same.

      Another pass with wet 2000 grit will soften the tile lines a bit too. Hopefully I can set the jig up right so I don't booger up the hull.
      Warm regards,

      Paul Crozier
      <><

      Comment

      • mermaid
        Junior Member
        • Feb 2006
        • 106

        #4
        Right On!! Great idea. You

        Right On!! Great idea. You seem to have done a fantastic job. I posted some months ago asking for suggestions on how to stimulate the hull anechoic tile pattern on a 1/120 scale static scale model of the USS Newport News. The anechoic tiles on the sail are a total surprise to me. I had never noticed the pattern on any of the Navsource images that I have ever seen. One point though. Will the paint layers be sturdy enough? I assume that you are building an RC boat so it's going to have to endure some wear and tear.

        Comment

        • PaulC
          Administrator
          • Feb 2003
          • 1542

          #5
          Thanks! I'm pretty pleased with

          Thanks! I'm pretty pleased with it so far. Marc's tips in the previous thread you mentioned are equally valid. There are often several ways to approach a modeling problem. In this case I felt more comfortable with a scriber than masking tape and an airbrush.

          If proper paint is used and allowed to cure throughly, it will last as long as you need it to. Adding a clear coat will give it additional protection.

          The real threat is always transportation dings and collision at sea. That's the skipper's responsibility.
          Warm regards,

          Paul Crozier
          <><

          Comment

          • PaulC
            Administrator
            • Feb 2003
            • 1542

            #6
            Phase II]http://www.warfish.com/images/LA/hull-688i.jpg

            As you can see,

            Phase II]http://www.warfish.com/images/LA/hull-688i.jpg[/img]

            As you can see, the hull treatment is laid out in a regular pattern on the hull. However, the edges are quite irregular. The forward end stops at the retractable cleats and dips down and around the bow planes (unseen). The treatment is cut out around MBT vents and stationary cleats where it wraps around the hull aft of the forward escape trunk.


            Using personal photos, downloaded images printed out from the PC, various types of tape, and a razor blade, the hull was masked to expose only the areas in which tiles are applied. Then, it was outside for 5 light coats of flat black. After drying in the sun for 15 minutes or so, I brought it inside to carefully peel off the tape.


            The results are more than satisfactory. The new paint is built up just enough to define the edge and gives the boat a unique new look.


            The edges will be softened a bit with a careful 2000 grit wet sand. Now I just have to paint the lower hull, build the jig, and begin to scribe.
            Warm regards,

            Paul Crozier
            <><

            Comment

            Working...