1/96 Akula II

Collapse
X
 
  • Filter
  • Time
  • Show
Clear All
new posts
  • Parallax
    SubCommittee Member
    • Aug 2017
    • 195

    1/96 Akula II

    After a lot of delaying, its time to start working on a new boat. Last year I got what I believe is an early version Scaleships Akula hull from Nautilus Drydocks. I kept putting it off, but based on my job, current events, available time, and the different projects I have in the pipe, I realized if I do not start now, it will not be ready for the 2020-21 SubComEast season.

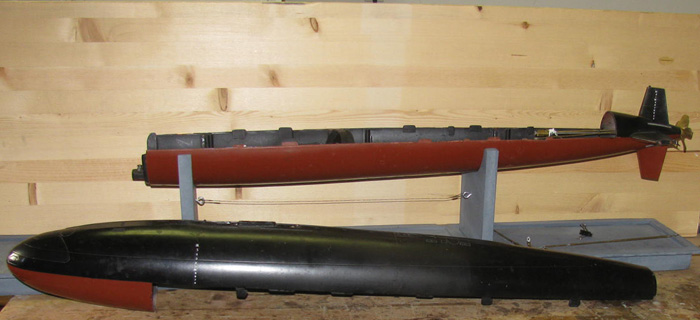
    The fiberglass hull itself is really nice and detailed, with resin planes and rudders, metal periscopes/antennas, and a large amount of photo-etch. The hull itself is 44" long and 5" in diameter. When taking into account the aft taper and bow dome, the 5" width extends roughly 24"
    Click image for larger version

Name:	20200414_142122.jpg
Views:	1
Size:	61.2 KB
ID:	138068
    Click image for larger version

Name:	20200414_142104.jpg
Views:	1
Size:	97.9 KB
ID:	138069

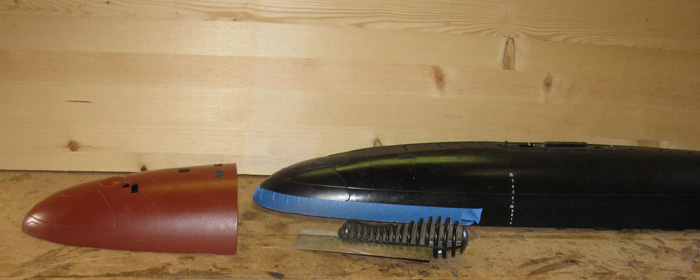
    I contacted Ron Perrott at R&R Model Engineering about a cylinder for my new boat. Based on my measurements, Mr. Perrott recommended one of his pump jet units that is designed for the Revell 1/72 Skipjack conversion. Ron worked pretty fast and the cylinder is now on its way.

    Now that the cylinder is on the way, its time to make decisions and start working up what needs to happen.

    1. Assemble the rudder and planes, and fix the for and aft linkages in place (probably use west marine epoxy to do that)
    2. Assemble and align prop shaft and bearings
    3. Do I join the top and bottom hull as made, or do I use a Z cut?
    4. Once the cylinder is here, I need to design and make cylinder saddles as well method to locate the cylinder.
    5. I'm wondering if I can use a sealed servo for the bow planes.
    6. Workout how much ballast and flotation she will need.
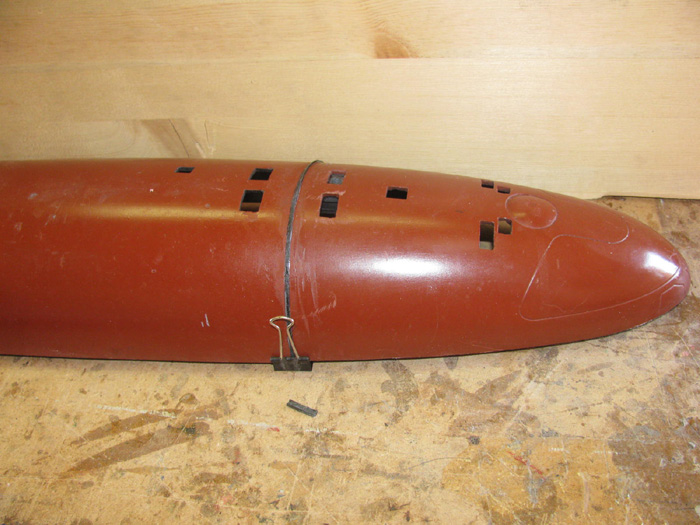
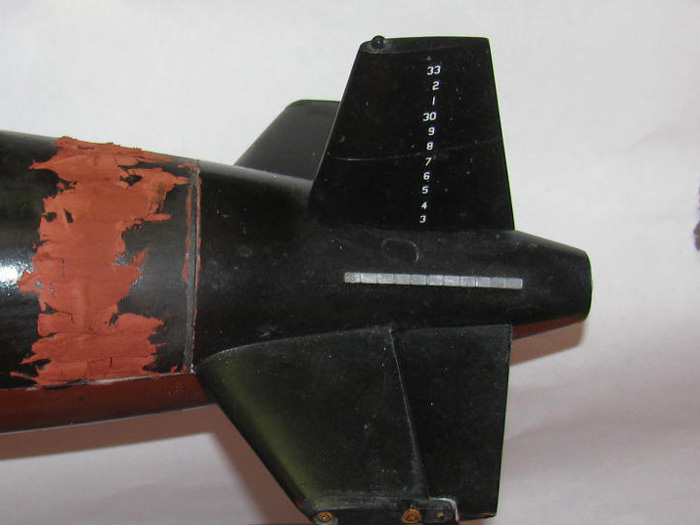
    7. Cleaning up imperfections in the hull (at the very aft there is some twisting as well that needs to be addressed)
    8. Add photo-etch
    9. Hull prep for primer and paint.
    10. Paint scheme.
    11. Get Pitch Controller, Depth Controller,
    12. Battery type and size.
    13. I also want to see if I can retrofit one of my radios to have a ratchet throttle.

    Well wish me luck, hopefully I'll have her ready in time!
    Last edited by Parallax; 06-08-2020, 10:50 AM. Reason: Add photo
  • Ralph --- SSBN 598
    Junior Member
    • Oct 2012
    • 1417

    #2
    I am going to give my pinion on a couple of these items.

    3. Z cut
    My 3 of my boats started out with Z cuts.
    After of years f running then this way, I recut my Skipjack.
    I remounted the bow to the lower hull and cut down the center line.
    Clenaed that up and then remounted the tail cone to the upper hull and cut farther back. (to the front edge of the planes)
    This gives much better access to the inside of the hull and cylnder control rods.


    5. Controls to bow planes.
    I have an Engel's 125 scale Akula II.
    The front bow planes are fixed and pitch is controlelled by the stern planes.
    With the bow planes separation from the rear planes, the boat dives and rises very quickly with just the stern planes.
    It takes very little input to maneuver the boat.
    Depth is controlled by the ballast system. I run slightly negative and trim up to keep the boat from going down. (I trim down to having just abut 1/2" of periscope above water)

    My Skipjack has sail planes and they work to dive and rise the boat.
    I only use the stern planes for trimming level once at periscope depth.
    With the sail planes more or less centered on the hull, the sail planes control depth and the boat stays level.

    I am now building aa Gato and the front bow planes are operational.
    So I will find out more about how they effect the boat as I have set the boat up to use the bow planes for dive and rise and the stern planes for pitch control on their own.

    Comment

    • thor
      SubCommittee Member
      • Feb 2009
      • 1453

      #3
      "Z" cutting the weakens the hull significantly and makes it much more difficult to get the lower half re-aligned with the top. Performing a Z cut requires the installation of "stiffener" bulkheads to restore the weakness introduced by completing the Z cut. Ralph points out another very important factor, which is internal access. This is just my individual opinion, for whatever that is worth....
      Last edited by thor; 06-08-2020, 08:26 PM.
      Regards,

      Matt

      Comment

      • salmon
        Treasurer
        • Jul 2011
        • 2327

        #4
        Matt,
        I too have joined in not doing the Z cut. My Walrus was originally cut that way. Will Oudmayer asked me why and showed me just the straight cut. For me, the straight cut through the bow is just easier to get on.
        Peace,
        Tom
        If you can cut, drill, saw, hit things and swear a lot, you're well on the way to building a working model sub.

        Comment

        • Parallax
          SubCommittee Member
          • Aug 2017
          • 195

          #5
          Everyone thank you for your thoughts on the Z cut, I have a lot to think about with it. I can now especially see the advantage of having the tail cone cut as close as possible to the stern planes and rudders. One thing with my Akula is there are no built in indexes in the hull so I will need to make all of that myself.

          Ralph, with your Skipjack, do you use a pitch controller on the stern planes? Or for that matter a depth controller? Typically how much input are you generally needing to add to your boats?

          Matt, your opinion is worth quite a lot in my estimation. Looking at my Permit, I am still amazed by how nice your indexing is along the entire length of the hull (Still have no idea how you made them),

          Btw Tom, who is Will Oudmayer?

          Comment

          • Ralph --- SSBN 598
            Junior Member
            • Oct 2012
            • 1417

            #6
            Pitch controller is installed on the stern planes.
            I do a static dive to periscope depth.
            Then I add a little throttle to get the boat moving at a slow speed.
            This allows me to make minor adjustments on the stern plane controls at the Tx. Usually using he slide control on the stick.
            This makes the boat level and the pitch controller will try to hold this level without any more stick input.

            My boats do not have depth controllers.
            Running in a lake, I like to see about 1/2" of the periscpe.
            When the boat goes deeper due to water temperature or anything at all, I get a bet nervous.
            At this point I add up sail planes or stern planes.
            If I do not see the boat in 5 seconds or so, I will empty some or all of the ballast tank to make sure the boat comes up.
            The lake has a lot of weeds below the surface at about 18" or 24".
            I have been stuck a few times and I do not like not seeing the periscope to know I am above the weeds.
            ----------
            Will Oudmayer runs his boats with SubRonLA. (southern California)
            When I have a problem I can not figure out or understand, I will go to Will and he will explain what he thinks is happening and offer several solutions.
            These solutions always fix the problem for me.
            He builds some of the smoothest running subs and boats I have seen.

            Comment

            • salmon
              Treasurer
              • Jul 2011
              • 2327

              #7
              To add to what Ralph has said, Will has been doing subs for a very long time. Another friend calls Will the Architect (from the movie the Matrix). Will builds WTC that work for decades. He builds his WTC in the thousandths of an inch and is just so willing to help. He does not go for the limelight, but is a constant steady. I am honored to call him a friend.
              If you can cut, drill, saw, hit things and swear a lot, you're well on the way to building a working model sub.

              Comment

              • Parallax
                SubCommittee Member
                • Aug 2017
                • 195

                #8
                Oooohhhhhh Ahhhhhhhhhh something came in the mail
                Click image for larger version

Name:	20200611_192811.jpg
Views:	1
Size:	96.9 KB
ID:	134658

                This is the second Cylinder I have gotten from R & R, I am really glad Jim had pointed me in this direction. This cylinder is the same diameter as my last one, but a little bit longer, so I can actually fit a larger battery in the forward compartment.
                Click image for larger version

Name:	20200611_193043.jpg
Views:	1
Size:	101.1 KB
ID:	134659
                Click image for larger version

Name:	20200611_193203.jpg
Views:	1
Size:	90.4 KB
ID:	134660

                I am looking forward to getting some time off from work to start putting her together. I think my first step actually needs to be to make some saddle mounts and location pin/device. I'll be spending the next few days worth of free time going back through this forum for ideas on where to go. Last year I made new saddle mounts for my Permit, but I was not happy with the results. And this one is a full inch wider, so I have more room to play with

                I'll end this post with my cat who thinks hes still a kitten:
                Click image for larger version

Name:	20200611_193059.jpg
Views:	1
Size:	95.5 KB
ID:	134661

                Comment

                • salmon
                  Treasurer
                  • Jul 2011
                  • 2327

                  #9
                  LOL, the backside of the El Gato. Very cool WTC you have there!
                  If you can cut, drill, saw, hit things and swear a lot, you're well on the way to building a working model sub.

                  Comment

                  • steveuk
                    Junior Member
                    • Oct 2005
                    • 467

                    #10
                    I'm along for the build. Can't wait to see all the photo etch details going on.

                    Comment

                    • Parallax
                      SubCommittee Member
                      • Aug 2017
                      • 195

                      #11
                      Steve,
                      I actually have very little photo etch experience, so this is going to be a learning experience for me. On the modelwarshipsudnerway forums I am scratch building a British cruiser, and I got a bunch of photo etch for things like railings, guns, etc so I will probably be practice on that first lol. When I get home from work tonight, I'll snap a picture of the photo etch for the Akula.

                      Comment

                      • steveuk
                        Junior Member
                        • Oct 2005
                        • 467

                        #12
                        Great! I have no experience with photo etch either. Tell a lie - I did do some PE plants for a diorama, but they don't require accurate folding. I have all the stuff, eg the folding/clamp machine thingy, but have yet to pluck up the courage to actually try some. Yes I would love to see what your etch set looks like. I am guessing lots of square flood holes and grilles seeing as its a Russian sub?

                        Comment

                        • Parallax
                          SubCommittee Member
                          • Aug 2017
                          • 195

                          #13
                          Steve sorry I have not had a chance to take pictures of the photo-etch yet. Ill try and take some tonight (I have been working 12 to 14 hour days the past month so have not had a lot of time).

                          I just ordered a few different thicknesses of Garolite to make saddles for the WTC. The 240 is still not wired up for my lathe, so I am going to try out how Ralph(SSBN598) made saddles for Farlan. I am planning on using West Marine epoxy to lock them in place. I don't know if I should use straight epoxy, or add some kind of filler to it. I have read from previous post by Matt Thors that microbubbles are bad idea for this application. I assume I need to scrub the interior of the hull to take care of any amine blush in there that might effect adhesion.

                          Comment

                          • Parallax
                            SubCommittee Member
                            • Aug 2017
                            • 195

                            #14
                            Ok here are some pics of the photo etch that came with the boat, along with the prop and.. I'm guessing they are radars or antennas?
                            Click image for larger version

Name:	20200625_193330.jpg
Views:	1
Size:	474.7 KB
ID:	134720
                            Click image for larger version

Name:	20200625_193343.jpg
Views:	1
Size:	398.2 KB
ID:	134721
                            Click image for larger version

Name:	20200625_193756.jpg
Views:	1
Size:	309.1 KB
ID:	134722

                            Comment

                            • steveuk
                              Junior Member
                              • Oct 2005
                              • 467

                              #15
                              yoy yoy! wonderful brass work. 12 - 14 hours are too long! Where's the work life balance? Having said that I have just spent all week on DIY outside house build projects whilst the weather is good, putting in about the same amount of hours. Back to normal for me on monday, so I should be able to get some modelling done again. On the Epoxy, I must say I have never had good results with it. After time it always comes away usually cleanly in one solid piece. So I do not have confidence in the stuff. Instead I just use plain old CA. It fuses most things together permanently for me. The only down side is if you want to un-join something later - this tends to destructive force being needed.

                              Comment

                              Working...
                              X