1:144 Kilo control help needed

Collapse
X
 
  • Time
  • Show
Clear All
new posts
  • southern or
    Junior Member
    • May 2014
    • 484

    #1

    1:144 Kilo control help needed

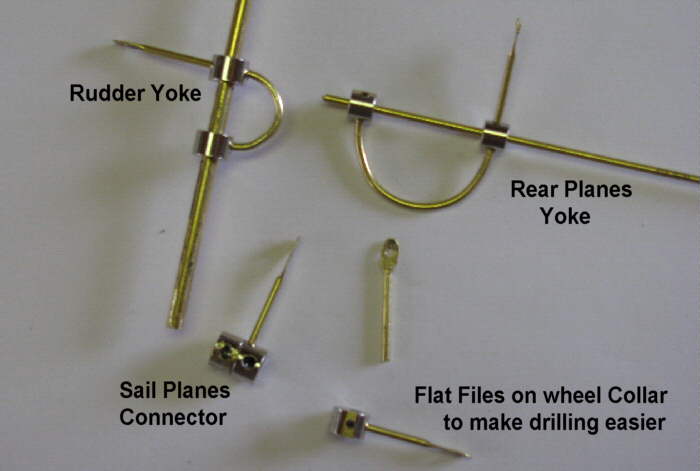
    Alright, I'm tired of fighting this thing. Could anyone proved some photos of the control setup they used on the sub (not the WTC) so I can get an idea on why everything I've tried doesn't work?

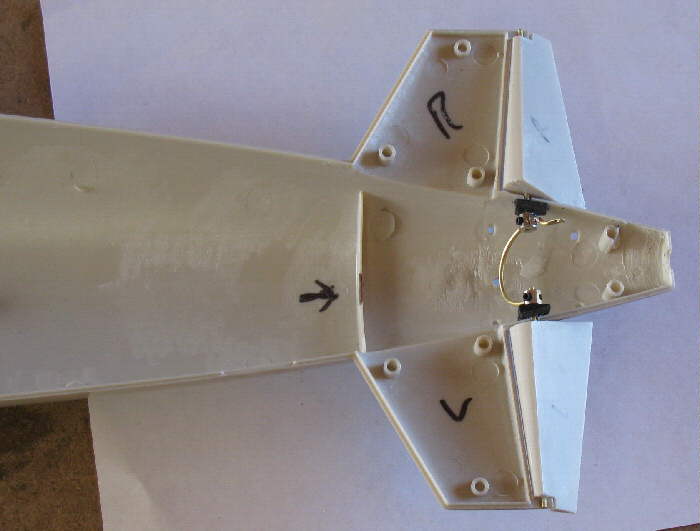
    So, my brass control links on the rods that go to the dive planes and rudder both broke (too thin) and I don't have the tools to make another one. Plus the rudder and dive planes are both set so I can't remove them to get another link over the rods (except if it's small enough, I *might* be able to get one on the rudder). I then turned to the plastic servo arms and modified them to fit, but NOTHING seems to want to bond to them and the rods. Any help is much appreciated.

    JP
  • Ralph --- SSBN 598
    Junior Member
    • Oct 2012
    • 1417

    #2
    The Kilo has a lower rudder and the two elevators.
    I use brass wheel collars on the shafts tot he rudders and elevators.
    Solder flat brass on collar to make the control horn.
    I use 1/16" brass rod for the control rods....on small boats and boats up to 48" long.

    Have you checked to see if your control horns on the rudder and elevators are binding against the hull?
    Because the rudders and elevators on submarines are balanced at about 70%/30% the control horns do not need to be very long.
    For the rear connection I just use a standard needle nose pliers Z bend through a drilled hole in the flat brass.

    Here is photo of the connection of the elevators in a Skipjack build.
    The yoke is made from 1/16" brass rod and small wheel collars.


    The yoke can be made much smaller.
    It only needs to go around the propeller shaft.

    To install, I have cut an Allen wrench and mounted in a long brass tube.
    I insert the Allen wrench in the wheel collar grub screw to hold it in place while I insert the elevator control shaft.

    I make sure the yoke and the control horn do not bind on the hull through the full movement of the control.
    30 degrees up and 30 degrees down... maximum.
    Same with rudder(s).
    --------------------
    Can you post a photo or two showing the problem area?

    Comment

    • southern or
      Junior Member
      • May 2014
      • 484

      #3
      Well crap. I didn't think of going about it that way. I went with an unconnected T with enough room from the prop shaft to fit between them. I would love to know where to get smaller collars, but I *thought* this would be a quick build while I waited for more cutting disks to arrive for the Oscar... so I used what I had only to have the horns break. Everything else but paint is done, I just need to um, be able to drive it.

      Click image for larger version

Name:	IMG_1319.jpg
Views:	1
Size:	9.6 KB
ID:	127991

      Comment

      • southern or
        Junior Member
        • May 2014
        • 484

        #4
        As you can see (be it upside down apparently) I have no room thanks to the Trumpeter design.

        Comment

        • Ralph --- SSBN 598
          Junior Member
          • Oct 2012
          • 1417

          #5
          I see.

          Suggestion.
          If you use brass sheet for the horn arm, you can bend it away from the hull sides to get a little more room for the arm to move.
          Basically curve tot he shape of the hull but a little tighter bend so it comes away from the hull.

          I like wheel collars because I just drill 1/16" holes in the collar to push the 1/16" brass rod through and solder.
          For the control horn, I use 1/8" brass rod so I have enough material to flatten with a hammer to drill the 1/16" hole for the "Z" bend rod.

          Here is a photo of the yokes for both rudder and elevators using wheel collars and 1/16" brass rod.
          The rudder has 1/8" control rod and the elevators have 1/16" control rod.
          These rods go all the way through to hold the wheel collars during soldering.
          It also shows a 1/16" rod end flatted in a vise and drilled with a 1/16" hole.


          The small rudder yoke is less than 1/2" across the wheel collars.

          Comment

          • Ralph --- SSBN 598
            Junior Member
            • Oct 2012
            • 1417

            #6
            Looking at your photo do I have it correct that the elevator rod is not inline with the propeller shaft.
            You can actual have a control rod go straight across from side to side.
            If that is true, you could slip a wheel collar on the shaft and then tighten it on the shaft closer to the propeller shaft giving more movement room.

            Comment

            • chips
              Member
              • Feb 2003
              • 494

              #7
              I made the stern planes in my Trumpeter KILO full flying planes - like the elevator on a F-4 Phantom jet. The rod connecting the two wheel collars is 1/16" brass, as are the pushrods.

              Click image for larger version

Name:	IMGP6449.jpg
Views:	2
Size:	87.4 KB
ID:	128003

              Click image for larger version

Name:	IMGP6450.jpg
Views:	1
Size:	96.3 KB
ID:	128004
              Attached Files

              Comment

              • Ralph --- SSBN 598
                Junior Member
                • Oct 2012
                • 1417

                #8
                Nice use of wheel collars.
                I see the limited space to work in.

                I think when making control rods in the tail cones of submarines, some people tend to over think trying to come up with a solution.
                Simple usually has fewer parts and smaller parts.

                The fun part of submarines is there is not just one solution that will work well.
                I have a box full of rejected attempts.
                Might have enough to build another boat.

                Comment

                • southern or
                  Junior Member
                  • May 2014
                  • 484

                  #9
                  Alright, this is great. Thanks guys. I can't remove the dive planes from the rod unfortunately because I'd have to destroy everything to do that, but I have a better idea now (I think). I left the planes split, but I'm not sure how and if I should add the forward planes, and if so, at what degree should they be fixed.

                  Comment

                  • southern or
                    Junior Member
                    • May 2014
                    • 484

                    #10
                    Originally posted by Ralph --- SSBN 598 View Post
                    Nice use of wheel collars.
                    I see the limited space to work in.

                    I think when making control rods in the tail cones of submarines, some people tend to over think trying to come up with a solution.
                    Simple usually has fewer parts and smaller parts.

                    The fun part of submarines is there is not just one solution that will work well.
                    I have a box full of rejected attempts.
                    Might have enough to build another boat.
                    Yeah, I seem to have under thought the Kilo. I have put a lot more thought into the Oscar, but at 1:96, she has a lot more room and both sets of planes will be usable. I agree, Chip's setup looks a lot better then mine.

                    Comment

                    • chips
                      Member
                      • Feb 2003
                      • 494

                      #11
                      I didn't install the forward planes on the KILO - works just fine with the stern planes. On the Trumpeter SEAWOLD, I glued the forward planes so they are parallel to the centerline. Picture is of my subs at the 2014 Carmel Fun Run.

                      Click image for larger version

Name:	IMGP5227.jpg
Views:	1
Size:	96.9 KB
ID:	128006

                      Comment

                      • southern or
                        Junior Member
                        • May 2014
                        • 484

                        #12
                        I have to say Chips, That is a fine looking fleet there. Where did you get the idea for a blue boat? I was going for all black like the Russian and Indian boats. I'm wondering how I'll be able solder new rods on without setting the hull on fire.

                        Comment

                        • chips
                          Member
                          • Feb 2003
                          • 494

                          #13
                          The blue KILO just happened as I had some left over paints from other projects. The blues I used were mostly Testors Model Master: MM1720 - Intermediate Blue FS 35164; MM1772 Blue Angel Blue FS 15050; and MM1717 Dark Sea Blue FS 15042. I also used some Poly Scale 505088 USN Blue Grey, which has been discontinued.

                          Comment

                          • southern or
                            Junior Member
                            • May 2014
                            • 484

                            #14
                            I never cared for Testor's paint-mainly because I kept getting 3 different colors for the same "color." A LOT of us over in the model train community were very sad to see Floquil/Polly Scale go away and be replaced by Model Master. At least for the RR I model Tru-Color has come trough, and with consistent color batches too.

                            As for the Kilo, (I'm thinking of calling it Kobayashi Maru, some of you'll get it) I epoxied new links onto it and we'll see what happens once it's set.

                            Comment

                            • salmon
                              Treasurer
                              • Jul 2011
                              • 2342

                              #15
                              Kobayashi Maru, it is a no win situation. Trekkies unite!
                              If you can cut, drill, saw, hit things and swear a lot, you're well on the way to building a working model sub.

                              Comment

                              Working...