Have you had one of those days?

Collapse
X
 
  • Filter
  • Time
  • Show
Clear All
new posts
  • Ralph --- SSBN 598
    Junior Member
    • Oct 2012
    • 1417

    Have you had one of those days?

    Today it's my turn.
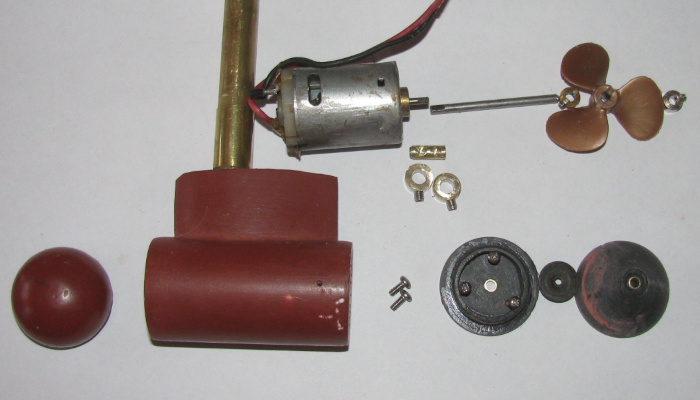
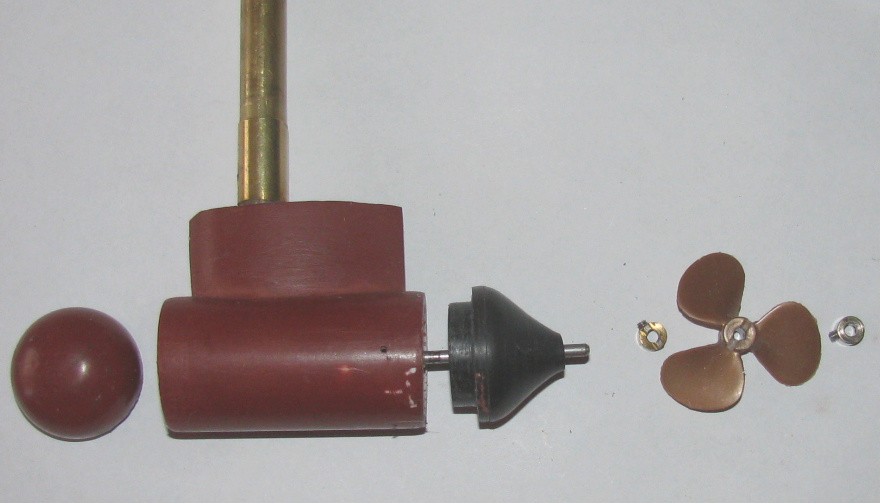
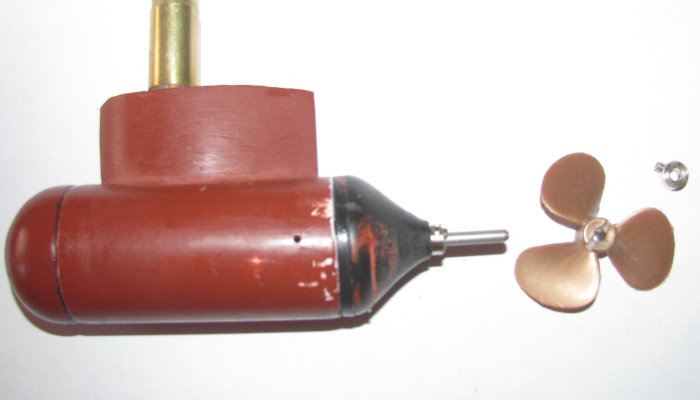
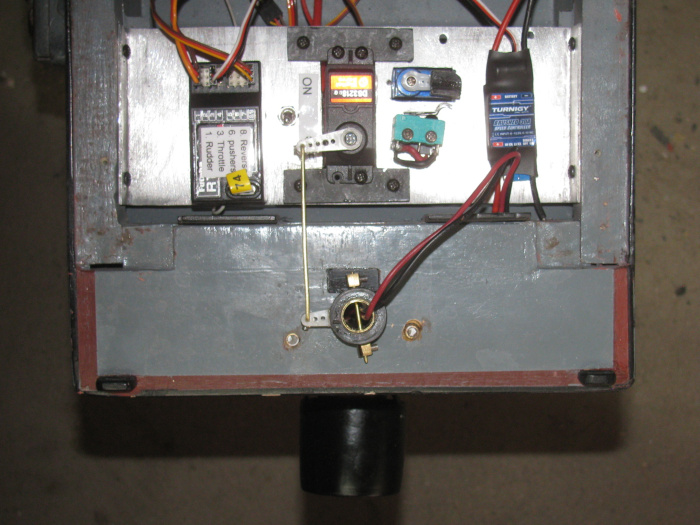
    Yesterday, I made several parts for a new Z pod.
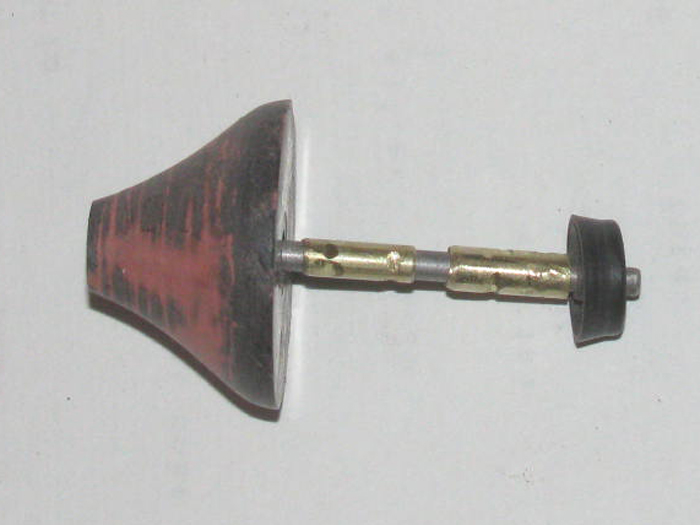
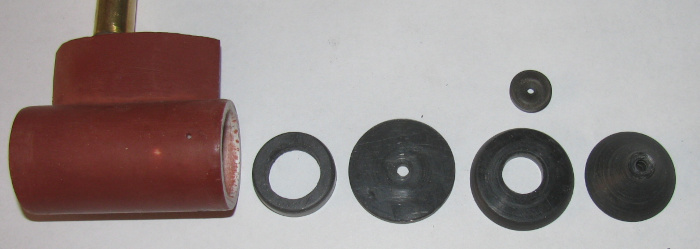
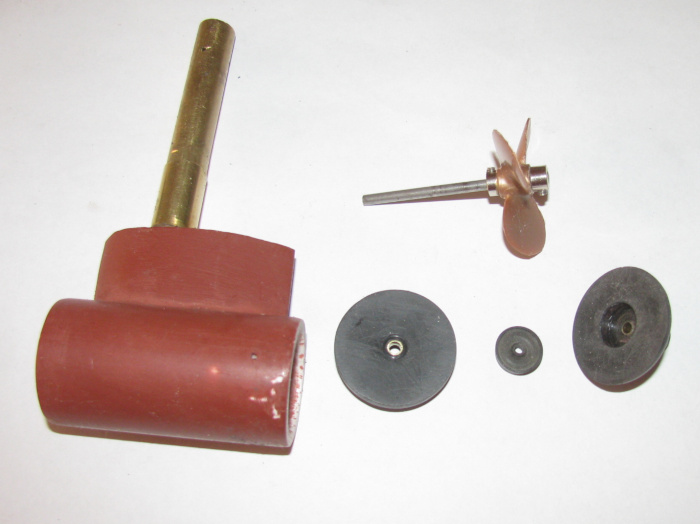
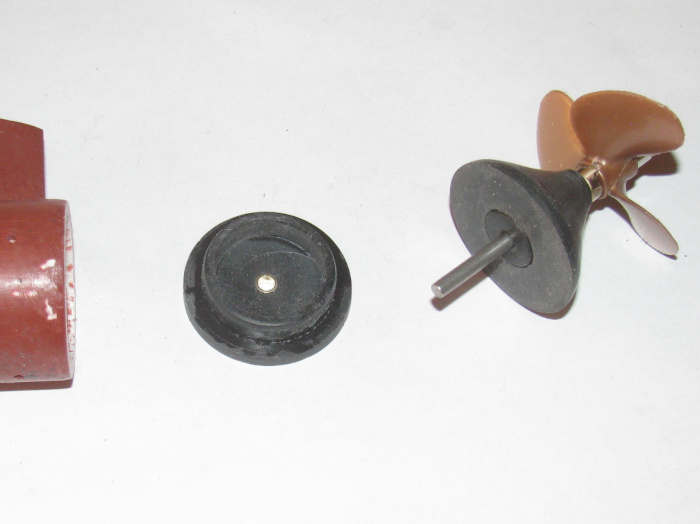
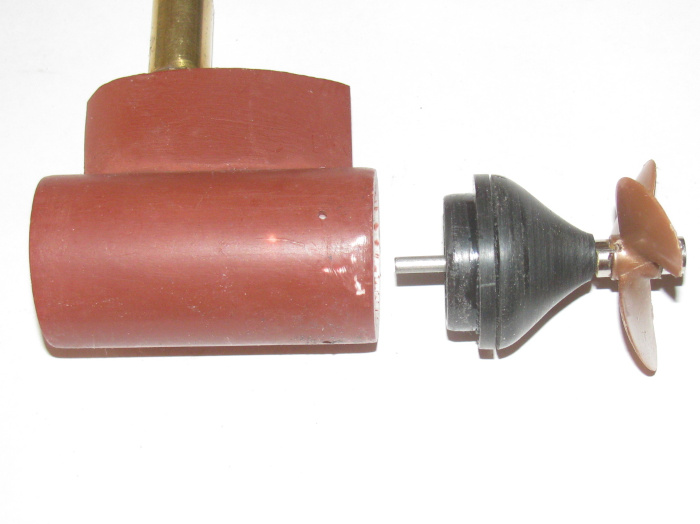
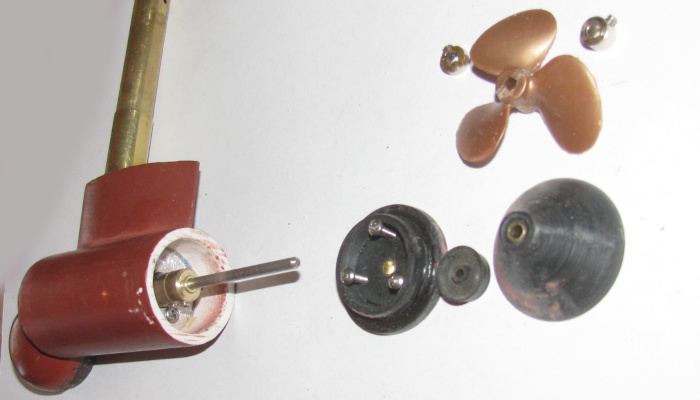
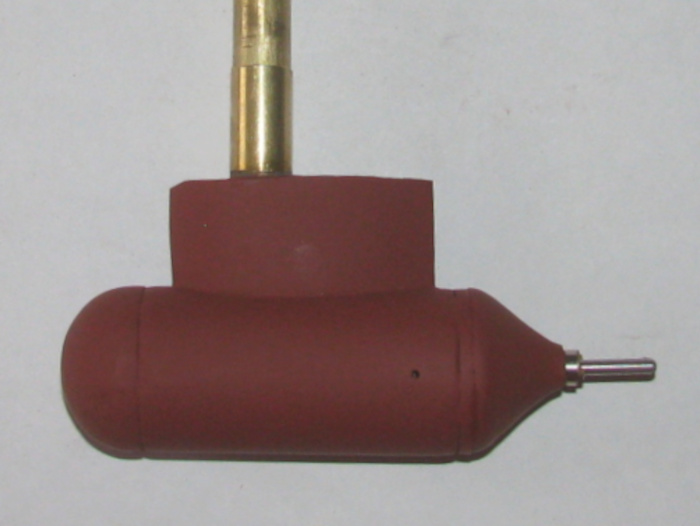
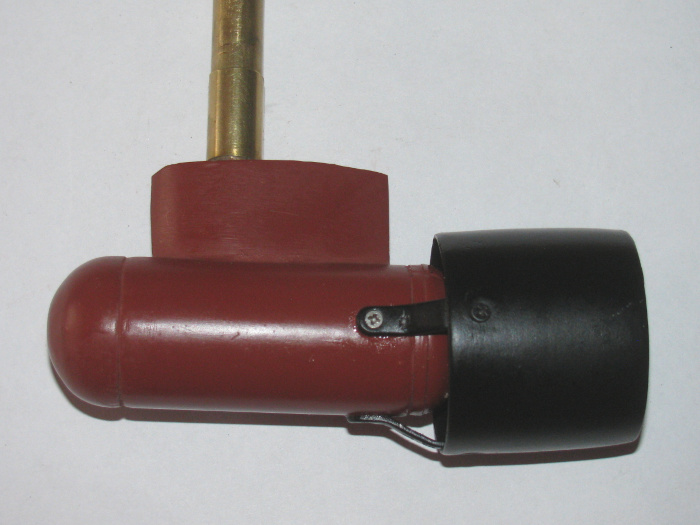
    I modified an old tail cone and made the new propeller shafts for the new motor.

    This morning I went out to the shop to assemble the tail cone , shafts and motor in tot he pod body.
    I can not find these parts any where.
    I spent 30 minutes looking every where I worked on it yesterday.

    I had to go in to town but I am back now.

    My plan is to get my little flash light and go crawl around the floor looking under every thing and moving every thing on the shelf under the work bench.
    It has got to be there some where.

    I do not want not make a new tail cone.
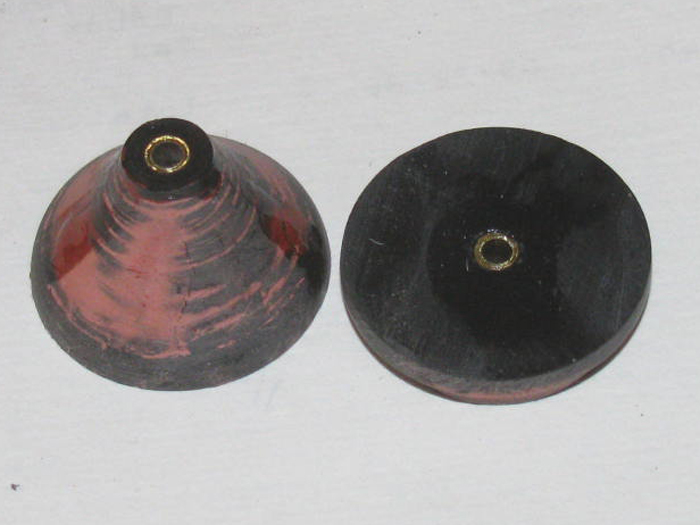
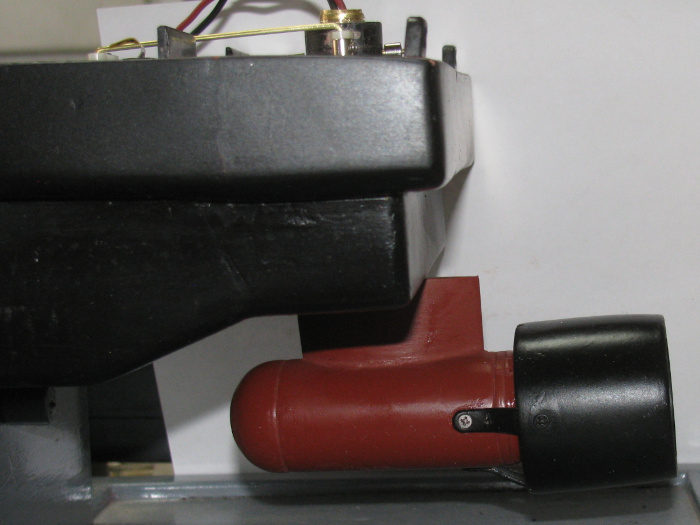
    It is made in two pieces with a cup seal inside.
    It has been on my rescue barge for a year and a couple of months.
    When I opened up the pod last week, there was no signed of water and not signed of rust inside the pod.

    I got to find the tail cone which as the shafts in it.

    Yep, it's one of those days. ;^(
  • feet wet
    Member
    • Mar 2003
    • 212

    #2
    I have those dyas... once a week. I find whatever I was looking for exactly where I had left it. Always it is some place safe and secure, somewhere that I will remeber where it is.........until I forget.
    Then there are those days when I put a part or a a tool down, right in front of myself, usually right next to what I am working on. Can I find it when I go to pick it up? NOOOOOOOOO. Apparently, somewhere between my eyes and my brain there is a disconnect, because again, whatever it is I 'm looking for is right TH+ERE!!!!

    Comment

    • Ralph --- SSBN 598
      Junior Member
      • Oct 2012
      • 1417

      #3
      In from the shop.
      3 hours out there.
      Looking for the parts and working on the electronics tray in the rescue barge.

      Making some modifications.
      I needed to move the power switch to make room for a servo that will operate 2 switched stacked.
      I need a switch to reverse a brush motor.
      The brushless motor has not worked out well.
      I could not slow it down enough to control the boat.
      The motor would slow down then stop long before slowing down.

      Any way I have a solution with the brushed motor.
      I need the 2 switch and servo to reverse the power to the motor to reverse the motor.
      The speed control for the brushed motor does not have a built in reverse.
      I made a simple double pole, double throw switch with 2 single pole double throw stacked.

      Got the servo and 2 switches mounted.
      Relocated the power switch.
      I have room for the speed controller.
      I tested the radio and programed one of the many switch on the Tx.
      It is an either or switch that will move the servo arm against the 2 switches on the tray.

      All while still looking for the missing parts.

      I changed the way the steering works.
      I had 2 pulleys and heavy fishing line.
      Now that I am not using the 270 degree rotation of the servo, way too much turning, I will go back to a brass rod and horns.
      The fishing line would stretch and put a lot of slack in the rudder control.
      This should fix that.

      All is going well. . .except the missing parts.
      Pod tail cone, propeller shaft, shaft connector for two different sizes and the propeller.
      I have spare propellers.
      I will have to make new tail cone and connector if I can't find them.

      I have tomorrow here at home.
      I guess it's time to clean the shop up. (until I find the parts)
      --------------------------
      I work with my boats on their wooden stands.
      There is a base with a 1/4" high edge all the way around so parts don't roll off.
      I have been working here on this boat for a few days with all the parts on this lid.
      All the pod parts where in the center section.
      The screws, the pod body, the nose piece and all the wiring is still there.

      I guess the propeller got to think about going places and took to spinning and took off.

      I don't want to think I am getting to old to remember what I am doing.
      That would just be sad.
      Last edited by Ralph --- SSBN 598; 01-18-2022, 05:34 PM.

      Comment

      • Ralph --- SSBN 598
        Junior Member
        • Oct 2012
        • 1417

        #4
        Today the propeller, tail cone shaft and connector are still missing.
        Still more cleaning to do.

        But all is not lost.

        All the new rudder system has been completed.
        Required modifying the rudder post pullet.
        Turned it down to a smaller diameter and cut in a place to install a nylon horn.
        Drilled new holes for the pin that holds the horn to the rudder post was in the way of the horn. (turned it 90 degrees)

        Wired the reversing switch.
        I would put the motor in but I need the propeller connector to be installed first.
        The connector is recessed in to the pod and I can not get to the Allen grub screws to tight it.
        Plan for tomorrow is to keep cleaning and looking for the missing parts.
        I give it 1 hour then I will make new parts which depends on if I have any cup seal in the back up box of part.

        Progress being made.
        Just can not figure out where the propeller and parts got off to.
        ================================
        After posting the above, I realized it was still early.

        Out to the shop I went.
        I cut plastic squares to make a new tail cone.
        I looked for cup seal but didn't find any.
        They may be in the house parts box. (I will look there)

        Anyway, the tail cone is made up of 17 (1/16" pieces) glued together.
        Then there is the part of the tail cone which will slip in to the pod body which is made up of 7 (1/16" pieces glue together)

        There are 2 more pieces which will be added after drilling for the shaft bearing and inlet for the cup seal.
        The part that slips in to the pod body is not glue but has 3 small bolts for access to the cup seal should it need to be replace.

        Two blocks of plastic pieces have been glued and placed in the vice to cure.

        Next time in town, I need to pick up more 1/8" stainless rod for the shaft.
        What I thought was solid turned out to be 1/8" stainless tubing.
        Won't work, it will let water in to the pod.
        Also if I tighten the wheel collars that hold the propeller on the shaft it may collapse.

        I worked on 1 of the 2 spare propellers I have.
        There is a drive notch on one side of the hub.
        I had to deepen it a little and widen it to fit the wheel collar with the 2 teeth to engage the propeller.

        There are the parts I am making.


        Last edited by Ralph --- SSBN 598; 01-18-2022, 07:31 PM.

        Comment

        • wlambing
          SubCommittee Member
          • Feb 2003
          • 843

          #5
          Maybe in the kitchen?

          Comment

          • Ralph --- SSBN 598
            Junior Member
            • Oct 2012
            • 1417

            #6
            Once I finish the new parts, the originals will show up.
            My thoughts are, I have spent more time looking for the missing parts than to remake them again.

            So I am making new parts.
            The originals will show up a once I get them done.
            I will have a spare tail cone unit in my tool box.
            =========================
            In for lunch.
            I cleaned of the kitchen table just to make sure.
            Not there.
            Last edited by Ralph --- SSBN 598; 01-19-2022, 04:18 PM.

            Comment

            • Ralph --- SSBN 598
              Junior Member
              • Oct 2012
              • 1417

              #7
              Rebuilding Z pod due to motor speed control failure.
              No low speed and jerky.

              New system will be a brushed motor.
              Requires new pod to be build.

              The new pod has been built.
              The original nose will be used.
              Some how I can not find the tail cone assembly after modifying for the new brushed motor.

              After 2 days and about 3 hours looking, I decided to make a new tail cone.
              If I find the original one, I will have a spare.

              New tail cone plastic parts have been glued up and turned to shape.

              Right to left are : tail cone to propeller cone.
              The ring with the big hole in it is for the cup seal which is above the part.
              The next disk is the cover for the cup seal.
              The left ring slips in to the pod.

              Tail cone and cup seal ring will be glued together.
              The disk and ring will big hole will be glued together.

              The 2 assemblies will be held together with 3 small bolts.

              Before gluing can be done, I need to cut and fit the 2 brass tube bushings in the tail cone and the compression disk.

              I have about 6 hours in it but most of that time was waiting on glue to cure before I could spin the parts in the drill press to shape them.

              Comment

              • Ralph --- SSBN 598
                Junior Member
                • Oct 2012
                • 1417

                #8
                January 21, 2022 ===================================

                Finished making the new tail cone.
                Here al the parts.
                Left to right.
                Pod body.
                Front of tail cone with flange that goes inside the pod body.
                Cup seal.
                Tail cone end with recess for cup seal.
                Shaft and propeller and wheel collars.


                Parts on propeller shaft.


                Tail cone end with seal in recess.


                Parts again on propeller shaft squeezed together.
                There is a small gap between tail cone end and front piece.
                This is caused by the cup seal and will be pressed out when I install the 3 small bolts that will clamp the cup seal in place.


                Tail cone assembly in the pod body. (sorry the photo with the nose in place did not come out clear)


                I am currently cutting parts to make the motor to propellers haft connector.
                And I need to drill for the 3 small bolts that will be inside the tail cone to hold the parts together.

                Comment

                • Ralph --- SSBN 598
                  Junior Member
                  • Oct 2012
                  • 1417

                  #9
                  January 22nd ==================================

                  I finished making all the parts.
                  I have finished fitting all the parts.

                  This morning, I drilled the seal pressure plate and tail cone for the 3 small bolts that will compress the cup seal in the tail cone.
                  I made the motor to propeller shaft connector.
                  Motor has a 1/16"+ shaft and the propeller has a 1/8" shaft.
                  Couple of pieces of brass tubing and 2 wheel collars.
                  Ground flats on the two shafts for the set screw to bite.

                  Test fitting the motor in to the pod.
                  Needed to grind some of the pod plastic away for the 2 power wires and motor to slide in together.
                  Was a tight fit before grinding.
                  The wires would go in but the wires pushed the motor over to one side off center.
                  The grinding a slot did the trick.

                  Everything fits nicely now.

                  The tail cone assembly needed a little glazing to get ride of some small voids in the layers of plastic.
                  Once that cures, I can sand it to finish.

                  Paint the tail cone and front end to match the pod. (primer red and then hand rubbed to make it have a glossy look)

                  I should be able to assemble the pod tomorrow.

                  Put the pod back in the hull and install the new control horn.
                  Run the two power wires to the new DPDT switch that will do the reversing of the motor. (new speed controller does not have reversing. not a problem)

                  Will get more photos while assembling is done.

                  Comment

                  • Ralph --- SSBN 598
                    Junior Member
                    • Oct 2012
                    • 1417

                    #10
                    January 23rd ==================================

                    Here are all the Z pod parts.


                    Motor shaft and propeller shaft connected.
                    Motor installed in pod.


                    Test fitting the tail cone.
                    It has to fit without binding.
                    It took some filing and even a little sanding with the Dremel to get the tail cone to fit flat to the pod without binding the propeller shaft.

                    After fitting I disassembled the tail cone.
                    I applied silicone grease to the tail cone cup seal recess and the cup seal itself.
                    Reassembled the tail cone pressure plate to the tail cone with the 3 small bolts.


                    I applied silicone glue to the nose shoulder that goes inside the pod.
                    Slid it in while twisting to smear the silicone so the shoulder and edge where covered with silicone glue.
                    Turned the nose until it fit centered on the pod.

                    Did the same with the tail cone.
                    The tail cone actually has an mark for indexing the tail cone to the pod.
                    The best fit with the least resistance for the shaft.

                    Before installing the propeller, I need to loosen the wheel collar against the tail of the pod as it is holding with a little pressure the tail cone in the pod while the silicone cures.
                    I will move it to get a 1/16" gap so the wheel collar will not touch the pod bushing.


                    The new Z pod is done.

                    Comment

                    • Ralph --- SSBN 598
                      Junior Member
                      • Oct 2012
                      • 1417

                      #11
                      January 24th ==================================

                      Tested the pod for water tightness.
                      A bowl of water and I blew in to the rudder post which goes in to the pod for the power wires.

                      Lite pressure and I see no bubbles in the bowl.

                      Earlier today I brought the paint in to the house to warm it up.
                      After testing for leaks, I dry off the pod and lightly sanded the entire pod.
                      Wiped off the dust.
                      Taped off the rudder post and propeller shaft.
                      Got the paint from in the house.
                      30 seconds later, the pod is painted with red oxide primer. (bottom red)

                      Removed the tape and placed the pod in the hull upside down to dry.

                      When I first put the pod together, the propeller shaft had a hard time starting.
                      I know the pod bushings are straight to each other, there are 2, I think the compression on the cup seal is tight on the propeller shaft.
                      I know the cup seal is full of silicone grease so I decided to run the motor 100% for a few minutes.
                      I have now done this several time while working on the pod.
                      The motor now starts up easily.
                      The binding has been reduced.

                      Only thing left is to install the propeller on the shaft and install the nozzle shroud.
                      The 3 bolts go in to the pod so I need to make sure to apply silicone glue as I install.
                      Last edited by Ralph --- SSBN 598; 01-25-2022, 05:40 PM.

                      Comment

                      • Ralph --- SSBN 598
                        Junior Member
                        • Oct 2012
                        • 1417

                        #12
                        January 25th ==================================

                        Z pod painted. (red oxide primer)


                        The primer has been buffed to a gloss.
                        The nozzle has been installed with silicone glue at the 3 attachment points.


                        The pod has been installed on the hull.


                        A view looking down on the electronics tray.
                        Left to right.
                        1. Rx
                        2. Rudder servo
                        3. DPDT switch made from 2 SPDT switches and the servo to operate the switched to get reverse. (no reverse on the speed controller)
                        4. Speed Controller.

                        In front of the rudder was a recess that needed to be filled. The rudder post pin wheel collar kept falling in the recess and stopping the rudder from moving.
                        I put a piece of sheet plastic in the hole and flushed with the deck.
                        No more rudder problems.

                        Comment

                        • Ralph --- SSBN 598
                          Junior Member
                          • Oct 2012
                          • 1417

                          #13
                          January 27th ==================================

                          Today at the post office, there was a package with new speed controllers in it.

                          I sent a few minutes in the shop to install the new speed controller.
                          Before that I rechecked the wiring of the motor reversing switches.

                          Good thing I did, I had the power in crossed on the switch instead of the motor out wires.

                          Unsoldered the wires to the switches and started over.

                          Works great.
                          I now have control of motor speed down to a very slow turn.

                          Charging the batteries because this barge may go to the pond this Saturday.

                          Comment

                          • feet wet
                            Member
                            • Mar 2003
                            • 212

                            #14
                            Ralp,
                            If I remember correctly from my anatomy classes, we humans generate a mere 4lbs of pressure exhaling. As such you pod is not rally getting much aof a true pressure test for H2O tightness. I would also suggest doing a test with your shaft turning to ensure that the seal is seated. Experience speaking...
                            Realy nnice build and I love the pod design.
                            Jonathan

                            Comment

                            • Ralph --- SSBN 598
                              Junior Member
                              • Oct 2012
                              • 1417

                              #15
                              I looked it up.
                              Says an average human can blow making a pressure of about 2.8 psi.
                              ---------
                              I was checking to see if the silicone glue had any leaks and the cup seal.
                              Remember this pod is only 4" down in the water. (not a submarine)
                              ----------
                              Checking with my trusty net calculator for pressure...... 4" below the surface the pressure is .14 psi.
                              ----------
                              Was at the lake to day and the barge had very good throttle control.
                              High speed is not very fast and water did not run up on to the deck in forward or reverse.

                              Slow speed was so slow I could count the propeller turns.
                              This was enough to make head way.

                              There where no problems keeping and holding any speed.
                              How it ran today I am happy with.

                              Only change I might make is find a better DPDT switch for the reversing.
                              Have to look in to switches and make sure the switch disconnects when changing from forward to reverse.

                              The speed controller gives me full stick bottom to top control.
                              Again happy with today's running at the lake.

                              The Akula II ran and stayed at periscope depth for over an hour.
                              I found a very small trim weight loose in the hull.
                              I removed it and the slight listing I had was gone and the boat set level surfaced and submerged.
                              Got home to 46F so I think I will not be in the shop today.
                              Maybe not until June when it warms up. <G>
                              Last edited by Ralph --- SSBN 598; 01-29-2022, 06:40 PM.

                              Comment

                              Working...
                              X